Showing posts with label Easter. Show all posts

Monday, April 3, 2023

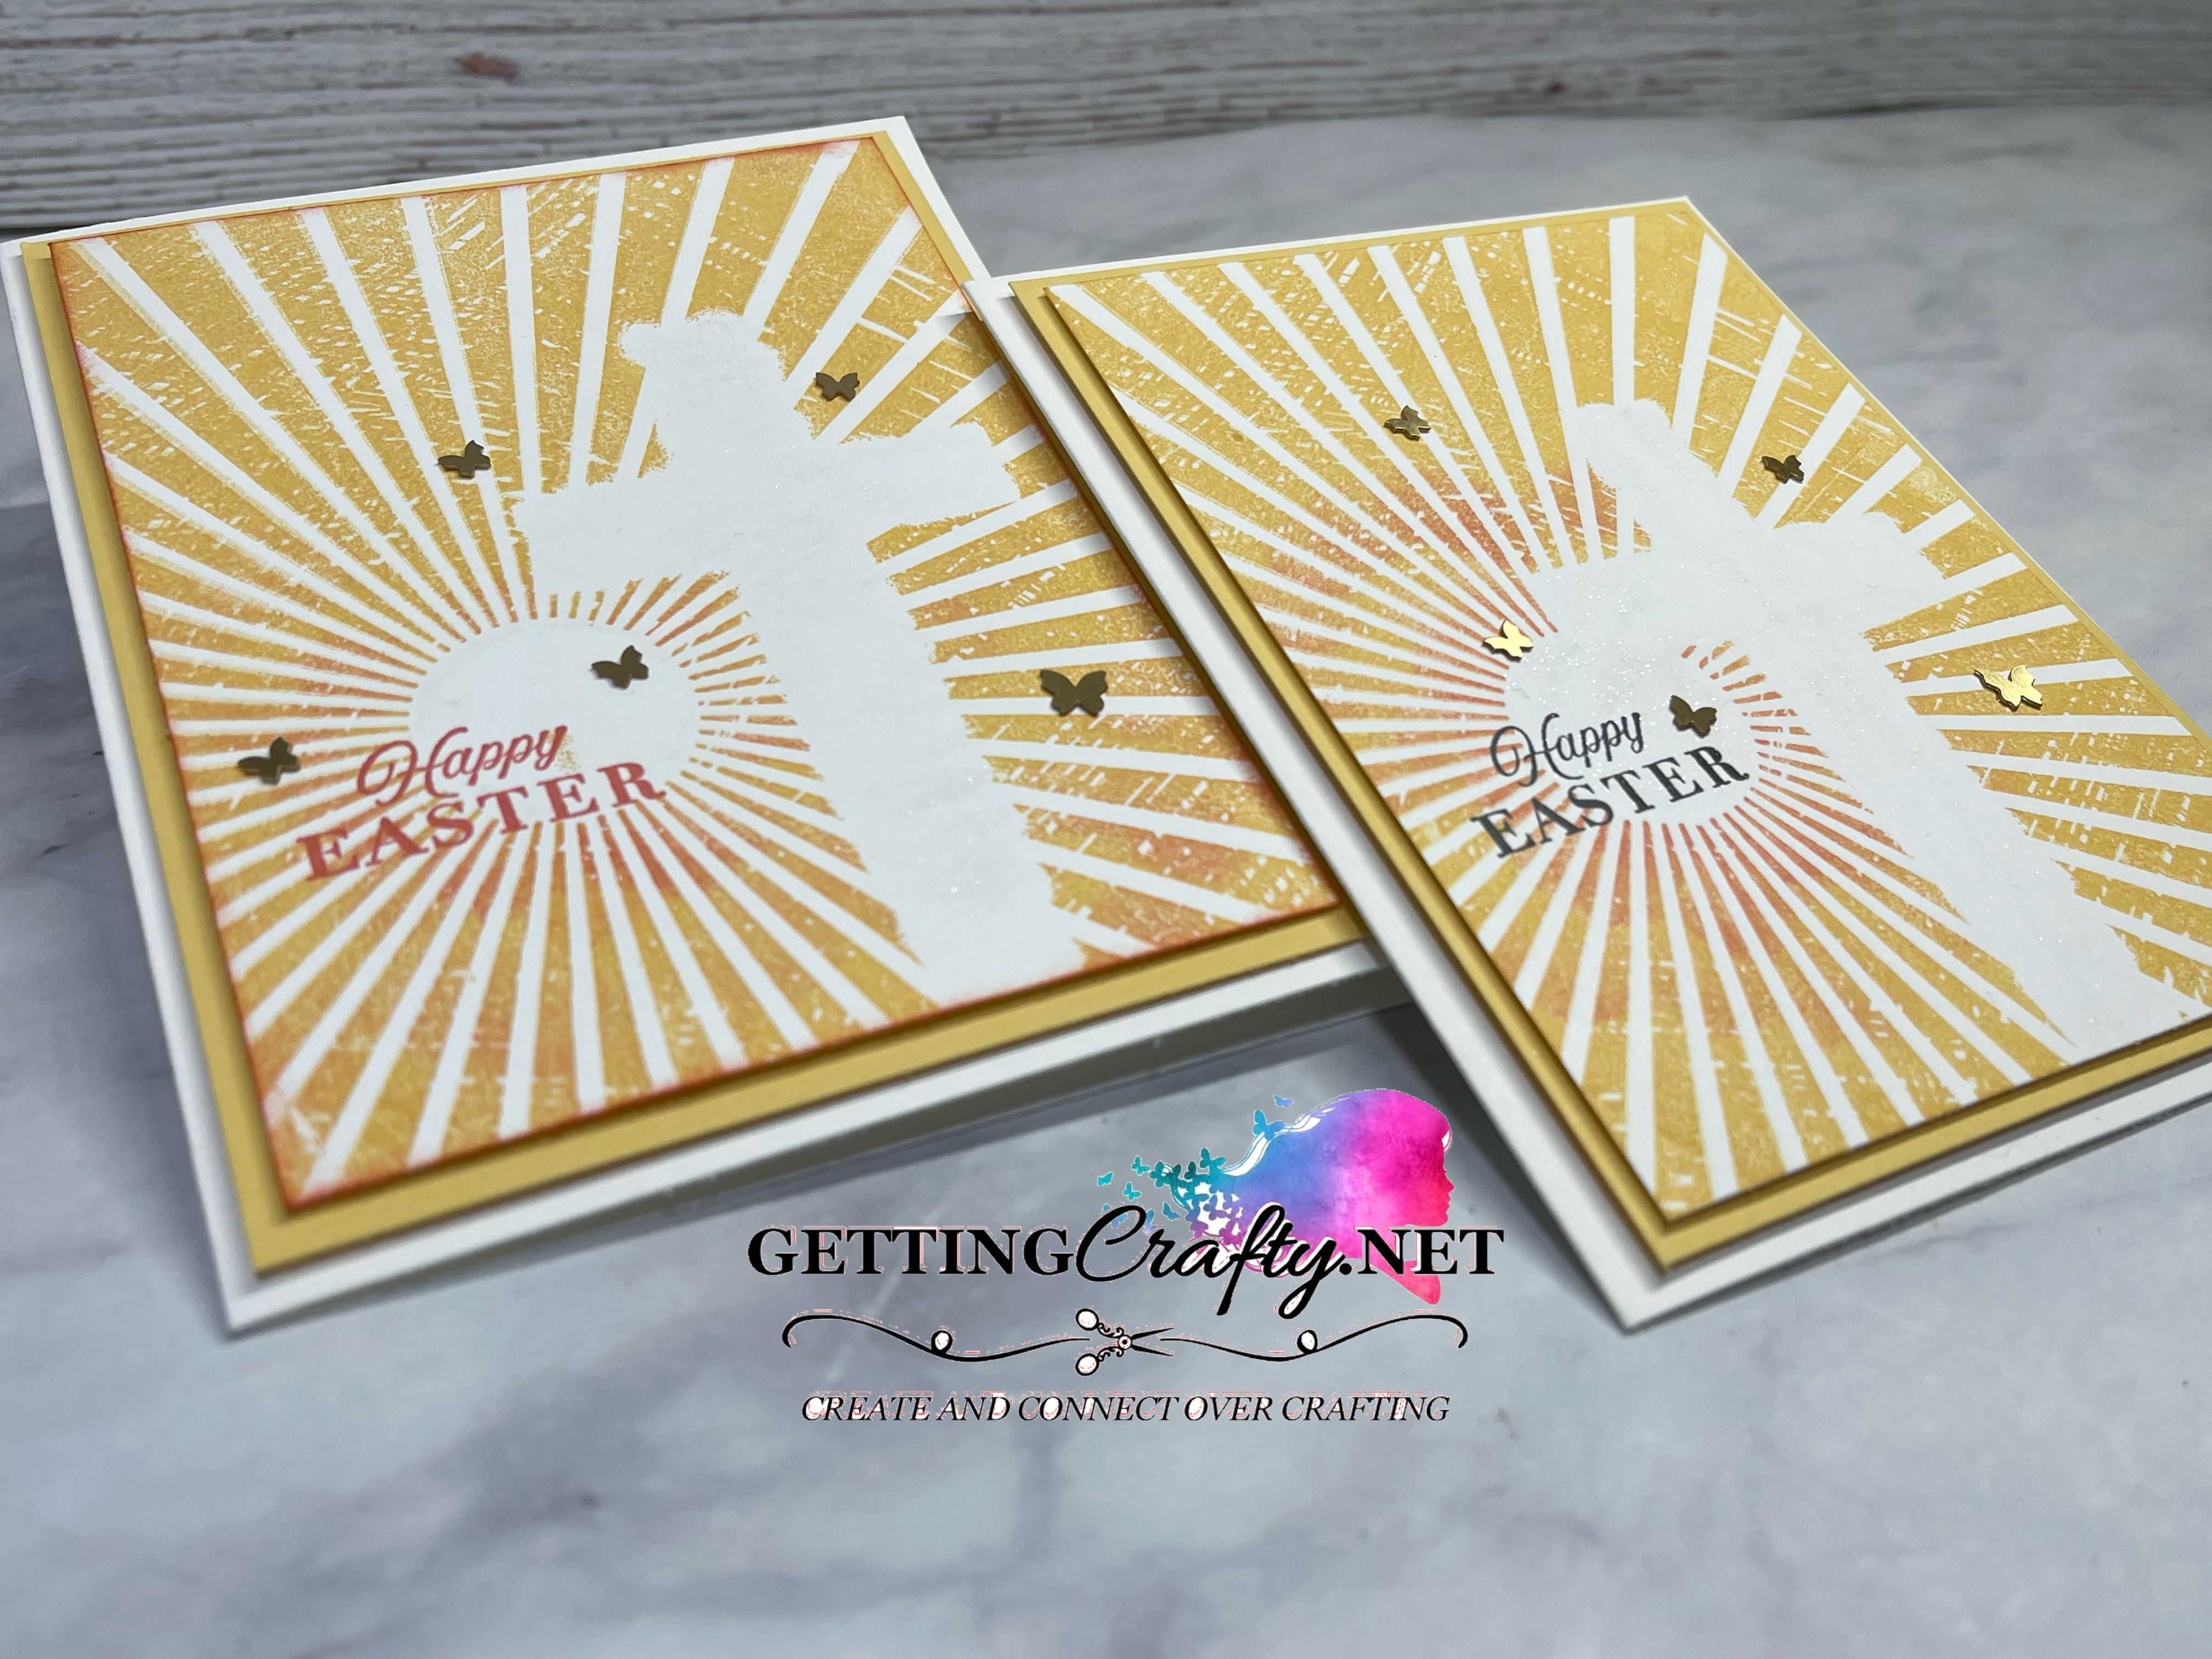
Easter Sunrise Cross StampinUp Handmade Card in Under 10 minutes!


When you want to create for the seasons but might not have the PERFECT stamp set - like for Easter - here is a quick and easy but lovely way to celebrate Easter with the Celebrating You and Rays of Light stamp sets.  Owning a greeting set that covers a variety of seasons and occasions can take all of your crafting up to celebrate whatever may arise.  

This is Holy Week and Palm Sunday is when Jesus enters Jerusalem.  Knowing what the Cross will mean to Him and to us... I wanted to create a handmade card to celebrate.  Here this masking technique and background stamp do all of the work.   
Shop the NEW Catalog and Score BIG TIME! 
See the NEW and AWESOME Catalog, Shop this and the newly Updated Clearance Rack!
SHOP and SCORE Happy Mail and a Gift!!  THANK YOU for your support, it is PRICELESS to me and my family!

Getting Crafty March 2023 
*Hostess Code 2F4TZ9TN
- JUST COPY & PASTE THIS CODE

**OR... If you Order $150 or more - Score the Hostess Shopping Spree !!

***BONUS GIFT!!***

In April of 2023 - WHILE SUPPLIES LAST - 

I am Giving AWAY a GIANT Paper Sampler 

to EVERYONE Who Orders From ME over $75!  

This will be shipped to YOU as my THANK YOU!  

Make SURE to use this month's Hostess Code to assure that your will receive this Sampler - while supplies last!!

Your Support is PRICELESS and Should Be REWARDED!  

**OR... If you Order $150 or more - Score the Hostess Shopping Spree !!

Simply COPY and Paste it when you are checking out!

****

Create this Easter Sunrise Cross StampinUp Handmade Card in Under 10 minutes! Video Tutorial .


I hope that you enjoyed this Video. 
Don't forget to Sign Up and Follow my Getting Crafty YouTube Channel 


 What do you think??  Please Share Me and This with a Pin, Email, Facebook post, Tweet.. and Join Me with a follow on these avenues like Pinterest and YouTube, Instagram, LinkedIn and Foursquare! Get even MORE Getting Crafty and Stamping with our Exclusive Mailing List and it's many rewards!!


Wednesday, April 13, 2022

Crafters Making Peeps Smores with our Stampin' Up! Heat Tool - How To Video!

 Do YOU Create something AMAZING that is so easy but has become a MUST for the Holidays??

My Brother In Law LOVED Peeps.  He passed suddenly and in order to keep him 'present' in our lives - especially at Easter... we created these Peeps S'mores.  So easy and PERFECT as a Crafter - I even brought them into our Spring Crafting and Card Making Classes and Getting Crafty Retreats!  

Shhhh... I was NOT a fan of Peeps before this.. but this has quickly become a FAVORITE Treat and a sweet nod to Jeff, a beloved Uncle to my kids and member of our family (until we meet again in heaven!).

Grab Your Heat Tool/Gun, 

Peeps, Chocolate Bars and 

Graham Crackers... 

let's have a BLAST Creating this (over a heat safe surface).

Product List
See the NEW and AWESOME Catalog, Shop this and the newly Updated Clearance Rack!
SHOP and SCORE Happy Mail and a Gift!!

THANK YOU for your support, it is PRICELESS to me and my family!

Getting Crafty May 2022 
*Hostess Code B44D74AB

**OR... If you Order $150 or more - Score the Hostess Shopping Spree !!

Simply COPY and Paste it when you are checking out**

****

Crafters Making Peeps Smores with our Stampin' Up! Heat Tool - How To Video! in this Video Tutorial.
I hope that you enjoyed this Video. 

What do you think??  Please Share Me and This with a Pin, Email, Facebook post, Tweet.. and Join Me with a follow on these avenues like Pinterest and YouTube, Instagram, LinkedIn and Foursquare! Get even MORE Getting Crafty and Stamping with our Exclusive Mailing List and it's many rewards!!


JOIN US!!
Simply Order the Stamp Set below (or SAVE 10% and grab the BUNDLE and coordinating dies!) and Use My HOSTESS CODE (copy and paste it in even!) and you can earn this FREE Class sent to you!  6 STUNNING handmade cards, all NEW Designer Series Paper and.....  FREE!  Then Create with us LIVE Every Monday (or catch the Replay!).  Enter, when you post what you create, in our Facebook.com GettingCraftyStampers group for a BONUS Free Prize Drawing!
Getting Crafty May 2022 
*Hostess Code B44D74AB
Product List

Thursday, March 18, 2021

DIY Paper Carrot Mommy & Me Easter Crafting

 Easter is RIGHT AROUND the Corner... and if you, like me, work to build memories with your kiddos while also running out of time to do so... this DIY Paper Carrot tutorial (that my youngest and I created) delivers the PERFECT Fix without being messy like a kitchen project lol.  Join us as we will fill in this adorable Easter Basket with projects as we create in these Mommy & Me projects leading up to the holiday.  This gives me the opportunity to teach my children the art of blessing our neighbors, family and friends - giving sunshine during the holidays through out the year.  See the FULL Video Tutorial here, on my blog, for some great Easter Crafting with my youngest daughter!

Product List

See the NEW and AWESOME Catalog, Shop this and the newly Updated Clearance Rack!
SHOP and SCORE Happy Mail and a Gift!!
Send my family and I to the Eastern Caribbean with YOUR Support!
****
Create a DIY Paper Carrot Mommy & Me Easter Crafting Video Tutorial.
I hope that you enjoyed this Video. 
Don't forget to Sign Up and Follow my Getting Crafty YouTube Channel 

We have been blessed to live in this neighborhood for nearly 14 years.  Presently we are selling and due to move a couple of days after Easter.  We wanted to bless our neighbors, friends and family with a sweet treat that will bless them as they have done us.  

My daughter said this reminds her of the monthly Paper Pumpkin seasonal crafting - grab YOUR Subscription and never be behind in your holiday crafting (they are GREAT for my kids to create with or without me!).  
THIS is the type of carrots my kids really want - lol.
~  Using a Square piece of Designer Series Paper - like this Subtles collection in Calypso Coral and Pear Pizzazz, adhesive two full sides in a backwards L.  Create a loop on that L with a half way line that connects on the next area. (see the video for the specifics)
** Here we used a 6" piece but a 4" is a great little carrot also!**
~  Using the same collection of Designer Series Paper in the Pear Pizzazz at 3"x6" and score at 1" along the 6" side.
~  Using the Paper Snips to create a fringe edge on the 2" side.
~  Using the Bone Folder and rub it to curl the paper.
~  Adhere the fringe to the back of the backwards L.
~  Roll the other side to create a tube.
~  Close the base with a pinch along the bottom where half was adhesived (I like to fold it back for a little 'flair').
~  Roll the Paper closed and fill with Basket Shred.
~  Add Candy - yummy!
~  Add more of the Basket Shred to the top.
~  Die-Cut the Word Wishes Dies in Happy Easter with the Basic White card stock in the Stampin' Cut & Emboss machine.
~  Adhesive down with the Multipurpose Liquid Adhesive.
Give away to bless someone today!!
I'm sooo excited about the NEXT Paper Pumpkin specifically designed for kids to create some sweet fun!
We will be filling this Easter Basket with a fun collection of Holiday, Spring and Easter Crafting that my girls and I will be creating and filming for you!  Join us for our Wild Card Wednesday with the next two weeks of bonus, easy holiday crafting!

What do you think??  Please Share Me and This with a Pin, Email, Facebook post, Tweet.. and Join Me with a follow on these avenues like Pinterest and YouTube, Instagram, LinkedIn and Foursquare! Get even MORE Getting Crafty and Stamping with our Exclusive Mailing List and it's many rewards!!


Join our WOW Card Making Online Classes! 
JOIN OUR EMAIL LIST as they score these Classes as a Priority!
(They also jump in on specials, prizes, contests, bonus creating and MORE!)
Getting Crafty Family ~ Join the FUN! www.gettingcrafty.net/p/join-getting-crafty-family.html
ORDER THIS AND MORE EARLY - WITH A DISCOUNT?!?
 
Did you know that you can join my team at any time for only $99 and there is never any pressure to sell. You can simply join us for the discount! Message me if you’d like to know more. We would love to have you and you would be welcome with open arms. The Getting Crafty Family women and men are a wonderful Stampin’ Up family to be a part of. 
RIGHT NOW Pick ANY $125 for ONLY $99 and Free Shipping 
PLUS BONUS Supplies and More from Stampin' UP!  

Grab the Starter Kit NOW!

Sunday, April 12, 2020

Easter Baskets of Blessings... from our home to yours!

Traditions are important.... the help build a foundation of memories for my loved ones.  These memories are often what we can hold onto during hard times that will come.  Easter was always a wonderful time for me... a gathering of loved ones at my grandparent's, sometimes my birthday, baking, food, games, baskets, Easter egg hunts, church and more.  
This year we decided to bless our neighbors with plates of 
Resurrection Rolls, Easter Baskets, Cookies, treats and more.  
After church, online, we created some baked goodness to share.
 Happy Easter…
From our family to yours
 The Albanese Family

RESURRECTION ROLLS RECIPE
Quick and Easy Resurrection Rolls Recipe

This easy resurrection rolls recipe is a meaningful tradition we do with our kids.

A quick and easy resurrection rolls recipe using crescent roll dough. 
Perfect sweet roll to serve on Easter morning!

Symbolic meanings of the Resurrection Rolls
Marshmallow – Jesus’ body (Luke 23:26-46)
Crescent roll dough – The linen used to wrap Jesus’ body (Luke 23:47-54)
Melted butter and cinnamon sugar – Anointing oil and spices for the body that the women planned to use on Jesus body after the Sabbath (Luke 23:55-56, Luke 24:1)
Oven – The tomb (Luke 23:53, Mark 16:1-6)
Empty roll – The empty grave clothes or the empty tomb (John 20:3-7)
 Easy Resurrection Rolls Recipe
A quick and easy resurrection rolls recipe using canned crescent roll dough.
Prep Time10 minutes
 Cook Time20 minutes
 Total Time30 minutes

Ingredients
8 ounce  package refrigerated crescent rolls
8 regular-sized marshmallows
5 tablespoons butter melted
2 tablespoons ground cinnamon
Instructions
Directions
Preheat oven to 350 degrees. Line 8 wells in a muffin tin with baking cups (for easier clean up) or spray the wells with non-stick cooking spray.  

Unroll crescent dough and divide into 8 triangles at the perforations.
A  small bowl to sprinkle the cinnamon over.
Dip a marshmallow into the melted butter.
Then sprinkle the marshmallow in the cinnamon over the bowl
Place the coated marshmallow on the large end of the crescent triangle.
Fold the dough over the marshmallow tightly sealing the edges so the marshmallow does not melt and leak.
Finish wrapping the dough around the marshmallow and form into a ball.
Repeat with the other marshmallows. Place the rolls in a muffin tin. Brush the rolls with some of the remaining melted butter. then sprinkle the remaining cinnamon over the rolls.
10. Bake the rolls for 10 to 14 minutes until puffed and lightly golden. Remove from oven and allow to cool slightly before serving.
 It's EMPTY!
My kids are always pleasantly surprised that it works!
Just like in our faith, the tomb is empty.
The gift of salvation... free to all who accept it.
 The sweet taste of victory, that our Lord gives us.
Smiles all around for these tasty treats and all who enjoy them.
 Creating these baskets with our Getting Crafty Family was SUCH fun...
They always receive a BONUS live from me weekly with extra crafting.
 Using the Sale~A~Bration blessings to create the cutest baskets!
 Giving bunny filled wishes!
These cute Punch-Art bunnies were created with my 
Getting Crafty Stampers on THIS Live card making tutorial. 
Happy Easter from our family to yours!

What Others are SAYING about Getting Crafty with Jamie

Jamie is so passionate and creative about making cards - and wants everyone else to join her in the fun! She is so encouraging and positive in her attitude, helping me along when I get frustrated - and then rejoicing with me at the finished product! I love going to her classes to get new ideas, learn techniques, and have loads of fun in the process. ~ Christine C.

Jamie has wicked awesome classes! If you don’t like a particular stamp or paper/ink color Jamie wants you to change it to suit your style! I did my sister-in-law’s entire bridal shower from invitations/thank you cards, party favors to decorations, it was quaint and whimsical! Everyone ooh’d and ahh’d! I’ve had lots of special requests for classes and Jamie delivers; she always has tasty treats and flavored coffees too ~Ashley W.

I have been attending Jamie's classes for over a year. Her ideas for cards are fresh and fun. She always tries to have several different styles of cards available, so everyone gets to make cards that fit their personal style. The techniques she shows each class can be used in many different applications. She is very patient teacher when instructing class members on how to use the Stampin Up products. ~ Carol D.

If I looked up the word sparkle in the dictionary, I would find Jamie Albanese picture there. I have had the sweet blessing of knowing Jamie and her family for over 5 years now. Every time I am with her I feel loved and inspired. When I am in one of her classes I feel my creative juices flow, as she encourages me to go outside my comfort zone. Jamie helped our girl scout troop make cards for a soldier who needed some encouragement!!! For any of you who have not been in one of Jamie's classes, please don't let another day slip by. She is a beautiful friend and she will become yours too. ~ Blessings, Karen:-)

Jamie has a great eye for style and flair, and it shows in her work. Yet she can pick up on your own individual style and makes great recommendations. I love that she is always flexible for last-minute decision maker mommies like me! So much fun to host craft events with your friends and family - that personal touch always means so much. ~ Adonna

Total Pageviews