Showing posts with label Facebook Live Class. Show all posts

Tuesday, January 30, 2024

One Sheet Wonder Stampin’ Up! Double Pocket Fun Fold Card Making

I LOVE using up my scrap paper and this fun fold handmade card comes together to easily create a wow hand stamped card!  Easy to create, our double sided Designer Series Paper, like this FREE* Softly Stippled collection, delivers a ton of options to use when creating!  With a double pocket fancy fold card, you can tuck away a gift card (see the secret way to hold the gift card in the video tutorial below) and it makes for many areas to write or gift all wrapped up in the hug of a hand crafted card!

Getting Crafty January 2024

*Hostess Code 4ZYXVD7W
- JUST COPY & PASTE THIS CODE

**OR... If you Order $150 or more - Score the Hostess Shopping Spree !!


Create this Fast & Easy Accordion Card Fun Fold Card Making Tutorial 
I hope that you enjoyed this Video. 
Don't forget to Sign Up and Follow my Getting Crafty YouTube Channel 

Catch our weekly LIVES and Videos on
Using up your spare paper while delivering a wow card... I'm the type of girl who LOVES her POCKETS andddd featuring BOTH sides of this pretty paper!
You can write inside on multiple levels!!
Recipe:
~  11"x8" of your favorite Designer Series Paper (like this FREE* Softly Stippled Designer Series Paper)!
~  Score at 5-1/2" on the 11" side, 4" along the 8" side.
~  With the paper with the long portrait on the 11" side, each of these four quadrants are to be used. 
~  Using the Paper Trimmer CUT the middle 4" side into the center.
~ Mark 3" on the Top Left Quadrant on the top and side, scoring to create a 3" corner.
~  Mark 4" on the BOTTOM Right Quadrant and score to the bottom of the center score line - causing a 4" corner fold.
Follow the VIDEO Tutorial on how I adhered this together.

Spice It Up:
~  Create Pockets Pulls ~
With 3" x 4-1/2" and a 3"x5" pieces of Basic White to create the pocket note area.... 
~  Decorate the TOP of each (and the bottom gift card pull) with the left over scap paper 1"x3", scored at 1/2" adhered to the top.
~  OR Frame each out with a coordinating card stock at 3-1/4"x4-3/4" or 5-1/2" like this Basic  Black card stock.
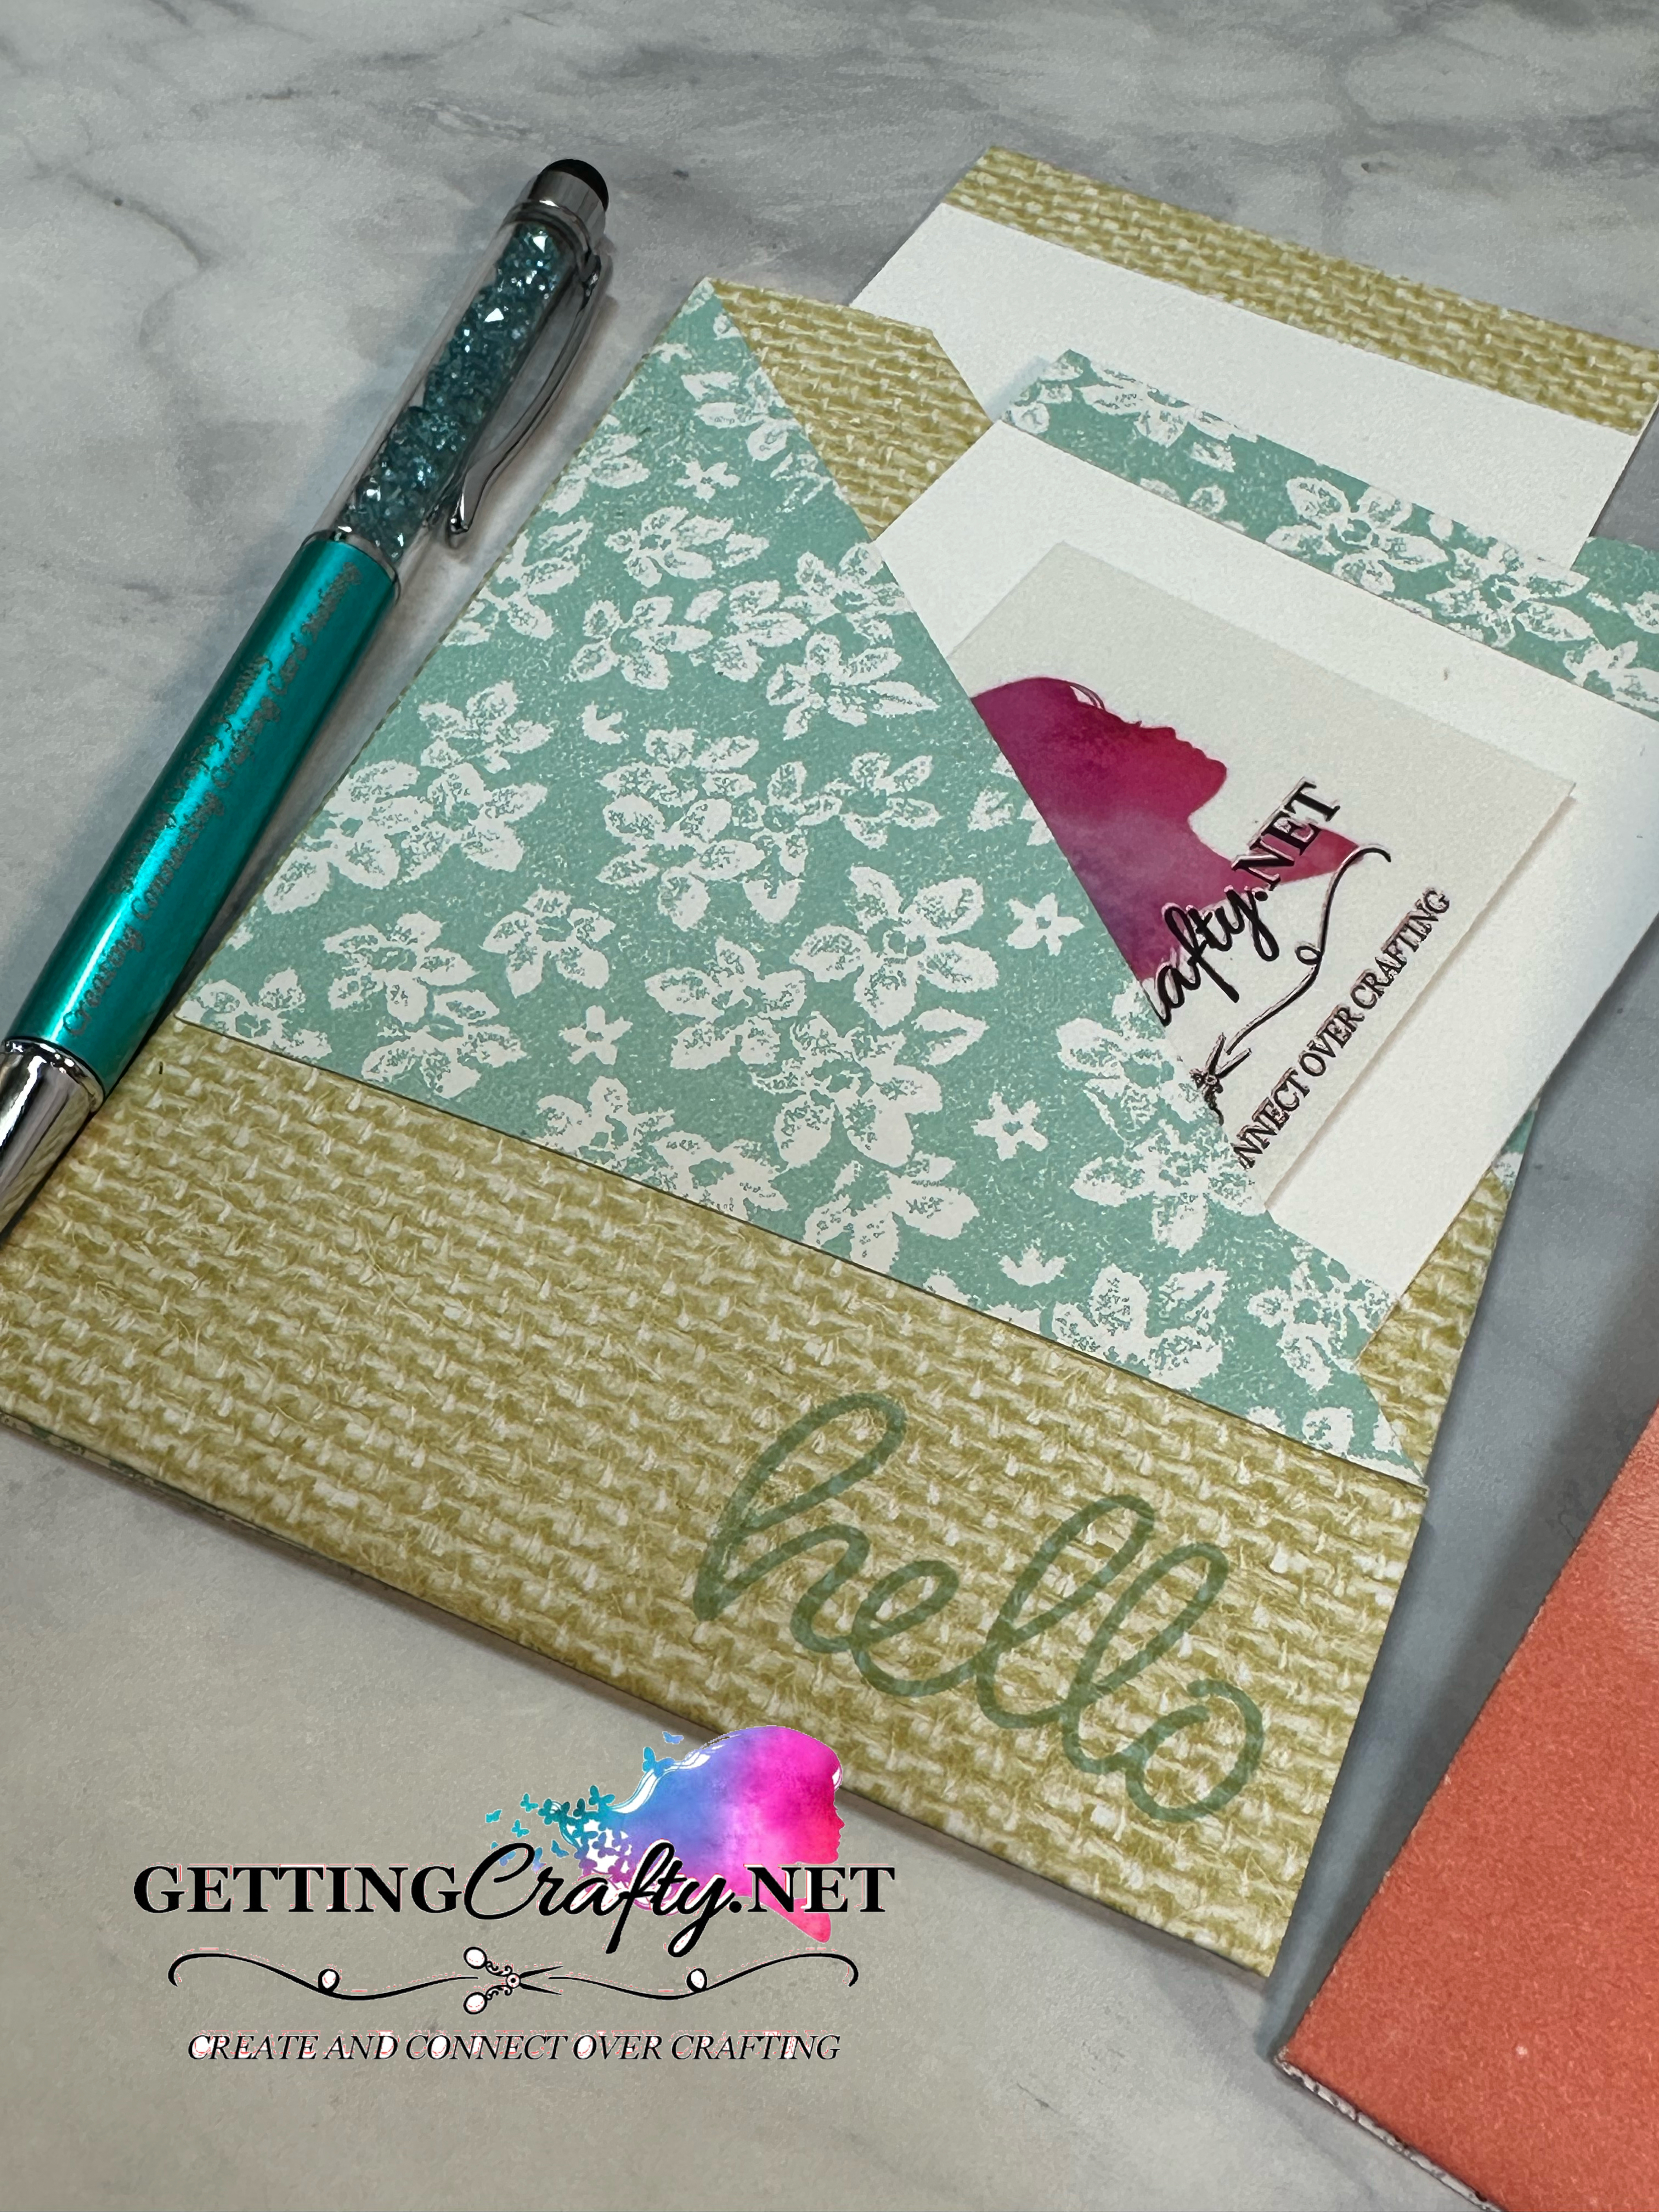
Using the FREE* Heartfelt Hello's stamp set and coordinating inks in Memento Black or Pool Party inks to greet with flair!!

WHICH is YOUR Favorite?!
Comment and let us know... 
What do you think??  Please Share Me and This with a Pin, Email, Facebook post, Tweet.. and Join Me with a follow on these avenues like Pinterest and YouTube, Instagram, LinkedIn and Foursquare! Get even MORE Getting Crafty and Stamping with our Exclusive Mailing List and it's many rewards!!
See the Catalogs HERE, Shop NOW and with EVERY $50 you spend, pick FREE stamp sets, papers, accessories and more in the Sale A Bration Catalog OR if your Wish List is long... make sure you Grab the VIP Starter Kit with me and Join our Getting Crafty Family!  The VIP Starter Kit brings you TWO amazing offers... 
Pick ANY $125 in crafting supplies
Receive FREE Paper Pumpkin Kit
BONUS Supplies
and During Sale A Bration (until the end of February!)
PICK the BONUS of YOUR Choice:
~  Free Stampin' Glass Mat Studio 
(Glass Mat - $60 value, Silicone Mat and Cleaning Cloth!)
or...
~  Add a BONUS $30 in Crafting Supplies of YOUR Choice!!
No Obligation to sell... simply score the Discount, Free Hostess Dollars Shopping and During Sale A Bration FREE Items!!
I am HERE to help YOU achieve your goals... 
With the friendship and support in our Getting Crafty Family group and my experience in leadership as the Top 1% of Stampin' Up! globally... You can earn Free Product or Profit and more with Stampin' Up!

Questions??  Let me know and I look forward to connecting!

Tuesday, October 24, 2023

A Stars at Night Screen Divider Fun Fold Stampin' Up! Card

A Fun Fold is a fabulous way to stand out from the crowd with just an extra score line or two.  This is the FIRST of THREE Card Designs (you receive TWO to create EACH of the Three Weeks!) in this FREE Card Making Class... and I love this Screen Divider Fun Fold handmade card.  The O' Holy Night Designer Series Paper lays out so beautifully across this fancy fold that is so easy and fun to create!

Created at our LIVES on Tuesdays at 8:30pm EST at

Getting Crafty October 2023 

*Hostess Code HEJR4GWJ
- JUST COPY & PASTE THIS CODE

**OR... If you Order $150 or more - Score the Hostess Shopping Spree !!


Create this Stars at Night Screen Divider Fun Fold Stampin' Up! Card  Video Tutorial 
I hope that you enjoyed this Video. 
Don't forget to Sign Up and Follow my Getting Crafty YouTube Channel 

Catch our weekly LIVES and Videos on
https://www.facebook.com/GettingCrafty.net
https://www.youtube.com/c/JamieAlbanese/videos
My Recipe... Let's Create!
~ Starting with a Night of Navy card stock at 5-1/2"x11"
~  Score at 2-3/4", 5-1/2" and 8-1/4" along the 11" side.
~  Impress with a Bone Folder.
~  Die Cut the bottom of the panels with the All That Dies.
(Here I did two sides at a time, marking the bottom to die cut at the same height.)
~  Basic White at 4-1/2" x 2-1/2" in four panels.
~  O Holy Night Designer Series Paper at 4" x 2" - I cut the 4" panel for a scenic look and trimmed it off at 2" segments - aligning them for a cohesive/scenic view.
~  With the Stars at Night Dies (that comes with the hybrid embossing folder) and the Stampin' Cut & Emboss Machine, Die Cut this Starburst in the front of the first panel.  
~  Die Cut the Slim Star with the Gold Foil sheets.
~  A 2" square More Dazzle gold sheet fits perfectly behind the starburst.
~  Adhere the Gold Foil star to the front with a Mini Stampin' Dimensional.
~  Stamp, with the Night of Navy ink pad, the Basic White corners the small stars.
~  The back panel is designed for greeting, stamped here with the Stars at Night stamp set and Night of Navy ink pad.
~  Adhere to the Starburst die cut Oh Holy Night paper and Dazzle paper together with Mini Glue Dots.
~  Assemble with the Stampin' Seal.
With TWO different Golds, this really shines.  I did add Wink of Stella glimmer to the front panel for more fun.
I couldn't help myself.. I die-cut, in the gold foil, more smaller stars and adhered them to the inside with the Mini Stampin' Dimensionals.
This will perfectly fit inside of an envelope but I'd fold it so that it lays flat like a card, not in the four fold.
 
I love this stunning collection... adding in some prayers for all the needs across the Middle East... this comes together so easily.  Coordinated paper collections allow for this easy cohesive look!
What do you think??  Please Share Me and This with a Pin, Email, Facebook post, Tweet.. and Join Me with a follow on these avenues like Pinterest and YouTube, Instagram, LinkedIn and Foursquare! Get even MORE Getting Crafty and Stamping with our Exclusive Mailing List and it's many rewards!!
*****
Catch this upcoming FREE Class and THESE Upcoming Card Making and Crafting Classes and events waiting for you.  With online and in-person classes.. we have fun to bring to you.

BONUS Kits Available!

Some have missed the original date and I have created additional kits to send out!  You can still score this FREE Class!

Shop, Using the HEJR4GWJ Hostess Code and 

Purchase this Stars At Night Bundle or like bundle and 

Receive the FREE Three Week LIVES Class Kit in the Mail!

Order from me for the Free Shipped Kit!

Create with us LIVE Oct. 24, 31 & Nov. 7th

YouTube.com/c/JamieAlbanese Facebook.com/GettingCrafty.net

LIVES Tuesdays at 8:30pm EST

Tuesday, October 17, 2023

Stars at Night Three Panel Fun Fold Stampin’ Up! Card Making

I love something interactive... a handmade card that flips, moves, is fun to create and play with... and this Three Panel Card, using the Stars at Night bundle from the upcoming FREE Class... it comes together so easily!  Catch the full recipe to create this, measurements, diagram, supplies and free card making class tied to this very Stars at Night Bundle below... 

Created at our LIVES on Tuesdays at 8:30pm EST at

Getting Crafty October 2023 

*Hostess Code HEJR4GWJ
- JUST COPY & PASTE THIS CODE

**OR... If you Order $150 or more - Score the Hostess Shopping Spree !!


Create this Handmade Stars at Night Three Panel Fun Fold Stampin’ Up! Card Making Card Video Tutorial 
I hope that you enjoyed this Video. 
Don't forget to Sign Up and Follow my Getting Crafty YouTube Channel 

Catch our weekly LIVES and Videos on
https://www.facebook.com/GettingCrafty.net
https://www.youtube.com/c/JamieAlbanese/videos
This lays flat, comes together so easily and fits into our standard envelopes... the interactive aspect to this fun fold handmade card will wow and delight!
I love how the Stars at Night bundle comes together with this stunning 

My Recipe..... Let's Create!

~  Firstly, to create the card base, I cut a piece of Night of Navy cardstock to 5-1/2″ x 8-1/4″ and scored it at 1,” 2,” 3,” and 4,” on the 8-1/4″ side. 

~  Then, on the 5-1/2″ side with the score lines at the top, I measured down 3/4″ from the top edge and cut all the way to the 3″ score line. (See the Diagram BELOW on this)

~  After that, I measured down to the 1 1/2″ mark and cut only to the 1″ score line. Finally, I cut on the diagonal from the 3″ cut to the 4″ score line and the 1″ cut to the 2″ score line.

~  Then, after I made the card base, I cut panels as follows:

     * Back Panel: Cardstock: 5-1/4″ x 4″ and DSP: 5-1/8″ x 3-7/8″

     * Middle Panel: Cardstock: 4-3/4″ x 3-1/2″ and DSP: 4-5/8″ x #-3/8″

     * Top Panel: Cardstock: 4″ x 3″ and DSP: 3-7/8″ x 2-7/8″


Let's Mix it Up... 

~  Top Panel: After cutting and adhering the cardstock and Oh Holy Night paper to the Crumb Cake card stock base.  Accent with the Wink of Stella glimmer brush to the windows and stars.. adding the Adhesive Backed Silver Glimmer Paper, die cut with the stars from this bundle.

~  Middle Panel: After adhering the Basic Black panel to the card base, then I stamped the sentiment from Stars at Night stamp set in Night of Navy ink on our Basic White card stock.  Die-Cutting it is so easy with the coordinating dies.  Using Stampin' Dimensional adhesive to rise it and add interest.

~  Back Panel: Finally, I added the Basic White cardstock to the back and the star filled Oh Holy Night paper to this.  Die Cutting the Deckled Rectangles dies with Basic White (here is the 4th smallest but the 5th or 6th in this series would be great also - if you want more room to write). 

Shaken.. not stirred....
I love how the added die-cut stars are so easy to apply with the adhesive backed Silver Paper - an online exclusive.  I love utilizing my Take Your Pick tool for easy application of these die-cuts.
I'm a visual girl and this was inspired based on a card by Debbie Mageed.  
I love this stunning collection... adding in some prayers for all the needs across the Middle East... this comes together so easily.  Coordinated paper collections allow for this easy cohesive look!
What do you think??  Please Share Me and This with a Pin, Email, Facebook post, Tweet.. and Join Me with a follow on these avenues like Pinterest and YouTube, Instagram, LinkedIn and Foursquare! Get even MORE Getting Crafty and Stamping with our Exclusive Mailing List and it's many rewards!!
*****
Catch this upcoming FREE Class and THESE Upcoming Card Making and Crafting Classes and events waiting for you.  With online and in-person classes.. we have fun to bring to you.

It was requested.... and I am bringing it back!

You are INVITED!!

Shop, Using the HEJR4GWJ Hostess Code and 

Purchase this Stars At Night Bundle or like bundle and 

Receive the FREE Three Week LIVES Class Kit in the Mail!

Order from me for the Free Shipped Kit!

Create with us LIVE Oct. 24, 31 & Nov. 7th

YouTube.com/c/JamieAlbanese Facebook.com/GettingCrafty.net

LIVES Tuesdays at 8:30pm EST

What Others are SAYING about Getting Crafty with Jamie

Jamie is so passionate and creative about making cards - and wants everyone else to join her in the fun! She is so encouraging and positive in her attitude, helping me along when I get frustrated - and then rejoicing with me at the finished product! I love going to her classes to get new ideas, learn techniques, and have loads of fun in the process. ~ Christine C.

Jamie has wicked awesome classes! If you don’t like a particular stamp or paper/ink color Jamie wants you to change it to suit your style! I did my sister-in-law’s entire bridal shower from invitations/thank you cards, party favors to decorations, it was quaint and whimsical! Everyone ooh’d and ahh’d! I’ve had lots of special requests for classes and Jamie delivers; she always has tasty treats and flavored coffees too ~Ashley W.

I have been attending Jamie's classes for over a year. Her ideas for cards are fresh and fun. She always tries to have several different styles of cards available, so everyone gets to make cards that fit their personal style. The techniques she shows each class can be used in many different applications. She is very patient teacher when instructing class members on how to use the Stampin Up products. ~ Carol D.

If I looked up the word sparkle in the dictionary, I would find Jamie Albanese picture there. I have had the sweet blessing of knowing Jamie and her family for over 5 years now. Every time I am with her I feel loved and inspired. When I am in one of her classes I feel my creative juices flow, as she encourages me to go outside my comfort zone. Jamie helped our girl scout troop make cards for a soldier who needed some encouragement!!! For any of you who have not been in one of Jamie's classes, please don't let another day slip by. She is a beautiful friend and she will become yours too. ~ Blessings, Karen:-)

Jamie has a great eye for style and flair, and it shows in her work. Yet she can pick up on your own individual style and makes great recommendations. I love that she is always flexible for last-minute decision maker mommies like me! So much fun to host craft events with your friends and family - that personal touch always means so much. ~ Adonna

Total Pageviews