Showing posts with label Hot Glue. Show all posts

Tuesday, December 8, 2015

Pretty Paper Ornament

I create this pretty paper ornament, yesterday, for our Women's Ornament Exchange and Pot Luck.  I adore the women in our church, they are just that awesome!  I created a similar ornament last year but this was revamped and upped a notch or three with the Winter Wonderland Designer Series Paper and coordinating, stunning, printed Winter Wonderland Vellum!!  I'm on overload with how cute it came out.  Join Us in upcoming pretty paper classes and you, too, can create gifts, cards and more.
Create this Pretty Paper Ornament with:
Winter Wonderland Designer Series Paper (139588)
Winter Wonderland Designer Vellum Stack (139594)
Snowflake Wooden Elements (139683)
Gold & White 3/8" Glitter Ribbon (139614)
Metallic Foil Doilies (138392)
Scallop Oval Punch (119856)
1-3/4" Circle Punch (119850)
Hot Glue

**  SHOP 24/7 with me while Earning BONUS Frequent Buyer Points!!   If you enjoy this project and want to have some fun crafting with me, CLICK HERE and RSVP ASAP for my Upcoming Classes!!  Most classes are FREE with a qualified purchase!!

BOOK Your OWN Private Class that will Highlight the card styles or techniques you are interested in!  With my designing cards for YOU,Book a FUN Gathering of family and friends to create!  From fun Holiday Cards to Celebrations... YOU will earn ALL of the Hostess Benefits on ALL of the Purchases - perfect for stocking up to make cards all year long!! 
Ohhhh I love the stunning collection of pretty Designer Series Paper and coordinating Vellum!!  Here with Gold Accents it helps to create a stunning pretty paper ornament.  Accent with the Gold Foil Doily from the Metallic Doilies Collection.  A change of texture and look is the pretty wooden snowflake for the center accent.  Hot glue holds this all together with ease.

See this Video Tutorial  on creating this Pretty Paper Ornament:
I hope that you enjoyed this Video Tutorial. Don't forget to Sign Up and Follow my Gettin' Crafty Stampin' YouTube Channel.
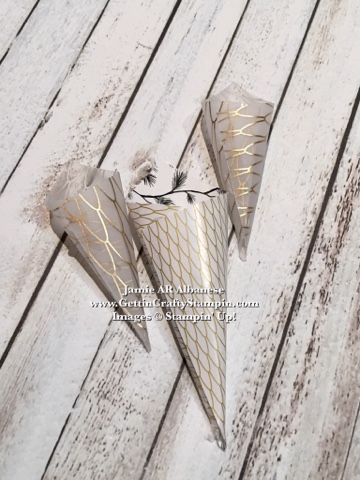
Follow Your Patterns!!  Make sure when you create these cones is to make sure that your patterns are in the same direction.  This will allow for your hand-crafted ornament to look cohesive and elegant.  Squares of 1-1/2" for the pretty Vellum and 2" for the pretty Designer Series Paper roll into these little cones.  Adhere it with Hot Glue (be careful, it is hot).
Punch a 1-3/4" Circle from Whisper White card stock.  Cover one side with hot glue and then tuck the cones into the center.  Using the Scallop Oval punch to support this pretty Gold Sparkling Ribbon hanging loop.  This packet of ribbon comes with TWO in a pack and both are sparkling!!
What do you think??  Please Share Me and This with a Pin, Email, Facebook post, Tweet.. and Join Me with a follow on these avenues like Pinterest and YouTubeInstagram, LinkedIn and Foursquare! Get even MORE Gettin' Crafty Stampin' with our Exclusive Mailing List and it's many rewards!! 

It was super fun to create this WOW hand-crafted ornament for the Women's Ornament Exchange.  I adore that a sweet friend actually picked it and didn't lose it (lol).  I love that it is easy, fun and budget saving to give a hand-crafted ornament to others.  I was surprised to see over 7 different tutorials for ornaments on my blog - yay!  Click, create and then Join Me at upcoming card making and crafting classes and you, too, can gift beauty to others that they will cherish because YOU made it!

Friday, December 4, 2015

Holly Berry Christmas hand-crafted Wreath

Decorating my home is one of my favorite aspects of the year!  With a variety of seasons, it is so much fun to change out what 'accessories' I have on and around my home.  I love what I do in paper crafting and using it to create home decorations like this pretty mock "Holly Berry" Christmas Wreath.  Join me in creating beauty and art all around you (and others) at our fun card making and crafting classes!
Create this Christmas Wreath with:
*Vintage Leaves stamp set (138802)
Mossy Meadow ink pad (133645)
Mossy Meadow card stock (138419)
Winter Wonderland Specialty Designer Series Paper (139588)
Red Glimmer Paper (121790)
*Leaflets Framelits (138283)
Gift Bow Bigz L Die (129977)
Spiral Flower Orginals Die (129379)
Big Shot Magnetic Platform (130658)
Big Shot Die-Cutting Machine (113439)

*Bundle and Save 15% on this stamp set and coordinating dies (photopolymer 140235)

**  SHOP 24/7 with me while Earning BONUS Frequent Buyer Points!!   If you enjoy this project and want to have some fun crafting with me, CLICK HERE and RSVP ASAP for my Upcoming Classes!!  Most classes are FREE with a qualified purchase!!

BOOK Your OWN Private Class that will Highlight the card styles or techniques you are interested in!  With my designing cards for YOU,Book a FUN Gathering of family and friends to create!  From fun Holiday Cards to Celebrations... YOU will earn ALL of the Hostess Benefits on ALL of the Purchases - perfect for stocking up to make cards all year long!! 
Pretty, pretty, pretty accents to use in paper crafting.  I adore how easy it was to create these fun mock "Holly Berries" and pretty gold bow for my Christmas Wreath. Grab a grapevine wreath from Amazon or your local craft store, hot glue and these fun dies.  See this fun Video Tutorial and let me know what you think (please Share and Like this for your family and friends, too!).

See this Video Tutorial  on creating this "Holly Berry" Christmas Wreath:

I hope that you enjoyed this Video Tutorial. Don't forget to Sign Up and Follow my Gettin' Crafty Stampin' YouTube Channel.
Creating these pretty flowers, leaves and big bow is super easy with the Spiral Flower Die, Gift Bow Die and the Vintage Leaves stamp set/ Leaflets dies.  
(I adore that the Leaves stamp set and dies are Bundled to Save 15%!!)  Simply using my Big Shot Die-Cutting Machine with these dies can die-cut all of these shapes and more!

~  Ask ME how YOU can get the Big Shot Die-Cutting Machine for FREE or 1/2 OFF!!  With a full collection from the one of the best catalogs in ages - you can be the first to enjoy the awesomeness and score the FREE Items when you book a Private Class with me!  Score the BEST Deal of $125 for only $99 and FREE Shipping when you take the starter kit home - a kit YOU Pick!!  ~
Die-Cutting these flowers is super easy.  Using Hot Glue to adhere them together is the best way.  I hope that you enjoy this pretty Christmas Wreath - use more than you'd think in Hot Glue to adhere it all together for the long haul.
What do you think??  Please Share Me and This with a Pin, Email, Facebook post, Tweet.. and Join Me with a follow on these avenues like Pinterest and YouTubeInstagram, LinkedIn and Foursquare! Get even MORE Gettin' Crafty Stampin' with our Exclusive Mailing List and it's many rewards!! 

What traditions do you hold on to?  Do you decorate your home for the holidays?  It sure is fun to see the way that our pretty paper and dies to create a hand-made Christmas Wreath for my front door.  Let me welcome in my family, friends and guests (and delivery people, it is the Christmas and Gift Giving Season after all) with a pretty wreath that I am proud to have made with my two own hands.  Join Me in creating pretty decorations for your home, hand-stamped cards at our in-person and to-go card making classes ~ you are invited!

Tuesday, November 3, 2015

Cup of Cheer and coffee hand-stamped card

Do you remember Cheers?  A TV show about a bar 'where every one knows you name'?  Ragamuffin Coffee Roasters is that for me!  I walk in to this artisan coffee house that the owners, friends of mine, and the staff as well as people who come in.. know my name.  I felt inspired to create something with this super cute cup.  Join us in creating and sending love - even at our Monday's at Ragamuffin (except I had four kids home, three sick, this past Monday).
Created with:
Real Red card stock (102482)
Black Archival ink pad (140931)
Bow Builder Punch (137414)
Hot Glue

Consider YOUR OWN My Paper Pumpkin Subscription and have the creative fun shipped directly to you.  With fun projects, complete videos and step-by-step picture tutorials any one can have a BLAST Creating in the comfort of their own home.  Contact ME and come to our Paper Pumpkin classes and create something wonderful.

**  SHOP 24/7 with me while Earning BONUS Frequent Buyer Points!!   If you enjoy this project and want to have some fun crafting with me, CLICK HERE and RSVP ASAP for my Upcoming Classes!!  Most classes are FREE with a qualified purchase!!

BOOK Your OWN Private Class that will Highlight the card styles or techniques you are interested in!  With my designing cards for YOU,Book a FUN Gathering of family and friends to create!  From fun Holiday Cards to Celebrations... YOU will earn ALL of the Hostess Benefits on ALL of the Purchases - perfect for stocking up to make cards all year long!! 
Inspired but this uber cute logo on my To-Go Ragamuffin Coffee Cup (I forgot my reusable cup - but I'm glad I did!).  This Real Red card stock frames out this cute cup for a great 3D accented coffee inspired card (they have great teas and cocoas too...).
My daughter is home sick today (we've been not 100% these past couple of days - but today I just had one of my kids home).  We grabbed a gluten free baked treat and a coffee for mom.  We were discussing their cute logo and decided to create something from it.  Cutting out a portion of the cup and trimming it down... we can create a fun 3D hand-crafted card.  RepPurposing this paper cup into a special hand-stamped card is a fun way to ReUse and not waste (my daughter is going to use the other part of the cup as a scoop!).
The July Paper Pumpkin kit had a fun collection of stamps that fit this hand-stamped card perfectly!  I love that the kits include the mini ink pad and a photopolymer stamp set that I can use over and over in a variety of ways!  Stamped with the Black Archival ink pad it looks so cute, the saying and 'steam' that perks up from this card.
Bows are soooo cute and soooo much fun to create!  Here with the Bow Builder Punch we created a cute little 3D bow that ties into the Ragamuffin Logo!  Using Hot Glue to adhere the cut cup and the punched bow it will stand up to handling.  
What do you think??  Please Share Me and This with a Pin, Email, Facebook post, Tweet.. and Join Me with a follow on these avenues like Pinterest and YouTubeInstagram, LinkedIn and Foursquare! Get even MORE Gettin' Crafty Stampin' with our Exclusive Mailing List and it's many rewards!! 

Create and send some cheer into the world!!  A hand-stamped card is a simple way to wow and bless others.  Here a personalized hand-crafted card, incorporating something special, allows me to have fun in crafting.  With a huge variety of rubber stamps, papers, tools and more paper crafting and memory documenting in our catalogs to our My Paper Pumpkin subscription boxes.. the creating is limitless!

Sunday, September 6, 2015

Wreath Love

I love decorating our home for the seasons!  We live in Southern California and don't really experience the seasons as others do.  Adding Autumn or Winter to our home is a fun way to bring in the holidays.  Here is the upcoming Wreath Class (Next Sunday, Sept 13th at 3:30pm - see the bottom to RSVP).  We will have fun creating a custom wreath from my Wall of Paper using the Vintage Leaves Bundle!!
Create this wreath with:
*Vintage Leaves stamp set (photopolymer 138802)
Into the Woods Designer Series Paper (138586)
Tangelo Twist card stock (133677)
Daffodil Delight card stock (119683)
Early Espresso ink pad (126974)
1-1/4" Burlap Ribbon (132140)
*Leaflets Framelits Dies (138283)
Big Shot Magnetic Platform (130658)
Big Shot Die-Cutting Machine (113439)
Branch Wreath
Hot Glue

*Bundle and Save 15% (140235) see below to Add this On with the Class!


**  SHOP 24/7 with me while Earning BONUS Frequent Buyer Points!!   If you enjoy this project and want to have some fun crafting with me, CLICK HERE and RSVP ASAP for my Upcoming Classes!!  Most classes are FREE with a qualified purchase!!

BOOK Your OWN Private Class that will Highlight the card styles or techniques you are interested in!  With my designing cards for YOU,Book a FUN Gathering of family and friends to create!  From fun Holiday Cards to Celebrations... YOU will earn ALL of the Hostess Benefits on ALL of the Purchases - perfect for stocking up to make cards all year long!! 
The beautiful thing about our Vintage Leaves Bundle is that it's perfect ALL Year Long!!  Use it with Designer Series Paper (like this Into The Woods) or on our card stock to bring in the seasons to fit the season or needs.  Inspired by our Vintage Leaves card class this wreath is another great way to use this bundle!  (Click Here to see a different version of this wreath!!).  
Create a fun play on an acorn with this Into the Woods Designer Series paper.  Have fun with your wreath!!  Let me show you some fun tricks and tips that will make your wreath fit YOUR Style!!

Take this class 
~  To-Go (Option C for Priority Shipping) is an option!  I'll send you the wreath, kit and a private Video Tutorial to create your own kit!  
~  Add on the Bundle if you haven't ordered it already (Option D) or 
~ RSVP and Take this Class IN PERSON - all of which is at the bottom of this post!!
Wrap your wreath!  Wrap the wreath along the inside and outside edges of the  side to give dimension and interest!  Going beyond just the front of your wreath will give you a better looking wreath!

I was super busy prepping for my Happy Scenes class so I had my 11 year old son die-cut these pretty leaves for me!!  I adore our Big Shot Die-Cutting Machine!!

Ask ME how YOU can get the Big Shot Die-Cutting Machine for FREE or 1/2 OFF!!  With a full collection from the one of the best catalogs in ages - you can be the first to enjoy the awesomeness and score the FREE Items when you book a Private Class with me!  Score the BEST Deal of $125 for only $99 and FREE Shipping when you take the starter kit home - a kit YOU Pick!!
What do you think??  Please Share Me and This with a Pin, Email, Facebook post, Tweet.. and Join Me with a follow on these avenues like Pinterest and YouTubeInstagram, LinkedIn and Foursquare! Get even MORE Gettin' Crafty Stampin' with our Exclusive Mailing List and it's many rewards!!

Leaving a legacy of love is fun to do!  I love showing my kids the value of decorating their lives to resemble an occasion or season!  I hope that my kids will look back on their childhood and smile at how we attempted to make memories and surround them in beauty.  Take this class and enjoy creating this wreath with us in-person or anywhere with the to-go!


Decorate the inside or outside of your home with a hand-crafted BY YOU wreath!  Using the Vintage Leaves BUNDLE we will create a beautiful custom wreath!  $35 for this branch wreath class that will welcome all who come and go while highlighting your skills!  CLICK HERE to see it and how taking the Vintage Leaves Card Making Class will SAVE YOU $20 on this class!! (Bring your items from the Vintage Leaves Card Making Class - your stamp set or your bundle or BUY them for this class!)

****This Class is immediately following our Stamper's 10 Club meeting - come and try the Stamper's 10 class and score two classes in one!***

~ Option A is the Autumn Wreath Class
~ Option B is SAVINGS if you have pre-ordered the Vintage Leaves Bundle
~ Option C is the Class and To-Go Shipping! Bundle is NOT included!!  Shipped Priority Mail
~ Option D is the Bundle pre-ordered if you want to own this must-have BUNDLE!


Autumn Wreath Options

Tuesday, April 28, 2015

Gold Birthday Wishes

Isn't it fabulous?  Sending a hand-stamped card, that while easy, is a beautiful birthday card brings me such joy!  With the Fabulous Four stamp set, our Bow Builder Punch, the Gold Foil Sheets and the amazing Birthday Bash Specialty Designer Series Paper this quick and easy card delivers a rich birthday greeting.  This was a HIT at our Recent Stunningly Colorful Cardmaking Crafternoon class - whew - Join Us for the Next Class on May 8th!
Create this Gold Flecked hand-stamped Birthday Card with:
Fabulous Four stamp set (wood 134171/clear 134174)
Bermuda Bay card stock (131197)
Gold Foil Sheet (132622)
Birthday Bash Specialty Designer Series Paper (137783)
Bow Builder Punch (137414)
Embossing Buddy (103083)
Gold Stampin' Emboss Powder (103129)
Versa Mark ink pad (102283)
Heat Tool (129053)
Hot Glue

**  SHOP 24/7 with me while Earning BONUS Frequent Buyer Points!!   If you enjoy this project and want to have some fun crafting with me, CLICK HERE and RSVP ASAP for my Upcoming Classes!!  Most classes are FREE with a qualified purchase!!

BOOK Your OWN Private Class that will Highlight the card styles or techniques you are interested in!  With my designing cards for YOU,Book a FUN Gathering of family and friends to create!  From funHoliday Cards to Celebrations... YOU will earn ALL of the Hostess Benefits on ALL of the Purchases - perfect for stocking up to make cards all year long!! 
To tell you that I love metallic accents is an understatement.  I adore them!  So rich and elegant but classic and timeless.  Here the Birthday Bash Specialty Designer Series Paper has an amazing collection of patterned paper with two sheets of gold foil accents.  Highlight those gold accents with our Gold Foil Sheets and the Bow Builder Punch.  

The secret to using this Bow Builder Punch is today's Tool Tip Tuesday!  I use the Bone Folder (102300), after punching the bow pieces, to curl the edges.  Use either the Fast Fuse adhesive (129026) or Hot Glue to adhere the pieces together.  The thinner the paper the easier to use the Fast Fuse Adhesive - I opted for Hot Glue when adhering this thick gold bow.  It is important to curl the edges with every paper and use a strong adhesive to hold it all together.  (I did use Glue Dots but find that it is too thick in the end.)
So rich and elegant!!  This coordinated gold accented card is easy to add an additional layer of WOW.  

TWO 'Fer as my Dad would have said - this is a DOUBLE Tool Tip Tuesday option!!  (I'm Generous like that - lol)  Create a premium heat embossed image when you do this:  Using the Embossing Buddy (a MUST when ever I am heat embossing) to wipe and prep the surface of the card stock.  Stamp the image you wish with Versa Mark ink.  Cover liberally with Gold Embossing Powder and shake off the excess.  Brush off anything that maybe 'extra' to the stamped image.  Hold the Heat Tool at a 45* angle and don't move the heat gun until that area has changed/set.  Easy but WOW!!
What do you think??  Please Share Me and This with a Pin, Email, Facebook post, Tweet.. and Join Me with a follow on these avenues like Pinterest and YouTubeInstagram, LinkedIn and Foursquare! Get even MORE Gettin' Crafty Stampin' with our Exclusive Mailing List and it's many rewards!!

What a FUN, Easy and Dynamic hand-crafted card!!  Wrap up someone's birthday with elegance and joy when you send a hand-stamped card like this.  It's easy to create this card, the 4" square paper and 1/2"x4" strips of Gold Foils Sheets, topped with the Gold Foil hand-crafted bow (really - how awesome is this?!?!) pulls together a festive and beautiful birthday card.  My kids (and those who take my class) are known to refer to heat embossing as 'magic' - the beauty astounds everyone who does it (I hadn't done it in a while - what a joy to start again).

Saturday, January 10, 2015

It's Your Day hand-stamped bow card

I love the 1950's.. I wasn't around then but the visions of poodle skirts, pink bows, black and white patterns and the introduction of Rock 'n Roll (Rock Around the Clock is a favorite bop from Happy Day's - lol to Churck Berry, Buddy Holly and more!!).  This Strawberry Slush In-Color reminds me of the pink accents of the 1950's, the black and white punched bow.. it makes for a sweet celebration hand-stamped card.  Add the cool accent of our new Chalkboard Paper and Chalk Ink for a groovy and hip hand-crafted card.
Create this sweet chalk-board inspired hand-stamped bow card with:
Big On You stamp set (137151)
Strawberry Slush card stock (131295)
Back to Black Designer Series Paper (133700)
Rose Coral Chalk Ink Pads (138091)
Chalkboard Paper (137786)
Bow Builder Punch (137414)
Stampin' Dimensionals (104430)
 Hot Glue

**  SHOP 24/7 with me while Earning BONUS Frequent Buyer Points!!   If you enjoy this project and want to have some fun crafting with me, CLICK HERE and RSVP ASAP for my Upcoming Classes!!  Most classes are FREE with a qualified purchase!!
BOOK Your OWN Private Class that will Highlight the card styles or techniques you are interested in!  With my designing cards for YOU,Book a FUN Gathering of family and friends to create!  From funHoliday Cards to Celebrations... YOU will earn ALL of the Hostess Benefits on ALL of the Purchases - perfect for stocking up to make cards all year long!! 
The matte look of this STUNNING Chalk Paper makes me giddy!  Silly but true - kind of like finding a fabulous new pair of shoes - on sale - lol!  This two sided paper has a regular black on one side, the Chalk Board side to the other.  The Chalk side is very rich and matte making for a unique background that actually has it's own depth.  Stamp with the New and Awesome Chalk Ink Pads for a real Chalk-Board look that won't brush off!  Here the Rose Coral Chalk ink pad really works with the Strawberry Slush in-color card stock.  Raise it with the Stampin' Dimensional Adhesive.

The new Bow Builder Punch makes for the CUTEST Bow!!  Love this cute and easy punch that can take a collection of papers and create a stunning hand-crafted bow accent!  Use Hot Glue (carefully) for a sturdy accent on your hand-stamped card that will hold up to mailing handling.   
The Chalk Ink really does look like a chalk writing from your local sandwich place or coffee shop - doesn't it??  I love this cool, trendy accent.  The Big On You stamp set from the Occassions Mini Catalog makes for a quick but cool card.  With large sayings - that say it all (lol) - you can deliver a hand-stamped card showing who is important and with style!

What do you think??  Please Share Me and This with a Pin, Email, Facebook post, Tweet.. and Join Me with a follow on these avenues like Pinterest and YouTubeInstagram, LinkedIn and Foursquare! Get even MORE Gettin' Crafty Stampin' with our Exclusive Mailing List and it's many rewards!!

'Put a bow on-top and call it a day' is what my Nanna would say.  This hand-crafted card gives you some cool accents in the Chalk Board paper and ink to the punched Bow.  The Occasions Mini Catalog has come out and YAY! I really, really love it!  With wonderful collections of stamps, tools and papers/inks you can have a BLAST creating and sending some love and cheer - in a hand-stamped card.  See how to Score FREE Stamps, Papers, Project Life and More with a minimum purchase!!  Bless others with a pretty hand-crafted card - Join Me in this small measure of love that will bless in a big way!

Thursday, December 11, 2014

Stunning Paper Cone Vintage Wreath Ornament

'Tis the season for decorating and gift giving.  This Paper Cone Wreath Ornament is the perfect combination of the two!  Easy to create, with a huge variety of designs in our Designer Series Paper you can create the perfect decoration and gift for all those special people on your list!  See the fun video tutorial on how to create this or Join the FREE CLASS Next Week to deliver a free ornament.
Create a stunning paper cone wreath ornament with:
Typeset Specialty Designer Series Paper (133704)
Basic Black card stock (121045)
Silver Glimmer Paper (135314)
Silver 5/8" Satin Ribbon (134548)
Rhinestone Basic Jewels (119246)
2-3/8" Scallop Circle Punch (118874)
Large Oval Punch (119855)
Little Letters Thinlits (133730)
Banners Framelits (132173)
Snowflake Card Thinlits Die (135855)
Big Shot Magnetic Platform (130658)
Big Shot Die-Cutting Machine (113439)
Fast Fuse adhesive (129026)
Silicone Craft Sheets (127853)
Hot Glue
 
**  SHOP 24/7 with me while Earning BONUS Frequent Buyer Points!!   If you enjoy this project and want to have some fun crafting with me, CLICK HERE and RSVP ASAP for my Upcoming Classes!!  Most classes are FREE with a qualified purchase!!
 
BOOK Your OWN Private Class that will Highlight the card styles or techniques you are interested in!  With my designing cards for YOU, Book a FUN Gathering of family and friends to create!  From fun Holiday Cards to Celebrations... YOU will earn ALL of the Hostess Benefits on ALL of the Purchases - perfect for stocking up to make holiday cards!! 
It's an understatement to say how much I love our top quality Designer Series Paper!!  It's versatile and there are so many options - you can customize to coordinate with a person's style or set the mood to a card with colors and patterns.  I love, too, that our Designer Series Paper is double sided.  Did you know that it's cutting edge style?  With modern colors and patterns it is contemporary and stylish.
 
See this Video Tutorial on creating this Paper Cone Wreath Ornament:
I hope that you enjoyed this Video Tutorial. Don't forget to Sign Up and Follow my Gettin' Crafty Stampin' YouTube Channel.
Technique Thursday is a fun way to learn a new and quick WOW Technique.  This week's Technique Thursday has a fun Video Tutorial on this very Paper Cone Wreath Ornament.
 
Here cutting one sheet of the Typeset Designer Series Paper into 3" squares gives me one ornament per sheet!  I love that there is no waste.  Create these paper cones using the Fast Fuse adhesive (I tried the SNAIL adhesive but it didn't stay adhered).
You, too, can join in on this fun and FREE Class!  It's super easy and the results are WOW-tastic! 
 
Build the wreath when you use the Silicone Craft Sheet to pool hot glue and create this hand-crafted wreath ornament.  I just love our Silicone Craft Sheets!!  See how easy it is to create this on the Video Tutorial above.
Adding sparkle with the Silver Glimmer Paper and the Little Letters Thinlits to spell just what you want to say.  Here JOY Says it all and while sparkling!!
 
The Snowflake Card Thinlits has this great tree punch - added over the 2-3/8" Scallop Circle Punch in Basic Black and the Basic Black Banners Thinlits allow the Silver Glimmer pieces to shine with the proper contrast to frame it.
 
Dashes of sparkle with the adhesive backed Rhinestone Jewels through the hand-crafted ornament.
Adding a second 2-3/8" Scallop Circle Punch to the back of the hand-crafted paper-cone wreath ornament to support it.
 
The rich elegance of using our amazing Silver Satin Ribbon gives a wonderful and coordinated hanging loop.  This is great for your own tree or as a gift!
What do you think??  Please Share Me and This with a Pin, Email, Facebook post, Tweet.. and Join Me with a follow on these avenues like Pinterest and YouTube, Instagram, LinkedIn and Foursquare!  Get even MORE Gettin' Crafty Stampin' with our Exclusive Mailing List and it's many rewards!!
 
Deliver a hand-crafted, vintage, paper-cone wreath ornament for those great people in your life.  From your coworkers, boss, family, friends, neighbors, teachers and more - this gift is universal (if you can find the ability to part with them).  I love giving a personalized, hand-crafted gift that fits the style and personality of my loved ones.  With no waste, this pretty ornament comes from one sheet of double sided, stunning Designer Series Paper.  I hope that you enjoyed this video tutorial on the Technique Thursday... please like and share me with your family and friends (and Join Us at the upcoming class).

What Others are SAYING about Getting Crafty with Jamie

Jamie is so passionate and creative about making cards - and wants everyone else to join her in the fun! She is so encouraging and positive in her attitude, helping me along when I get frustrated - and then rejoicing with me at the finished product! I love going to her classes to get new ideas, learn techniques, and have loads of fun in the process. ~ Christine C.

Jamie has wicked awesome classes! If you don’t like a particular stamp or paper/ink color Jamie wants you to change it to suit your style! I did my sister-in-law’s entire bridal shower from invitations/thank you cards, party favors to decorations, it was quaint and whimsical! Everyone ooh’d and ahh’d! I’ve had lots of special requests for classes and Jamie delivers; she always has tasty treats and flavored coffees too ~Ashley W.

I have been attending Jamie's classes for over a year. Her ideas for cards are fresh and fun. She always tries to have several different styles of cards available, so everyone gets to make cards that fit their personal style. The techniques she shows each class can be used in many different applications. She is very patient teacher when instructing class members on how to use the Stampin Up products. ~ Carol D.

If I looked up the word sparkle in the dictionary, I would find Jamie Albanese picture there. I have had the sweet blessing of knowing Jamie and her family for over 5 years now. Every time I am with her I feel loved and inspired. When I am in one of her classes I feel my creative juices flow, as she encourages me to go outside my comfort zone. Jamie helped our girl scout troop make cards for a soldier who needed some encouragement!!! For any of you who have not been in one of Jamie's classes, please don't let another day slip by. She is a beautiful friend and she will become yours too. ~ Blessings, Karen:-)

Jamie has a great eye for style and flair, and it shows in her work. Yet she can pick up on your own individual style and makes great recommendations. I love that she is always flexible for last-minute decision maker mommies like me! So much fun to host craft events with your friends and family - that personal touch always means so much. ~ Adonna

Total Pageviews