Showing posts with label Beary Cute. Show all posts

Monday, December 4, 2023

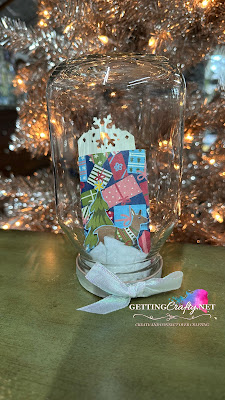
Create a Snow Globe Gift Card / Decor Use Up Your Stampin’ Up! Scrap Paper

I love creating this Snow Globe of a Gift Card Holder... our Twelve Crafty Days of Christmas is BACK (I was just so tired and returned home to homegroup, chaos and homeschool stuff).  This was an adaptation or recreation of a fun gift that was gifted to me years ago... and I now want to create a ton of them!  I don't know about you... but I am that type of mom who collects these 'good' boxes and jars lol.. and now that we live in the Amish area of America (Indiana) we are stocked with a wide variety of picked goodies that we nibble upon... and I now store as 'good' jars!!  Create this with me.. the measurements, supplies and even some goodies I recommend for your crafting are listed below. Join us on our FIFTH of the Twelve Crafty Days of Christmas where you will WOW others this holiday season and even have a chance to WIN a NEW Stampin' Cut & Emboss Machine! 

Disclosure: Links contain affiliates. When you buy through one of our links we will receive a commission. This is at no cost to you. Thank you for supporting Getting Crafty with Jamie and allowing us to continue to bring you valuable content.

Getting Crafty November/December 2023 

*Hostess Code Z9R9YPAC
- JUST COPY & PASTE THIS CODE

**OR... If you Order $150 or more - Score the Hostess Shopping Spree !!


Create this Create a Snow Globe Gift Card / Decor Use Up Your Stampin’ Up! Scrap Paper Video Tutorial 
I hope that you enjoyed this Video
Don't forget to Sign Up and Follow my Getting Crafty YouTube Channel 

Catch our weekly LIVES and Videos on
If you are like me.. you can see the ENDLESS possibilities to this FUN craft! It's LITERALLY a Gift within a Gift that is great to display.
Recipe:
~  2"x6" of a Window Sheet adhered with the Hot Glue Gun to the inside of the lid.
~  4"x5" Sheet of Beary Christmas Designer Series Paper 
~  Score, along the 5" side, at 2-1/4" and at the 1/2" flap, wrapping to and adhering it with Tear Tape or Multipurpose Liquid Adhesive.
~  Fussy Cut the critters out.
~  Adhere the envelope and critters to the Window Sheet with Tear Tape, Hot Glue and/or Stampin' Dimensionals.
~  Add 'snow' and here I'd suggest tissue or gift tissue paper.

Spice it Up:
~  Create a pull out Gift Tag/Gift Card holder... 2"x5-1/2" of Very Vanilla card stock, scored along the bottom at 1/2" strip.
~  Using the Sparkling Snowflake punch across the top.

NOW you have this cute area to write a note and it makes it easy to pull out the gift tag.
I love small and big ways to simplify my crafting... and when Stampin' UP! creates the CUTEST Designer Series Paper... with sheets of the cutest critters that would be GREAT when cut out... I wanted a faster and easier way to do so.  Between the cards I create to the classes I teach... I love that the Scan N Cut can do that and more!  A worthwhile investment... I needed something that made for easy creating.  I added the cordless hot glue gun... and let me tell YOU... it's dreamy!!
Disclosure: Links contain affiliates. When you buy through one of our links we will receive a commission. This is at no cost to you. Thank you for supporting Getting Crafty with Jamie and allowing us to continue to bring you valuable content.
 What do you think??  Please Share Me and This with a Pin, Email, Facebook post, Tweet.. and Join Me with a follow on these avenues like Pinterest and YouTubeInstagram, LinkedIn and Foursquare! Get even MORE Getting Crafty and Stamping with our Exclusive Mailing List and it's many rewards!!

Friday, December 1, 2023

Create a Custom Size Gift Bag! Use up your Stampin’ Up! scrap paper..

When heading off to a friend's home for a visit... I have LITERALLY had this gift for over a year.... so I wanted to create for my dear friend a custom gift bag!  Now YOU are welcome along for the ride.... as I share with YOU my creating a Custom Gift Bag to fit most any average size gift you may have and FROM our Scrap Paper!! Join us on our FOURTH of the Twelve Crafty Days of Christmas where you will WOW others this holiday season and even have a chance to WIN a NEW Stampin' Cut & Emboss Machine!

Getting Crafty November/December 2023 

*Hostess Code Z9R9YPAC
- JUST COPY & PASTE THIS CODE

**OR... If you Order $150 or more - Score the Hostess Shopping Spree !!


Create this Create a Custom Size Gift Bag! Use up your Stampin’ Up! scrap paper..  Video Tutorial 
I hope that you enjoyed this Video
Don't forget to Sign Up and Follow my Getting Crafty YouTube Channel 

Catch our weekly LIVES and Videos on
I simply LOVE using up my Scrap Paper!  I also dislike having to purchase a gift bag when they look cheap or are boring.... ESPECIALLY when I have a few pages of spare Designer Series Paper scrap pages!
Knowing that this is a gift within a gift... and will custom fit our gift... I FEEL like a super hero when I gift wrap this WHILE using up my scrap paper!
Recipe:
~  Using TWO matching Designer Series Paper sheets 12"x12" measure the item you are wrapping... here it is 6"x4" coffee mug and matcha tea container.
~  Here I scored these, while stacked on one another, on the Simply Scored board. I scored at 3" and 9" along the sides, 1" at the top and turn 180*, scoring 8" for the bottom.
~  Using my Paper Snips, I cut UP, from the bottom, to create the 'legs'.
~  Using my Bone Folder, I make a firm impression along all of the score lines.
~  Adhere the 'legs' in to the base of the bottom and tuck it into the second sheet's version of the same (sorry - you will need to see the video to see what I'm trying to say lol...).
~  Adhere the sides and apply a 7"x5" side panel to each side to cover any adhesive errors but also to secure the bag with additional support.
~  Using a handheld circle punch to punch the sides and create a handle with the Night of Navy and Gold Sparkle ribbon.
Spice it UP:
~  Using the coordinating Beary Christmas Bundle you can create the CUTEST Bear Tag even!
(I just love coordinating products that make ME look talented without much effort!)
 What do you think??  Please Share Me and This with a Pin, Email, Facebook post, Tweet.. and Join Me with a follow on these avenues like Pinterest and YouTubeInstagram, LinkedIn and Foursquare! Get even MORE Getting Crafty and Stamping with our Exclusive Mailing List and it's many rewards!!

Thursday, September 14, 2023

Surprise Double Fancy Fold Stampin’ Up! Card Making

I love a good WOW... and this easy and fun Fancy Fold comes together to be a 'Bear Hug' type of card!  Here we celebrate this adorable A Walk in the Forest Designer Series Paper that LITERALLY GIVES BACK $3 for every purchase to the Marine's Toys for Tots and I just LOVE that!  Having Military family and friends, I've seen the outpouring of love that this mission has done... being a small part of it in our crafting and card making makes me feel beary happy!

Created during our Tuesday Live you can catch this full tutorial, supplies, measurements and video below.  
https://www.facebook.com/GettingCrafty.net
https://www.youtube.com/c/JamieAlbanese/videos
Make sure YOU join us, Subscribe and Hit that Bell so that you can enjoy the many opportunities to create and connect over card making and crafting.

Getting Crafty September 2023 

*Hostess Code JSNUZ6DE
- JUST COPY & PASTE THIS CODE

**OR... If you Order $150 or more - Score the Hostess Shopping Spree !!


Create this Surprise Double Fancy Fold Stampin’ Up! Card Making! Handmade Video Tutorial 
I hope that you enjoyed this Video
Don't forget to Sign Up and Follow my Getting Crafty YouTube Channel 

Catch our weekly LIVES and Videos on
https://www.facebook.com/GettingCrafty.net
https://www.youtube.com/c/JamieAlbanese/videos
This is the CUTEST and easiest of cards to create!  
Perfect to mail a bear hug and a smile this Christmas!
I love that this double sided paper really delivers the cutest card!
Recipe:
~  Pretty Peacock card stock 8-1/2"x11", score along the 8-1/2" on each side at 2-1/8".
~  Turn 90* and score at 5-1/2".
~  Using the Paper Trimmer to trim off the two 'top' outer rectangles.
~  Make an impression with our Bone Folder.
~  Adhere the Basic White to the inside flaps at 2"x5-3/8" and the coordinating Designer Series Paper at 1-7/8"x5-1/4".
~  Stamp the INSIDE Basic White card stock 5-1/4"x 4" with the coordinating Pretty Peacock and Garden Green ink pads and the Beary Cute bundle.
~  Decorate the front flap with the 4"x5-1/4" Basic White and 3-3/4"x5" A Walk in the Forest Designer Series Paper.
~  See my Video Tutorial on the CUTEST Sassy Bow that is SO EASY with the Iridescent Ribbon and Mini Glue Dots.
~  Fussy Cut or Punch with the Bear Punch the Brown Bear (a nod to the bears I grew up with in California!).
~  I love how he's peaking into the card on the inner bonus fun fold flaps!

People are at the heart of what we do! Each year with our product giveback program, we look to support organizations in our communities that strive to make a positive difference for those in need. This year we’re supporting Marine Toys for Tots in the United States and Salvation Army in Canada.

Our featured product is A Walk in the Woods Designer Series Paper (item 162377), which you can find in the September–December 2023 Mini Catalog. For every paper sold, we will donate $3 USD  to a variety of charities throughout our global community.

Many of us have found ourselves in circumstances where we’ve needed some extra help and have been so grateful for the generosity of others. And we hope that you will join us in our efforts to give back!

I love how quick, fun and easy this handmade card is.  Perfect for ANY occasion but delivering a WOW with a Christmas Card!
What do you think??  Please Share Me and This with a Pin, Email, Facebook post, Tweet.. and Join Me with a follow on these avenues like Pinterest and YouTubeInstagram, LinkedIn and Foursquare! Get even MORE Getting Crafty and Stamping with our Exclusive Mailing List and it's many rewards!!

What Others are SAYING about Getting Crafty with Jamie

Jamie is so passionate and creative about making cards - and wants everyone else to join her in the fun! She is so encouraging and positive in her attitude, helping me along when I get frustrated - and then rejoicing with me at the finished product! I love going to her classes to get new ideas, learn techniques, and have loads of fun in the process. ~ Christine C.

Jamie has wicked awesome classes! If you don’t like a particular stamp or paper/ink color Jamie wants you to change it to suit your style! I did my sister-in-law’s entire bridal shower from invitations/thank you cards, party favors to decorations, it was quaint and whimsical! Everyone ooh’d and ahh’d! I’ve had lots of special requests for classes and Jamie delivers; she always has tasty treats and flavored coffees too ~Ashley W.

I have been attending Jamie's classes for over a year. Her ideas for cards are fresh and fun. She always tries to have several different styles of cards available, so everyone gets to make cards that fit their personal style. The techniques she shows each class can be used in many different applications. She is very patient teacher when instructing class members on how to use the Stampin Up products. ~ Carol D.

If I looked up the word sparkle in the dictionary, I would find Jamie Albanese picture there. I have had the sweet blessing of knowing Jamie and her family for over 5 years now. Every time I am with her I feel loved and inspired. When I am in one of her classes I feel my creative juices flow, as she encourages me to go outside my comfort zone. Jamie helped our girl scout troop make cards for a soldier who needed some encouragement!!! For any of you who have not been in one of Jamie's classes, please don't let another day slip by. She is a beautiful friend and she will become yours too. ~ Blessings, Karen:-)

Jamie has a great eye for style and flair, and it shows in her work. Yet she can pick up on your own individual style and makes great recommendations. I love that she is always flexible for last-minute decision maker mommies like me! So much fun to host craft events with your friends and family - that personal touch always means so much. ~ Adonna

Total Pageviews