Wednesday, October 30, 2013

Fall Flower Wishes

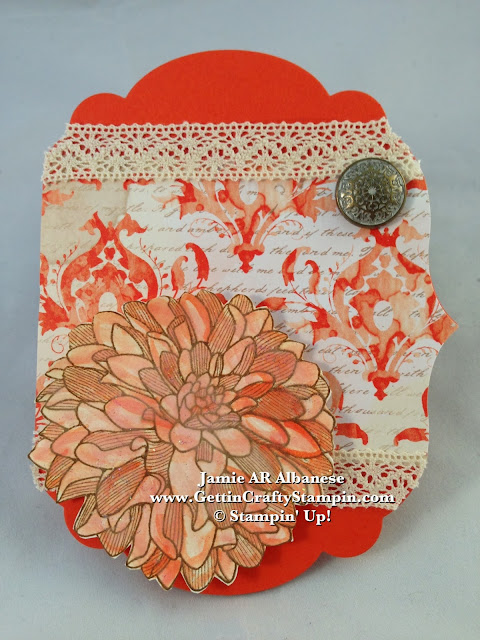
Inspired by the wallpaper my grandparents had in their home, this vintage Fall flowered card is sure to deliver sweet greetings!  I couldn't resist doing something fun and different with this card that still lent itself to the elegance of the design... Take a twist  when you create a shaped card!!
 
What do you think?!?!  Leave me a comment and let me know!  Share this and me with your friends and family... Pin, Email, Facebook, Tweet, Google+ this and FOLLOW ME on these avenues, YouTube, Instagram, LinkedIn and more!
To create this card you will need:
Venetian Romance Designer Series Paper (#130144)
Very Vanilla card stock (#101650)
Tangerine Tango card stock (#111349)
Tangerine Tango stamp pad (#126946)
Crisp Cantaloupe stamp pad (#131176)
Soft Suede stamp pad (#126978)
Aqua Painter (#103954)
Dazzling Details (#124117)
Antique Brads (#117273)
Victoria Crochet Lace Trim (#118481)
Regarding Dahlias stamp set (#130324)
Labels Collection Framelits (#125598)
Adhere the Venetian Romance Designer Series Paper to the front of the Tangerine Tango card.  Run through the Big Shot Die-Cutting Machine and the largest of the Label Collection Framelits.... making sure to leave the folded edge with area for the seam to remain intact.
 
Stamping the Regarding Dahlias flower on Very Vanilla card stock with the Soft Suede ink ties in the pretty patterned Venetian Romance paper. 
 
Paint, with the Aqua Painter, Crisp Cantaloupe across the leaves in the direction they flow.  Then go and do the same with the Tangerine Tango ink accenting the edges of the leaves.. this doesn't take long, creating a soft water colored flower. 
 
Adding sparkle with our Dazzling Details Glitter Adhesive is easy when you place a drop in the lid of the Antique Brads and use the Aqua Painter to blend across the flower. 
 
Cut out with our Paper Snips for a flower that appears to move.  Layer it with Stampin' Dimensional adhesive so it raises above the pattern while coordinating with it.
Add the Victoria Crochet Trip to the edges for a blended edge that continues the vintage look.  Tucking the Antique Brad so that the edges open under the Venetian Romance Designer Series Paper... a beautiful accent.
Stamping inside this card has left a ton of room to write a note.  The shape of the card is a fun twist on your standard card.
Celebrate the Fall Season when you send a friend this fun, fast and vintage card.  I love this paper, stamp and how it all comes together, don't you??
 
I love that you came by today!  Please come back often, visit and bring others with you.  I try to post daily... so join me in this crafting walk we call life!
 
Vintage wall paper inspired this fun and vintage card.. what will inspire YOU??  Leave me a comment and let me know!  Do something fun and different when you celebrate your friendship and in the season's colors!  Happy Fall Y'all!!

Tuesday, October 29, 2013

Rudolph Punch Art Card

I grew up and didn't celebrate Santa at Christmas but I did love the Rudolph the Red Nosed Reindeer Claymation movie... so bringing back memories or old.. I created this fun Reindeer to celebrate the moment when Rudolph sees his red nose and how he can use it to help Santa - lol. 
 
What do you think?!?!  Leave me a comment and let me know!  Share this and me with your friends and family... Pin, Email, Facebook, Tweet, Google+ this and FOLLOW ME on these avenues, YouTube, Instagram, LinkedIn and more!
The teens that attended a recent Private Class enjoyed creating this card!  Here with a few simple punches this little guy comes to life!  Items Needed:
Crumb Cake card stock (#120953)
Chocolate Chip card stock (#102128)
Real Red card stock (#102482)
Basic Black card stock (#121045)
Very Vanilla card stock (#101650)
Big Shot Die-Cutting Machine (#113439)
Lattice Bigz Die (#115958)
Small Oval Punch (#120908)
1" Circle Punch (#119868)
3/4" Circle Punch (#119873)
White Stampin' Chalk Marker (#132133 Holiday pg. 20)
Layer the face out so that you can make hi cross eyed, looking sky ward, to the side... it's a fun way to add a feeling to this whimsical card.  Cut the Small Oval punched mouth to create a smile, etc.
 
Adding a hand-drawn quality to this card by accenting the eyes and nose with the new White Stampin' Chalk Marker from the Holiday Mini pg.20.
Cutting the Lattice cut card stock for these cute antlers.  I tucked one point behind the Chocolate Chip card stock to have it overlap a little like ears would.
This fun and quick card is sure to delight all who receive it.  Have fun celebrating childhood memories when you send a light hearted Christmas card like this!
 
I'm so excited that you came by today!  Come back often as I post daily!  Bring your family and friends along for this fun crafting ride!
 
Do YOU want to have a fun filled class with our family and friends?  Consider a Private Class and reap the rewards of being a Hostess with the Mostest... fun!!  Don't want to be a Hostess?  Join ME in one of my many fun and upcoming classes that are waiting for YOU!  RSVP ASAP!
 
I remember laying on my stomach on my Nanna and Pappa's mauve colored carpet watching the large tv while the adults played cards, backgammon or dominoes on TV trays.. this card brings back a snapshot of happy memories..  and will be sent to hopefully do the same for others.  Take others with you on a memory path... and share the warmth of our childhood memories.  Can't you just hear that shining sound when his nose lit up? (Me, too, lol.)

Raffle for Bonus Foil Paper!

Place an Order with Me, before Noon TOMORROW (10/30) will be Entered in a drawing for a BONUS Packet of our new Foil Paper (the winner can pick Silver or Gold)! 


Load up for the Holidays, gifts, cards, and more..


Monday, October 28, 2013

Go ahead, Put Your Name On The List!

He's checking his list... is your name on it?? 
Do YOU want Fun Exclusive Tutorials, Exclusive Deals, Bonus Offers and Crafting FUN sent right to YOUR Mail (email) Box?!?!
Whether you were naughty or nice this year... you can still get the gifts that being on the
Gettin' Crafty Stampin' Mailing List gives you!!
Receive 3 Bonus WOW Tutorial Projects
Exclusive Newlsetter with Exclusive Bonus Projects
Gifts, Discounts and MORE offered only to the Gettin' Crafty Stampin' Mailing List Members!!
 
Sign Up and Jump into the 12 Weeks of Christmas Projects email BONUS, too!!  Hurry, don't miss a day of fun!
 
So Go Ahead, sign yourself up to receive awesome crafting emails and look forward to opening your in-box!!
 

Holiday Card Consultant

Do YOU want to send out Custom, WOW Holiday Hand Stamped Cards this Year??  Running out of Ideas or Have toooo many to chose from??  Sit with an Award Winning Card Maker and Paper Crafter, ME, for a Private Exclusive Consultation where I will design two cards to your style for YOU to create!  These will NOT Be re-created or duplicated elsewhere! 
As a Designer and Artist in the Paper Crafting field I love designing on-of-a-kind originals that WOW!
Are you traditional?
Elegant? Vintage? Minimalistic? Bold? Conservative?
Trendy? Fashion-forward? Country?
Add Custom Envelopes, too!!
Whimsical? Child-At-Heart??
No matter YOUR Style Hire ME to help You in a custom design that is going to reflect your style while Wowing ALL who receive the cards!!
With fun options, it's limitless the style you can create.  I will sit with you for a 30 minute consultation, design 2 cards per our consult and give you the PDFs on the creation(s) you chose!!
ALL for only $47!
 
Don't delay, my calendar is filling and fast!  I've created cards for Personal, Corporate, Weddings, Birthdays, Celebrations and more (that have all been WOW'd and owned by the customer)!  Let me help You WOW all who receive these custom hand-stamped cards! 
 
Contact Jamie at (805)300-3679 cell/text or email me at Jamie@GettinCraftyStampin.com for this in-person or virtual appointment, creations and designs that YOU will Own! 
Space on my calendar is filling and FAST... don't delay, schedule your appointment with me TODAY!

Merry Christmas in Silver and Blue!

Silver and Blue.. what a rich and vintage combination!  Celebrate classic moments and memories this Christmas.  Add a trendy and fun look to stand out from the crowd when you have an unusual sized card and a patterned envelope to fit!
 
What do you think?!?!  Leave me a comment and let me know!  Share this and me with your friends and family... Pin, Email, Facebook, Tweet, Google+ this and FOLLOW ME on these avenues, YouTube, Instagram, LinkedIn and more!
Going for a fun and unusual sized card you need:
O Holy Night stamp set (#131832 Holiday pg.33), Smoky Slate card stock (#131202),
Shimmery White card stock (#101910),
Smoky Slate Stamp Pad(#131179),
Midnight Muse Stampin' Write Maker (#126856),
Midnight Muse card stock (#126860),
adhesive backed Rhinestone Basic Jewels (#119246),
Silver Ribbon (#132137 Holiday pg. 28)
Create this card when you cut this 3-1/2" by 9" card stock and fold at 4-1/2".  Save the cut off portion for another card!
 
Stamping this O Holy Night stamp into Smoky Slate ink and then color Merry Christmas in Midnight Muse with the Stampin' Write Marker.  This will have a slightly streaked and multi-colored looking image but this lends towards the vintage look.  Layer the piece over a Midnight Muse card stock for a coordinated, framed look!
 
Adding the North Star stamp above it and accenting with this adhesive backed Rhinestone Jewel for an elegant touch.  (Sometimes less is more.)
 
Tie this silver ribbon (#132137 Holiday pg. 28) for a simple but elegant accent.
Create a Custom Envelope with our Envelope Punch Board (#133774) and the Winder Frost Specialty Designer Series paper (#132341).  This paper is double sided allowing for a coordinated pattern 'envelope liner' which is a rich accent.
 
Save $$ when you can create custom sized envelopes (over 66 sizes!) with the scraps of paper you have laying about.  Specialty envelopes can be so pricy and hardly as pretty!!
This card reminds me of singing carols, holding my Pappa's hand... time has since passed and he is looking down on us with a smile.  This card brings back great memories to share with those on my list!
 
It's a blessing to have you by today!  Remember that I post daily to my blog.  Sign Up for the Gettin' Crafty Stampin' Mailing List to have Exclusive Tutorials and Projects sent directly to you, in addition to the 12 Weeks of Christmas BONUS Projects!!
 
Don't Miss out on my Upcoming Holiday Card Classes and be ready before the holiday crush!  CLICK HERE to see the Full Line-Up of my Upcoming Classes or CLICK HERE to Pick a Private Class of your own and earn Exclusive Hostess Benefits while I bring the Fun to YOU!
 
Have fun with this classic combination of Silver and Blues for the Christmas Season!  Ring in the holidays with the sparkling elements that show how you care.  Pull up your family favorite recipes and celebrate memories, old and new, this Holiday Season!

Silver and Red Poinsettia Hand Stamped and Embossed Card

Card Making and Paper Crafting follows style trends... and the big trend in fashion, right now, is Metallic Accents!  What a fun accent to incorporate into your Holiday Cards this year!!  Here is a fun and easy way to emboss in two ways adding a splash of fun silver!!
 
What do you think?!?!  Leave me a comment and let me know!  Share this and me with your friends and family... Pin, Email, Facebook, Tweet, Google+ this and FOLLOW ME on these avenues, YouTube, Instagram, LinkedIn and more!
This stamp Joyful Christmas poinsettia stamp set (#131802 Holiday pg. 27) has been in demand this year... and was requested for a Private Class that Christine and June held for a Neighborhood Party!  A fun, festive and elegant card that is quick to create!
Using Real Red card stock (#102482),
Silver Foil sheets (#132178 Holiday pg. 28),
Silver Embossing Powder (#109131),
Heat Tool (#129053),
adhesive backed Rhinestone Basic Jewels (#119246),
Petals-a-Plenty embossing folder (#116824)
you can create this card in a matter of minutes!
Embossing the Silver Foil, this creates a fun and elegant base for this Heat Embossed poinsettia.  Using my Paper Snips (#103579) to cut this holiday flower out it stands above using the Stampin' Dimensional adhesive (#104430).
Using the adhesive backed Rhinestone Jewels in two ways... coloring red with my permanent marker for one and then leaving in its original crystal look... which do you prefer??
Creating an elegant and fun card is a great way to prepare for the Holiday Season!  Sending rich, festive greetings that is sure to WOW all who receive it!  I have tried year after year to grow the poinsettia flower.. my Nanna had a knack for growing them... but haven't' had luck yet.  This card brings back memories of walks with my Pappa in the garden and seeing these beautiful red blooms come to life.
 
I'm so glad you came by today!  Remember to visit often as I post daily!  Bring your friends and family along to join in on the fun!  Sign up for MORE of Gettin' Crafty Stampin' when you join the Mailing List with Exclusive projects and tutorials!  Just in time to enjoy my 12 weeks of Christmas Projects, too.
 
Go ahead, grab your sparkling holiday wear and then style a card that is sure to be the envy of all who see it!  Adding Metallic accents, like Silver Embossing and Foil Sheets, creates a luxurious element that is sure to show you care!

Sunday, October 27, 2013

24 Hours Left....

Limited Time Offers can be 'Memory Post-It Notes'.. they stick initially but fall off at the most inconvenient time.. lol. 
 
A friendly reminder... Grab YOURS!!  25 Stamp Sets at 25% OFF!!  This Offer ENDS in 24 Hours!! 
Secure them NOW... at this Great Savings!!
CLICK HERE to see the Awesome Stamp Sets
Click Here to ORDER when You Select Shop Now!!  All while earning Bonus Frequent Buyer Club Points!  The Rewards keep rolling in!!

Saturday, October 26, 2013

Surprise in the Mail!

For the FIRST THREE PEOPLE to Place an Order Today, With ME I will Send a SURPRISE Gift! 
Place an Order with me Via Jamie@GettinCraftyStampin.com or
Call Jamie at (805)300-3679 or
RIGHT NOW See All of Stampin' Up!'s Catalogs and Shop ON-Line
(Use Hostess Code QHSDAHDW at Check Out) When You CLICK HERE!
 

Give the Gift that Keeps on Giving!!

Are there those in your life that stump you on what to give them??  Do they have everything they need?  Give them the gift of adventure, laughter and crafting!  The Gettin' Crafty Stampin' Gift Certificate is a great gift to give for Paper Crafting, Classes, Supplies and MORE!
 
 
Who would YOU Give it to??  Give someone the gift of classes (on-line and in-person) but it does exclude CRPD classes.  Give them the gift of crafting supplies... any item in the catalog that they desire... and if you don't know exactly what they need?  They do!! 

Gift wrapped by Jamie, these Gift Certificates are Available Year Round, in Any Denomination and Exclusively through Jamie@GettinCraftyStampin.com 
 
Give a great Hostess Gift for those upcoming holiday parties to gifts for Gift Exchanges, a great way to get Friends to Join YOU for a Class, the Gift of an Adventure as they learn new techniques while having fun in one of the Gettin' Crafty Stampin' Classes!!  It's Limitless and sure to be appreciated!!  Give the gift that keeps on giving... and bless someone!!

Friday, October 25, 2013

Envelope Fun

A new favorite tool is the Envelope Punch Board... If you haven't played with it.. you so have to!!  I adore that I can take my scraps of pretty paper, wrapping paper, card stock and create beautiful Envelopes (cards, 3D gifts and so much more!!).
 
What do you think?!?!  Leave me a comment and let me know!  Share this and me with your friends and family... Pin, Email, Facebook, Tweet, Google+ this and FOLLOW ME on these avenues, YouTube, Instagram, LinkedIn and more!
Create 66 different sized envelopes... in addition to file folders (of limitless sizes), 3D Gifts and MORE!  Simply pick the size of card you want, cut the paper to the size and score along the guidelines and punch when you score... you, too, can create these fun projects in mere moments. See what this Envelope Punch Board (#133774) can do for you!
Folded for a cool envelope that, yes, is able to be mailed.  (To do so, you create and adhere the envelope closed, then place the address information on a white label so it can be clearly read.)
 
I planned to GIVE this envelope... so using the Very Vintage Designer Buttons (#129327) for a feminine, vintage accent.  Adhered with Glue Dots (#103683) and accented with the adhesive backed Large Pearl Basic Jewels (#125577) for an elegant accent.  Adhere ONLY the bottom half and now the envelope flap can tuck under the embellishment.
This Epic Day This and That Designer Series Paper (#130814) is oh so pretty!!  I LOVE it... a great mix of old and new, cool and classic... it is DOUBLE SIDED so it now has a color and pattern coordinated inside!  Here Jenna helped create this envelope at a recent class and with no prior experience had a blast!
Coordinated to the card it is sure to WOW... and this Epic Day This and That Designer Series Paper has great map patterned pages... perfect for this globe card.
Any page that fits your style can create a stunning and personalized envelope, card and more!! 
Again, it's limitless!!  Everyone has scraps of paper they've hoarded (or is that just me, lol??) or not used.. give them a new life as a bonus gift in a beautiful envelope!!  It's so easy to do and less expensive than purchasing envelopes for unique sized cards!!
This light weight, easy and simple board is a great gift for others or yourself!  A MUST for everyone's crafting collection... it will be a classic tool sure to be well used!!
 
I love that you came by today!  Do YOU want MORE Gettin' Crafty Stampin' fun??  CLICK HERE to Join me in my on-line and in-person classes and clubs that are waiting for YOU!!  Do YOU want Exclusive Benefits, tutorial and specials??  Join the Gettin' Crafty Stampin' Mailing List!  CLICK HERE for More on this fun club... and Invite your friends and family to join in on the fun, too!!
 
Some tools are a MUST... this Envelope Punch is just that!  I LOVE It!!  What would YOU do with it?  Using those scraps of paper in a new RePurposed way... a new life to a paper that was forgotten.  Go ahead, try it out... see what all the buzz is about!

Thursday, October 24, 2013

Necklace Fun, Repurposing your Fancy Paper and Ribbons into a Gift!

Sometimes Paper Crafting is more than just cards and scrapbooks (say it ain't so! - lol).  Using the Scraps and Pages you love to create a gift is a great way to show you care while the paper lives on in a new form!  Give a new life to those scraps of paper and ribbon in a long lasting gift!
 
What do you think?!?!  Leave me a comment and let me know!  Share this and me with your friends and family... Pin, Email, Facebook, Tweet, Google+ this and FOLLOW ME on these avenues, YouTube, Instagram, LinkedIn and more!
Creating these stunning necklaces was fun and easy to do!  First grab one of my favorite tools, the Crystal Effects (#101055) liquid adhesive.
 
Using retired buttons and these glass medallions with our Modern Medley Designer Series Paper (#126926) and our Cherry Cobbler card stock (#119685) punched out with the Itty Bitty Shapes Punch Pack (#118309 for three cute punches) to create an accent color.  Adding the adhesive backed Large Pearl Basic Jewles (#125577) for a classic accent.
Here I used the stunning and vintage Etcetera Designer Series Paper (#130129) where these retired Beveled Window Panes create beautiful hanging portraits of vintage advertisements!  Square accents are all the rage.. old, clear square buttons would work, too!  Repurposing these items is a great way to be on trend while giving a classic gift!
Accenting these beautiful images with our adhesive backed Pearls Basic Jewels (#119247) for these tiny pearls that lend towards the elegance and vintage images!
Having always wanted to get my pilots license (some day - after the little ones are older, lol)... this image was near to my heart... and the Vintage aspect captured my old soul heart.  Adhering a Bevel to the back of the image (after the Crystal Effects dries) it now is ideal to wear as a necklace or hang in my car from the rear view window.  The Vanilla Taffeta Ribbon (#109070) reminds me of how they'd wear accents in the Victorian Era!
OK so I wore this lady on my chest all day... and have sported her since.  Her roaring 20's hat (I own one or two in this style, lol) and the beautiful blue... framed behind this retired clear square button lends to the style of the age, too!  I've received a few compliments on her... isn't she worth wearing??
 
I love that you came by today!  Do YOU want MORE Gettin' Crafty Stampin' fun??  CLICK HERE to Join me in my on-line and in-person classes and clubs that are waiting for YOU!!  Do YOU want Exclusive Benefits, tutorial and specials??  Join the Gettin' Crafty Stampin' Mailing List!  CLICK HERE for More on this fun club... and Invite your friends and family to join in on the fun, too!!
 
Go ahead, go beyond card making and journaling or scrap booking!  Create something pretty that will live on from your scraps or even a sheet you pick out specifically for it's beauty!  Giving a gift like this will sure to be near and dear to someone's heart... I'm wearing a bird necklace now and have received a few compliments on it today!  It's warm, fun and lays on my heart.  Give a gift that will life a new and special life, or wear it like I do!!

A Pair of Pumpkins

I don't share cutesy stuff often but this picture brought me such joy lol. They aren't myyyy kiddos but if they were I'd sooooo do this!!!  
Happy Fall Y'all!!  

What Others are SAYING about Getting Crafty with Jamie

Jamie is so passionate and creative about making cards - and wants everyone else to join her in the fun! She is so encouraging and positive in her attitude, helping me along when I get frustrated - and then rejoicing with me at the finished product! I love going to her classes to get new ideas, learn techniques, and have loads of fun in the process. ~ Christine C.

Jamie has wicked awesome classes! If you don’t like a particular stamp or paper/ink color Jamie wants you to change it to suit your style! I did my sister-in-law’s entire bridal shower from invitations/thank you cards, party favors to decorations, it was quaint and whimsical! Everyone ooh’d and ahh’d! I’ve had lots of special requests for classes and Jamie delivers; she always has tasty treats and flavored coffees too ~Ashley W.

I have been attending Jamie's classes for over a year. Her ideas for cards are fresh and fun. She always tries to have several different styles of cards available, so everyone gets to make cards that fit their personal style. The techniques she shows each class can be used in many different applications. She is very patient teacher when instructing class members on how to use the Stampin Up products. ~ Carol D.

If I looked up the word sparkle in the dictionary, I would find Jamie Albanese picture there. I have had the sweet blessing of knowing Jamie and her family for over 5 years now. Every time I am with her I feel loved and inspired. When I am in one of her classes I feel my creative juices flow, as she encourages me to go outside my comfort zone. Jamie helped our girl scout troop make cards for a soldier who needed some encouragement!!! For any of you who have not been in one of Jamie's classes, please don't let another day slip by. She is a beautiful friend and she will become yours too. ~ Blessings, Karen:-)

Jamie has a great eye for style and flair, and it shows in her work. Yet she can pick up on your own individual style and makes great recommendations. I love that she is always flexible for last-minute decision maker mommies like me! So much fun to host craft events with your friends and family - that personal touch always means so much. ~ Adonna

Total Pageviews