
I am STOKED to have found this FUN Decorative USA Wooden Tray in the Dollar Spot of Target! I KNEW the moment I saw it that our STUNNING Designer Series Paper is a MUST to create in this space! THEN taking it and ELEVATING it with Gold Leafing.. SQUEE! Creating Not ONE but TWO Videos to WOW with this project AND a FUN PDF.... Just CLICK HERE to Download this 8x14" Printable PDF for this map (it's a close fit - feel free to create your own even!). IF this Google PDF doesn't Download for you... Please EMAIL ME at Jamie@GettingCrafty.net and I'll be glad to email you the PDF Word or Google Document.
ALSO - Don't miss the Video Tutorials below!

 Specialty Designer Series Paper")


| Shop the NEW Catalog and Score BIG TIME! |
See the NEW and AWESOME Catalog, Shop this and the newly Updated Clearance Rack!
SHOP and SCORE Happy Mail and a Gift!!
THANK YOU for your support, it is PRICELESS to me and my family!
Getting Crafty May 2022
*Hostess Code B44D74AB
**OR... If you Order $150 or more - Score the Hostess Shopping Spree !!
Simply COPY and Paste it when you are checking out**
Create a Pretty Paper Stampin’ Up! Quilt Target Dollar Spot USA Crafting Home Decoration Stampin’ Up! Video Tutorial.
I hope that you enjoyed this Video.
Don't forget to Sign Up and Follow my Getting Crafty YouTube Channel

Can we JUST Gushhhh at this stunning Texture Chic Specialty Designer Series Paper?! Soooo LUSH! Metallic and Vintage with amazing patterns on each side!

We DID elevate it with the Gold Leafing and I have some GREAT Tips and Tricks to avoid it being too messy!

From THIS to THIS! WOW! What do YOU think?! Comment and Let Me Know.
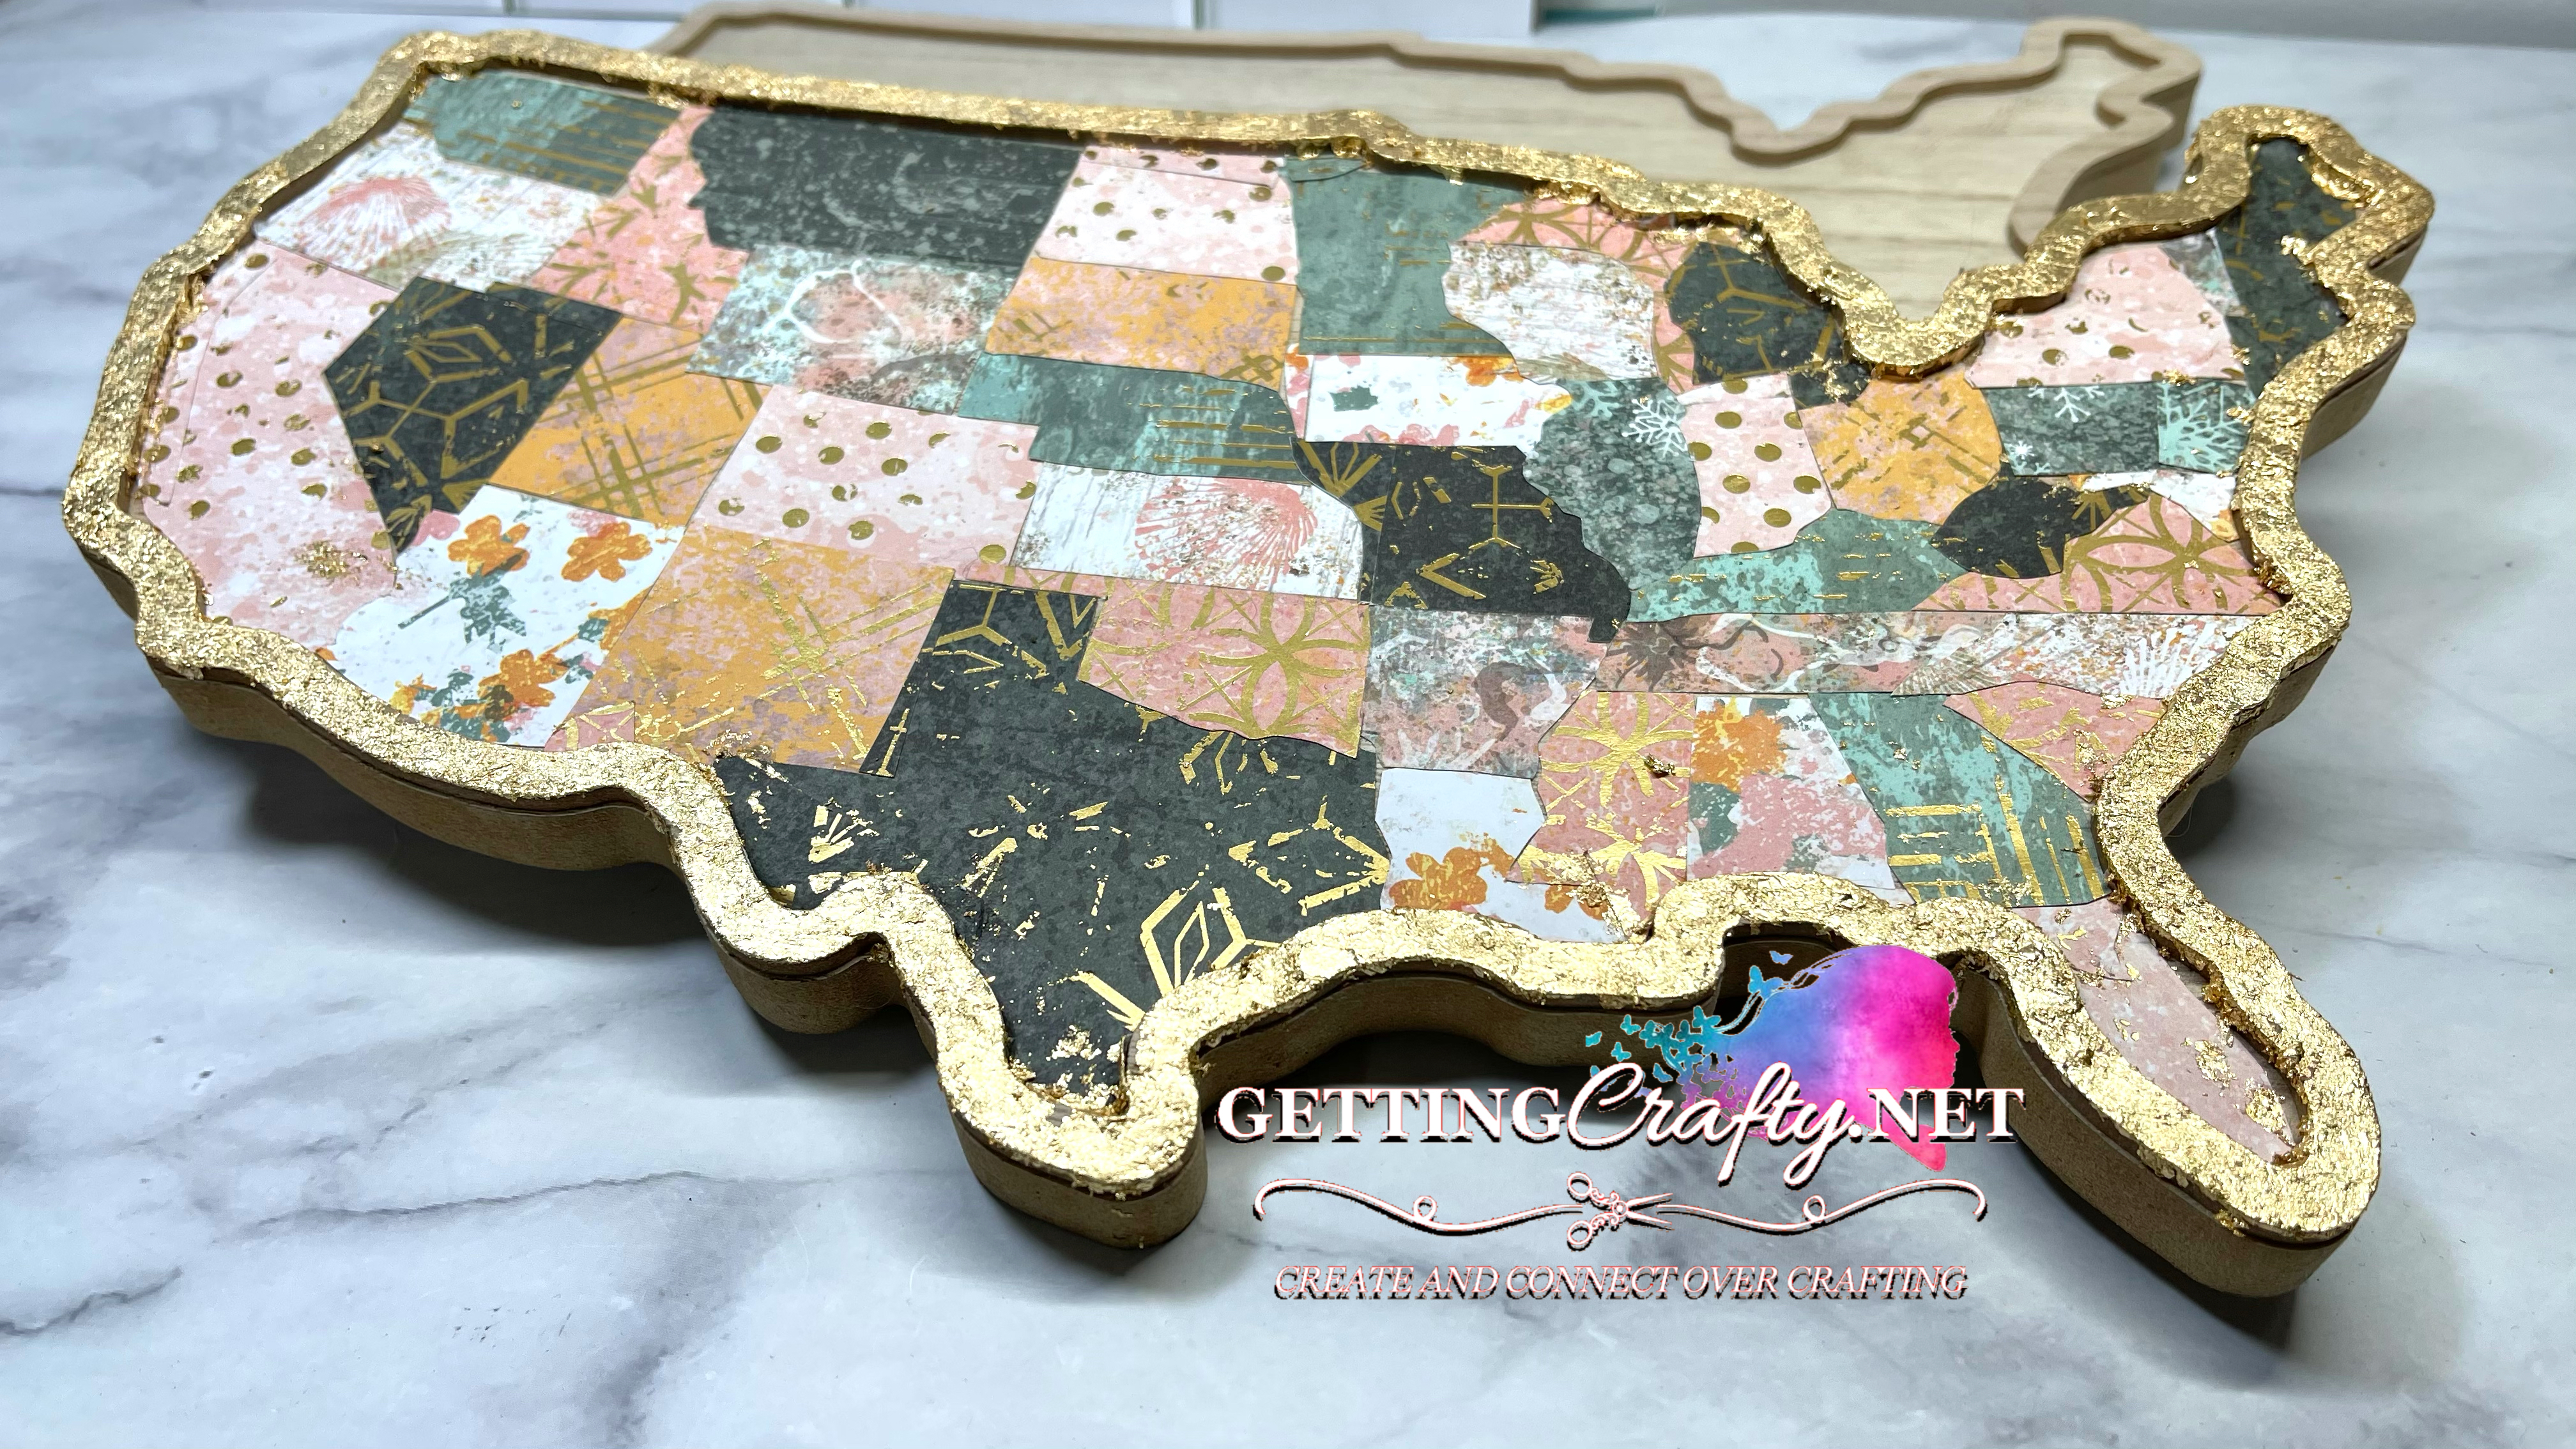
This was a timely process... the Paper Cutting to placing it down..
Honestly, I dislike Puzzles! So... Here is the ULTIMATE puzzle that I'm putting together. THAT BEING SAID.. I created this in about 3 hours, 15 minutes (the Gold Gilding was about 20 more minutes). I also watched some videos, did an interactive Facebook LIVE for my team - all while creating this! This would be a GREAT Project to do while watching some TV.
FUN TIP:
I printed a SECOND Map and used it as I cut, trimmed out my pieces and placed it down.
I also used the Multi Purpose Liquid Adhesive with Each Piece I cut out.
WHEN - Not If - you have some gaps.. use the strips that you trimmed off to fill in.

What do you think?? Please Share Me and This with a Pin, Email, Facebook post, Tweet.. and Join Me with a follow on these avenues like Pinterest and YouTube, Instagram, LinkedIn and Foursquare! Get even MORE Getting Crafty and Stamping with our Exclusive Mailing List and it's many rewards!!


MASSIVE SALE - YES!! PLEASE!
MAY ONLY!!
If your Wish List is LONG or you want to score the Best Deal...
HERE IT IS and For A Limited Time!
Save OVER 50%
~ Pick Any $125 in Crafting Happiness from Stampin' Up! that YOU Choose!!
~ $66.50 in Stampin' Up! New In Color Products!
~ Free Stampin' Up! Paper Pumpkin All-Inclusive Kit!
~ All with FREE SHIPPING!
NEW FREE KIT TO SHIP TO YOU!!
We will be going MASCULINE and Retro Cool!!
With the NEW He's All That Stamp Bundle (Order NOW THIS Bundle or Suite and I'm Happy to Mail YOU this New Kit Starting Monday, May 30th with TWO Cards For TWO Weeks on These Mondays!)
")
")
 Specialty Designer Series Paper")
This is so beautiful, but I received an error when trying to download the PDF. I was planning on making it for my craft room.
ReplyDeleteI am GLAD to Email it to you! Jamie@GettingCrafty.net just email me
Deleteawesome project - so creative. BTW the link t the PDF did notwork for me.
ReplyDeleteI am GLAD to Email it to you! Jamie@GettingCrafty.net just email me
DeleteThis is one of those over the top projects! You did a beautiful job. Don't you love that DSP???!! I am emailing you for the map PDF, since the link isn't working. Thanks for sharing it.
ReplyDelete