Showing posts with label Decorations. Show all posts

Tuesday, December 19, 2023

Create a Decorated Table for the Holidays with this Designer Series Paper Table Scape

Do you look at the holidays and wonder HOW to make those you live with, host, love, even YOURSELF (yes - you are worth it!) feel special?  To feel the celebration of the season?  For me, it's in the little things... like decorations to the big things, like time together.  This week, with two beautiful collections of our Designer Series Paper, and a bit of love and joy for the season - adding in the house we love (you know the 'House Proud' line in the song from the '80's??).... Inspired by some of my favorite people on Instagram (like Hamilton House Designs here) I wanted to create a festive seasonal table scape to welcome our homegroup in with (I created extra for our family gathering due this week even).

Disclosure: Links contain affiliates. When you buy through one of our links we will receive a commission. This is at no cost to you. Thank you for supporting Getting Crafty with Jamie and allowing us to continue to bring you valuable content.

Getting Crafty November/December 2023 
*Hostess Code Z9R9YPAC
- JUST COPY & PASTE THIS CODE

**OR... If you Order $150 or more - Score the Hostess Shopping Spree !!


Create a Decorated Table for the Holidays with this Designer Series Paper Table Scape Video Tutorial 

I hope that you enjoyed this Video
Don't forget to Sign Up and Follow my Getting Crafty YouTube Channel 

Catch our weekly LIVES and Videos on
Recipe:
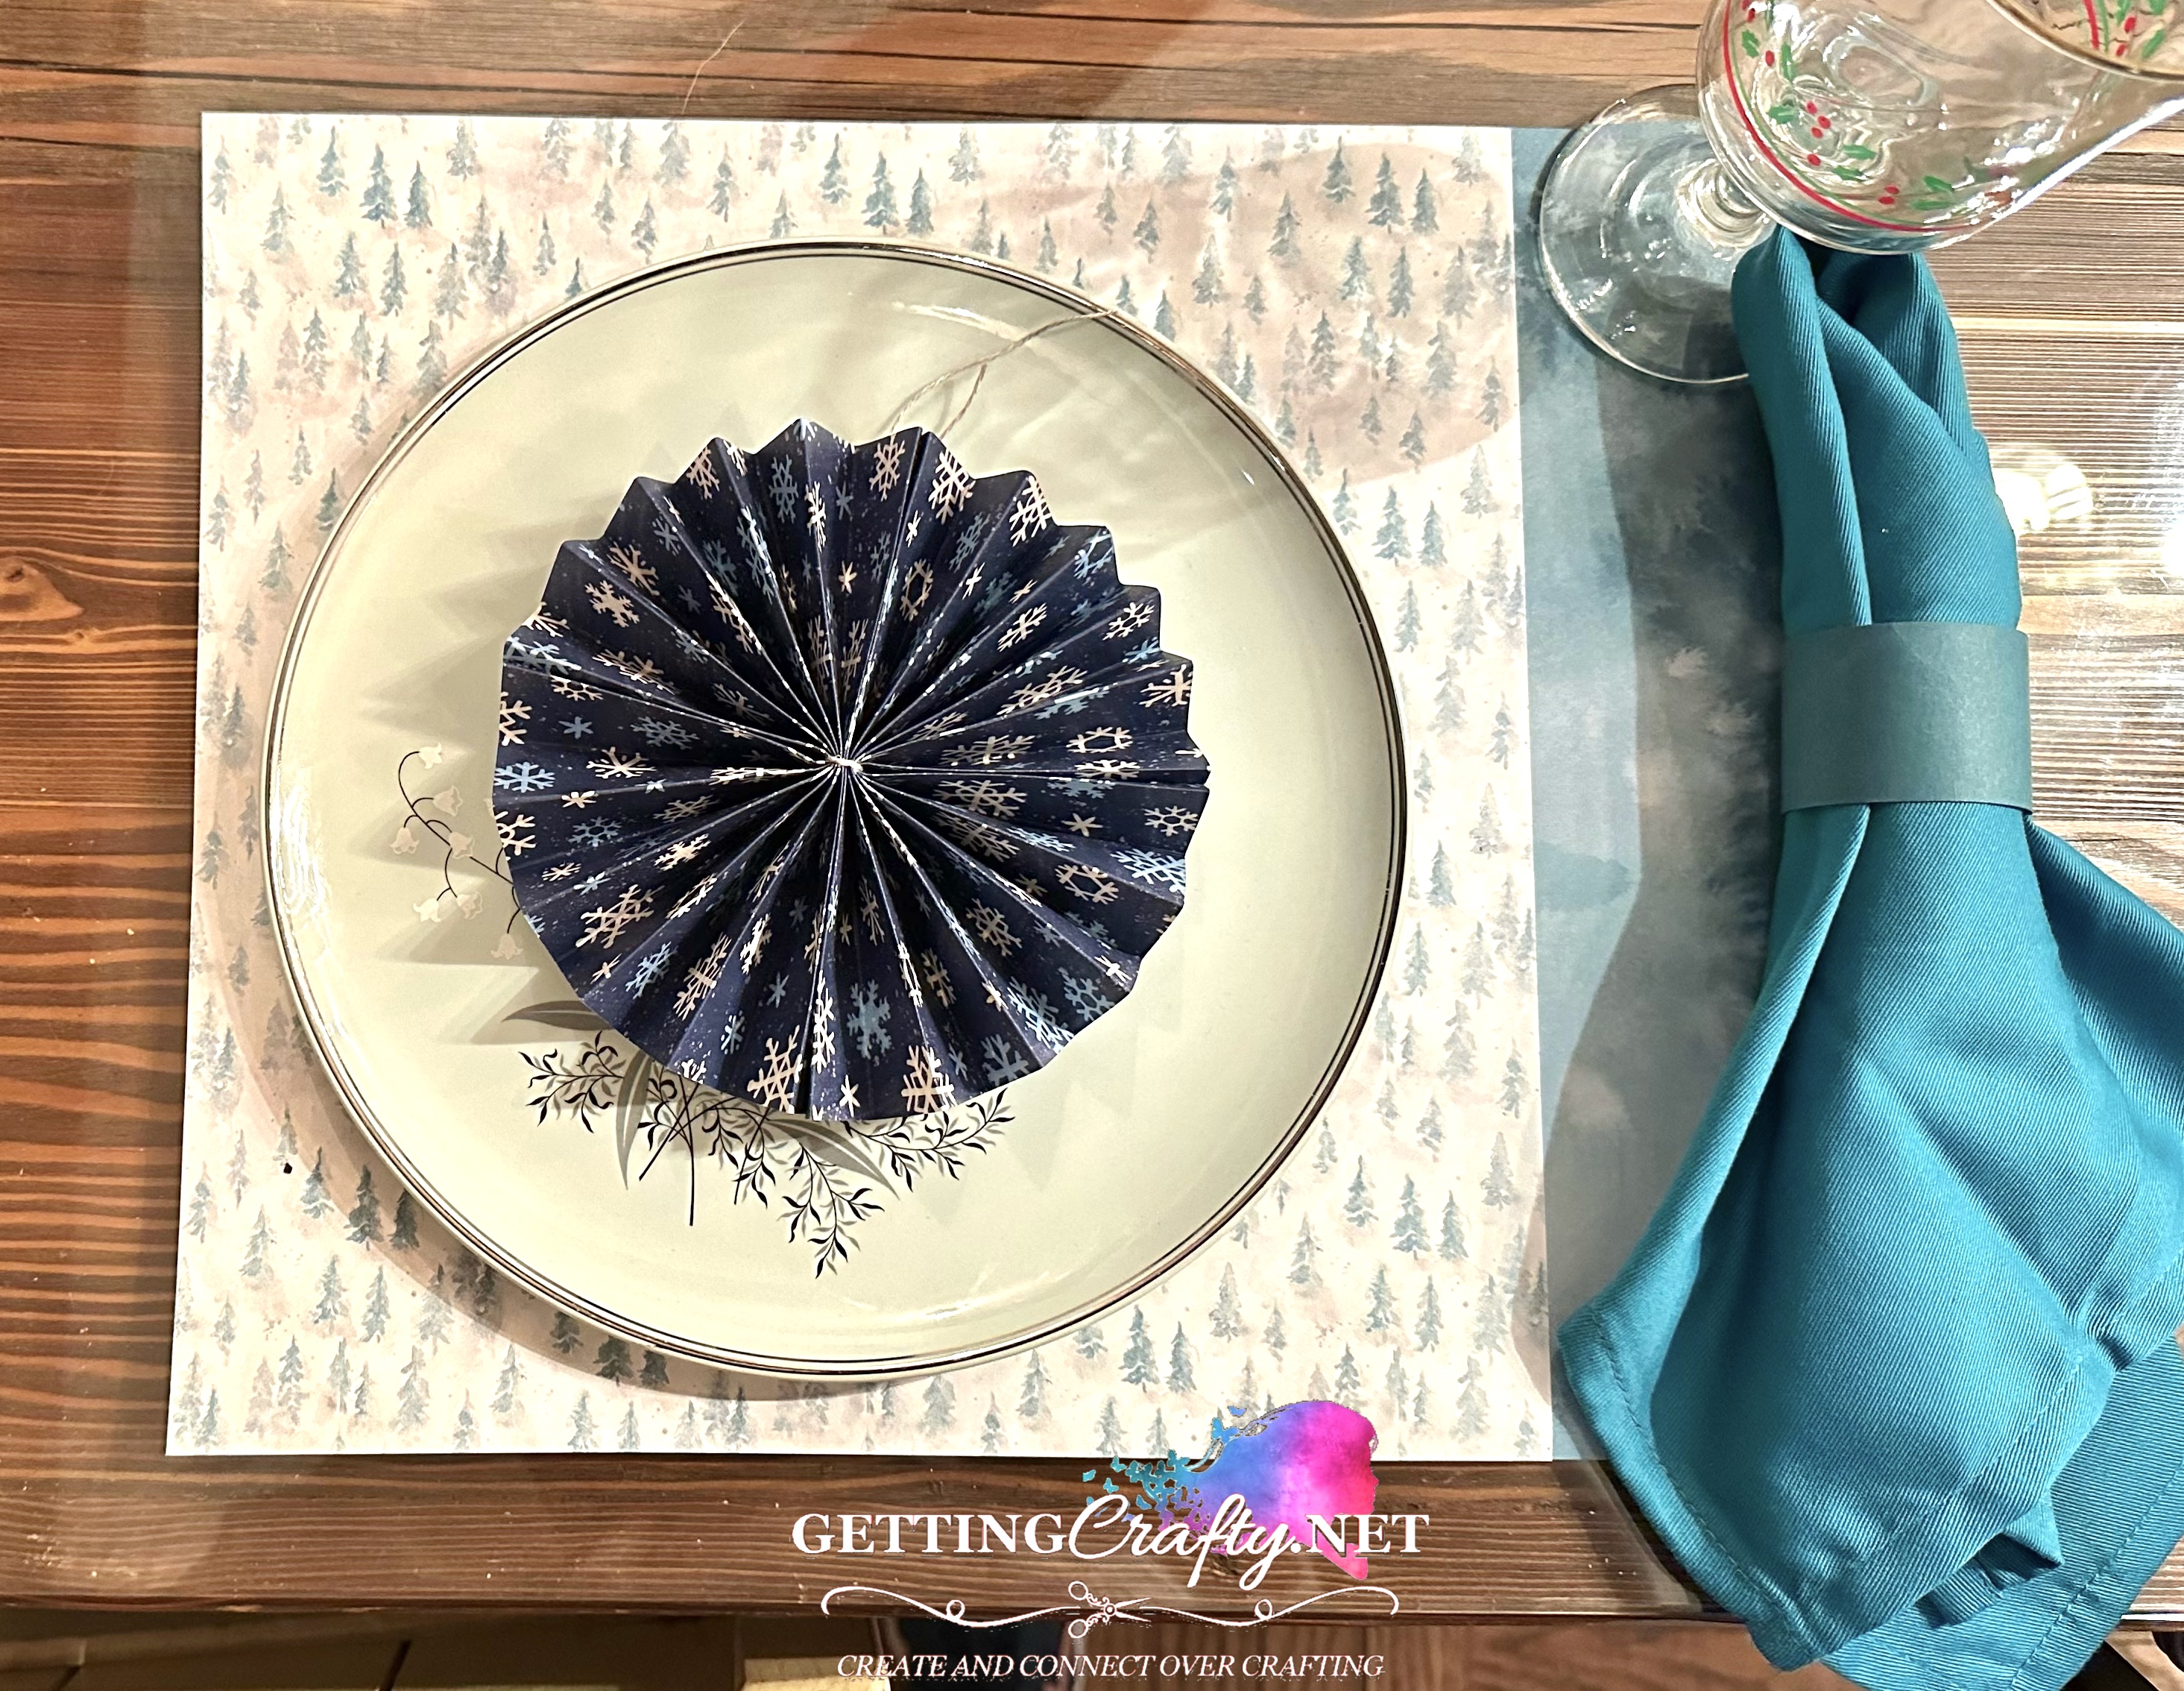
~  Using 12" Designer Series Paper, cut one or two sheets (I'd recommend a more solid pattern?  Something that does NOT compete with the main sheet you use.)  Trim a 3" panel (you can see how to trim it up to 1-1/2" on each side).
~  Adhesive it to the side of the 12" sheet - with Stampin' Up! you have DOUBLE the options as the paper is designed to coordinate and are double sided!
~  I recommend that Multipurpose Liquid Adhesive as lining this up cannnn be a tad challenging!

Creating the Napkin Rings.... 
~  Using the Pretty Peacock cardstock and cutting, with our Paper Trimmer, 1-1/2"x8-1/2".
~  Using the side of the Bone Folder to soften the strips and 'curl' them easier.  
~  Adhesive, with the Stampin' Seal adhesive, one side and wrap around.
* I LOVE these with the paper napkins of our homegroup/bbq to the cloth napkins for the upcoming more formal gathering.

~  Spice it Up ~
~  Split the 3"x12" strip and frame the placemats on BOTH sides with the TWO different but coordinating patterns!
I LOVE how the table came out - AND when the MEN noticed?   Women, we notice these things and the ladies sure did appreciate it... but when the men commented that they liked/loved it and 'wow' was thrown around... what a JOY it was!!

BBQ food and a Bible Study to our upcoming family meal (and Mexican food!) - these are so easy to use and dress up every table!
I have a SECRET... it's easy to SAVE these!  Having grown up so poor, I can tend to want to reuse items and be frugal.  Owning THESE to top the table placemats and keep them for the Season or even LONGER... it's awesome!!

Clear placemats that can COVER the ones I create from our Designer Series Paper!!  I can NOT wait to create table scapes for Valentines to Easter and every birthday/holiday... SQUEEE!!

Disclosure: Links contain affiliates. When you buy through one of our links we will receive a commission. This is at no cost to you. Thank you for supporting Getting Crafty with Jamie and allowing us to continue to bring you valuable content.

I love these pretty paper collections and how beautifully it came out.
Minutes to create... have fun with your spare paper and use up your paper each season - just dooooo ittttt!!  You and your loved ones are worth it!!
Our cloth napkins were in the wash but the girls had fun using paper napkins and laughed that it fit with our BBQ meat and potato bar!

What do YOU like about this table scape?  
I love a pretty table runner for each season...
Having grabbed the JOY letters from a friend, I didn't have wall space but here, adding it to the center of the table was a perfect fit!
I love adding a few glass spun, light up ornaments.
 What do you think??  Please Share Me and This with a Pin, Email, Facebook post, Tweet.. and Join Me with a follow on these avenues like Pinterest and YouTubeInstagram, LinkedIn and Foursquare! Get even MORE Getting Crafty and Stamping with our Exclusive Mailing List and it's many rewards!!

Thursday, May 26, 2022

Pretty Paper Stampin’ Up! Quilted USA Target Dollar Spot

I am STOKED to have found this FUN Decorative USA Wooden Tray in the Dollar Spot of Target! I KNEW the moment I saw it that our STUNNING Designer Series Paper is a MUST to create in this space!  THEN taking it and ELEVATING it with Gold Leafing.. SQUEE! Creating Not ONE but TWO Videos to WOW with this project AND a FUN PDF.... Just CLICK HERE to Download this 8x14" Printable PDF for this map (it's a close fit - feel free to create your own even!).  IF this Google PDF doesn't Download for you... Please EMAIL ME at Jamie@GettingCrafty.net and I'll be glad to email you the PDF Word or Google Document.
ALSO - Don't miss the Video Tutorials below! 
Product List
Shop the NEW Catalog and Score BIG TIME! 
See the NEW and AWESOME Catalog, Shop this and the newly Updated Clearance Rack!
SHOP and SCORE Happy Mail and a Gift!!

THANK YOU for your support, it is PRICELESS to me and my family!

Getting Crafty May 2022 
*Hostess Code B44D74AB

**OR... If you Order $150 or more - Score the Hostess Shopping Spree !!

Simply COPY and Paste it when you are checking out**

Create a Pretty Paper Stampin’ Up! Quilt Target Dollar Spot USA Crafting Home Decoration Stampin’ Up! Video Tutorial.
I hope that you enjoyed this Video
Can we JUST Gushhhh at this stunning Texture Chic Specialty Designer Series Paper?!  Soooo LUSH!  Metallic and Vintage with amazing patterns on each side!
We DID elevate it with the Gold Leafing and I have some GREAT Tips and Tricks to avoid it being too messy!
From THIS to THIS! WOW!  What do YOU think?!  Comment and Let Me Know.
This was a timely process... the Paper Cutting to placing it down.. 
Honestly, I dislike Puzzles!  So... Here is the ULTIMATE puzzle that I'm putting together.  THAT BEING SAID.. I created this in about 3 hours, 15 minutes (the Gold Gilding was about 20 more minutes).  I also watched some videos, did an interactive Facebook LIVE for my team - all while creating this!  This would be a GREAT Project to do while watching some TV.
FUN TIP:  
I printed a SECOND Map and used it as I cut, trimmed out my pieces and placed it down.  
I also used the Multi Purpose Liquid Adhesive with Each Piece I cut out.
WHEN - Not If - you have some gaps.. use the strips that you trimmed off to fill in.
What do you think??  Please Share Me and This with a Pin, Email, Facebook post, Tweet.. and Join Me with a follow on these avenues like Pinterest and YouTubeInstagram, LinkedIn and Foursquare! Get even MORE Getting Crafty and Stamping with our Exclusive Mailing List and it's many rewards!!


MASSIVE SALE - YES!! PLEASE!

MAY ONLY!!

If your Wish List is LONG or you want to score the Best Deal... 

HERE IT IS and For A Limited Time!

Save OVER 50%

~ Pick Any $125 in Crafting Happiness from Stampin' Up! that YOU Choose!!

~ $66.50 in Stampin' Up! New In Color Products!

~  Free Stampin' Up! Paper Pumpkin All-Inclusive Kit!

~  All with FREE SHIPPING!

CLICK HERE for MORE Info!

NEW FREE KIT TO SHIP TO YOU!!

We will be going MASCULINE and Retro Cool!!  

With the NEW He's All That Stamp Bundle (Order NOW THIS Bundle or Suite and I'm Happy to Mail YOU this New Kit Starting Monday, May 30th with TWO Cards For TWO Weeks on These Mondays!)

Product List

Friday, December 4, 2015

Holly Berry Christmas hand-crafted Wreath

Decorating my home is one of my favorite aspects of the year!  With a variety of seasons, it is so much fun to change out what 'accessories' I have on and around my home.  I love what I do in paper crafting and using it to create home decorations like this pretty mock "Holly Berry" Christmas Wreath.  Join me in creating beauty and art all around you (and others) at our fun card making and crafting classes!
Create this Christmas Wreath with:
*Vintage Leaves stamp set (138802)
Mossy Meadow ink pad (133645)
Mossy Meadow card stock (138419)
Winter Wonderland Specialty Designer Series Paper (139588)
Red Glimmer Paper (121790)
*Leaflets Framelits (138283)
Gift Bow Bigz L Die (129977)
Spiral Flower Orginals Die (129379)
Big Shot Magnetic Platform (130658)
Big Shot Die-Cutting Machine (113439)

*Bundle and Save 15% on this stamp set and coordinating dies (photopolymer 140235)

**  SHOP 24/7 with me while Earning BONUS Frequent Buyer Points!!   If you enjoy this project and want to have some fun crafting with me, CLICK HERE and RSVP ASAP for my Upcoming Classes!!  Most classes are FREE with a qualified purchase!!

BOOK Your OWN Private Class that will Highlight the card styles or techniques you are interested in!  With my designing cards for YOU,Book a FUN Gathering of family and friends to create!  From fun Holiday Cards to Celebrations... YOU will earn ALL of the Hostess Benefits on ALL of the Purchases - perfect for stocking up to make cards all year long!! 
Pretty, pretty, pretty accents to use in paper crafting.  I adore how easy it was to create these fun mock "Holly Berries" and pretty gold bow for my Christmas Wreath. Grab a grapevine wreath from Amazon or your local craft store, hot glue and these fun dies.  See this fun Video Tutorial and let me know what you think (please Share and Like this for your family and friends, too!).

See this Video Tutorial  on creating this "Holly Berry" Christmas Wreath:

I hope that you enjoyed this Video Tutorial. Don't forget to Sign Up and Follow my Gettin' Crafty Stampin' YouTube Channel.
Creating these pretty flowers, leaves and big bow is super easy with the Spiral Flower Die, Gift Bow Die and the Vintage Leaves stamp set/ Leaflets dies.  
(I adore that the Leaves stamp set and dies are Bundled to Save 15%!!)  Simply using my Big Shot Die-Cutting Machine with these dies can die-cut all of these shapes and more!

~  Ask ME how YOU can get the Big Shot Die-Cutting Machine for FREE or 1/2 OFF!!  With a full collection from the one of the best catalogs in ages - you can be the first to enjoy the awesomeness and score the FREE Items when you book a Private Class with me!  Score the BEST Deal of $125 for only $99 and FREE Shipping when you take the starter kit home - a kit YOU Pick!!  ~
Die-Cutting these flowers is super easy.  Using Hot Glue to adhere them together is the best way.  I hope that you enjoy this pretty Christmas Wreath - use more than you'd think in Hot Glue to adhere it all together for the long haul.
What do you think??  Please Share Me and This with a Pin, Email, Facebook post, Tweet.. and Join Me with a follow on these avenues like Pinterest and YouTubeInstagram, LinkedIn and Foursquare! Get even MORE Gettin' Crafty Stampin' with our Exclusive Mailing List and it's many rewards!! 

What traditions do you hold on to?  Do you decorate your home for the holidays?  It sure is fun to see the way that our pretty paper and dies to create a hand-made Christmas Wreath for my front door.  Let me welcome in my family, friends and guests (and delivery people, it is the Christmas and Gift Giving Season after all) with a pretty wreath that I am proud to have made with my two own hands.  Join Me in creating pretty decorations for your home, hand-stamped cards at our in-person and to-go card making classes ~ you are invited!

Wednesday, May 20, 2015

Seaside Wedding Shower

Celebrating life... it's simple and easy to do.  Decorating home, parties and life with hand-crafted love. Here a simple collection of signs takes this beach themed wedding shower to the next level of cuteness with this soon~to~retire By The Seashore stamp set that is perfect for this seaside wedding shower.  It doesn't have to be super expensive to decorate and celebrate when you use our paper-crafting products.

****THANK YOU for supporting my blog!  Are you a Gettin' Crafty Stampin' Stamper - they received this tutorial last week! Sign Up NOW for this FREE Tutorial!  Happy Crafting!!****
Create these hand-crafted signs with:
By the Seashore stamp set (wood 132582/clear 126532)
Wetlands stamp set (wood 126695/clear 126697)
Very Vanilla card stock (101650)
RETIRED and GONE...
2013-15 In Colors Baked Brown Sugar, Coastal Cabana, Crisp Cantaloupe card stocks and inks
Baked Brown Sugar Thick Baker's Twine (135639)
Pearl Jewels (119247)

**  SHOP 24/7 with me while Earning BONUS Frequent Buyer Points!!   If you enjoy this project and want to have some fun crafting with me, CLICK HERE and RSVP ASAP for my Upcoming Classes!!  Most classes are FREE with a qualified purchase!!

BOOK Your OWN Private Class that will Highlight the card styles or techniques you are interested in!  With my designing cards for YOU,Book a FUN Gathering of family and friends to create!  From funHoliday Cards to Celebrations... YOU will earn ALL of the Hostess Benefits on ALL of the Purchases - perfect for stocking up to make cards all year long!! 
Using the recently retired and GONE (it went the same day the list of retiring items was announced!) 2013-15 In-Color card stocks and inks to frame the words I printed on my Very Vanilla card stock. 
Don't say 'good-bye' to great stamp sets like these - bring them home at a great discount!!  Shop using this Hostess Code at check out 7KAKXZZK ) and I will send you a hand-stamped card from this stamp set!!  **ANY Ink Pad that you purchase - secure the Ink Refill to make sure that your ink pad lasts for years!!

See MORE:  This By The Seashore stamp set has helped to create these amazingly colorful images: Memories In A JarBeach Day InsirationPretty Swell, and Seaside Wedding Signs.
With a Menu, like this, you can highlight the delicious foods.  The Wetlands stamp set, inked in the Baked Brown Sugar ink, ties more of the beach theme into this wonderful celebration.  Layer the stamped card stock across the top for a coordinated look in your decorations.
With a fun invite like this digital one and these lovely labels it was easy to tie in the decorations.  Adding the adhesive backed Pearls adds an element of luxury while being easy!
Look at these amazing ladies that I am blessed to call my friends.  These ladies have had a hand in raising my kids and with a shoulder to lean on or a laugh to share, we are blessed to live life together. Celebrating Sherri and her upcoming wedding with a special shower like this. Participating in this special day is an honor, even in a small way like this.  It's easy to create hand-crafted signs that tie the meal into the theme of the party.
What do you think??  Please Share Me and This with a Pin, Email, Facebook post, Tweet.. and Join Me with a follow on these avenues like Pinterest and YouTubeInstagram, LinkedIn and Foursquare! Get even MORE Gettin' Crafty Stampin' with our Exclusive Mailing List and it's many rewards!!

Lined up to highlight the amazing foods - these hand-stamped signs are fun and festive while tying the event together.  Simple accents like these adhesive backed pearls takes a simple rubber stamped image on these hand-crafted signs to the next level.  Save money, time and energy when you create easy and fun hand-stamped decorations like this for your celebrations.

What Others are SAYING about Getting Crafty with Jamie

Jamie is so passionate and creative about making cards - and wants everyone else to join her in the fun! She is so encouraging and positive in her attitude, helping me along when I get frustrated - and then rejoicing with me at the finished product! I love going to her classes to get new ideas, learn techniques, and have loads of fun in the process. ~ Christine C.

Jamie has wicked awesome classes! If you don’t like a particular stamp or paper/ink color Jamie wants you to change it to suit your style! I did my sister-in-law’s entire bridal shower from invitations/thank you cards, party favors to decorations, it was quaint and whimsical! Everyone ooh’d and ahh’d! I’ve had lots of special requests for classes and Jamie delivers; she always has tasty treats and flavored coffees too ~Ashley W.

I have been attending Jamie's classes for over a year. Her ideas for cards are fresh and fun. She always tries to have several different styles of cards available, so everyone gets to make cards that fit their personal style. The techniques she shows each class can be used in many different applications. She is very patient teacher when instructing class members on how to use the Stampin Up products. ~ Carol D.

If I looked up the word sparkle in the dictionary, I would find Jamie Albanese picture there. I have had the sweet blessing of knowing Jamie and her family for over 5 years now. Every time I am with her I feel loved and inspired. When I am in one of her classes I feel my creative juices flow, as she encourages me to go outside my comfort zone. Jamie helped our girl scout troop make cards for a soldier who needed some encouragement!!! For any of you who have not been in one of Jamie's classes, please don't let another day slip by. She is a beautiful friend and she will become yours too. ~ Blessings, Karen:-)

Jamie has a great eye for style and flair, and it shows in her work. Yet she can pick up on your own individual style and makes great recommendations. I love that she is always flexible for last-minute decision maker mommies like me! So much fun to host craft events with your friends and family - that personal touch always means so much. ~ Adonna

Total Pageviews