Tis the 'Ber months (October, November, December) season. I'm super excited to have jumped into some amazing Craft Fair events. I also recently stopped and was shocked at the STACK of Chipboard that I've been hoarding! I literally traveled from California to Indiana with over 8" tall of 12" Chipboard! INSANE! Am I alone?!? Do YOU HOARD all of the good-stuff... knowing that the MOMENT that you toss it away - you will NEED it?!?!
Well, join me this week, with some fun tutorials as I create with this very stack of FREE Chipboard that I am stockpiling and WOW people over the holiday season! Perfect for gifts to decoration and I'll have a FUN variety at my upcoming Craft Fairs... what will YOU create?! Comment and let us know!!
Now picking a favorite is SURE to be challenging...
I feel like I've JUST begun and do NOT want to STOP!
The FACT that it is super easy and even fun to create...
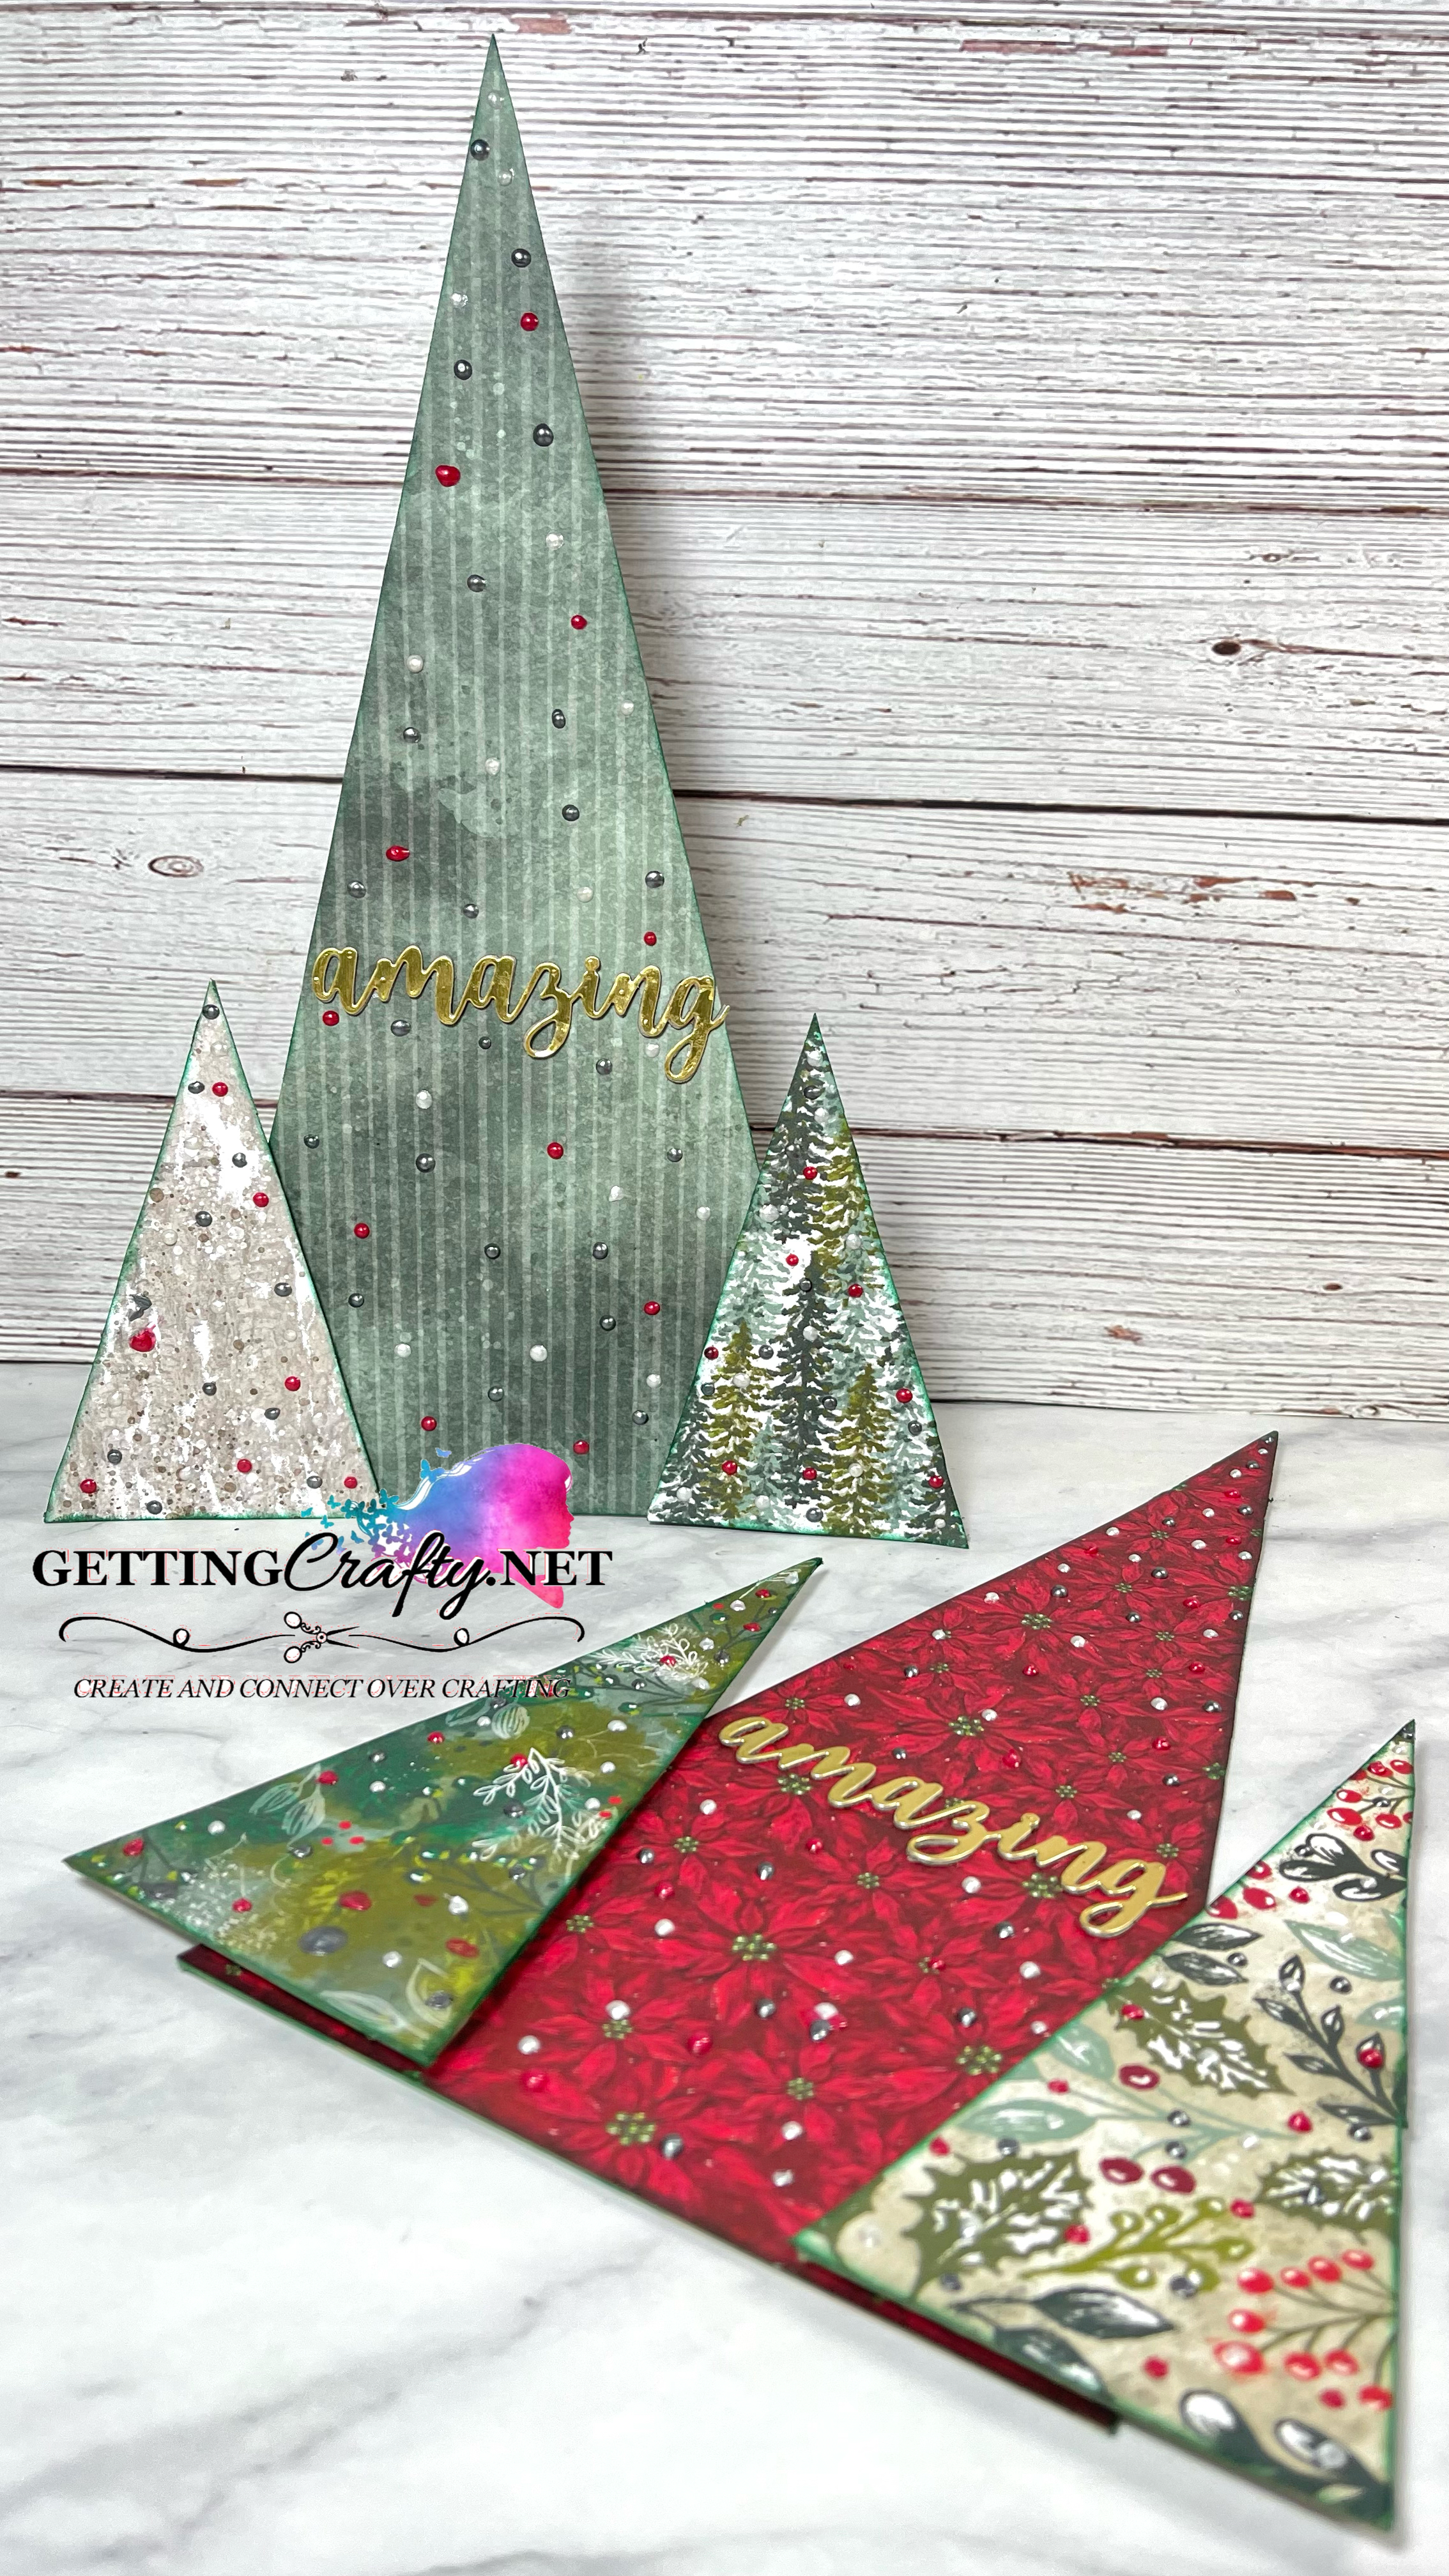
One sheet of 6"x12" FREE Chipboard (from the back of our Specialty Designer Series Paper and Glimmer/Foil Papers) will ROCK this Three Tree decoration!
~ Mark the MIDDLE (3") of the 6" Chipboard.
~ Using the Paper Trimmer - cut down to the opposite corners.
~ Using the Cut-Offs to Create the TWO Other smaller trees
~ Cover with Multipurpose Liquid Adhesive.
~ Apply the Boughs of Holly Designer Series Paper
~ Trim it out with our Paper Snips
~ Using the Sponge Daubers to create depth and a finished look with the Shaded Spruce ink pad.
~ Adhesive with Stampin' Dimesional Adhesive.
~ Apply the Pearlized Enamel Effects.
With Hot Glue, apply the stand from one of the scraps!
Accent with the Gold Foil Covered Chip Board, die-cut in the Cut & Emboss Machine with the Amazing Thanks dies.
NOW Which is YOUR Favorite?!? Comment and Let Us KNOW!
What do you think?? Please Share Me and This with a Pin, Email, Facebook post, Tweet.. and Join Me with a follow on these avenues like Pinterest and YouTube, Instagram, LinkedIn and Foursquare! Get even MORE Getting Crafty and Stamping with our Exclusive Mailing List and it's many rewards!!
JOIN US for the Christmas Club Sept 24th from 6:30-9:30pm with 20 beautiful cards in one evening! Join us LIVE, stream in, video tutorials, pdfs and fun (in-person and online!). The class is only $25 with the Brightest Glow Bundle! Take the Class FOR FREE with the Lights Aglow Suite!
What Others are SAYING about Getting Crafty with Jamie
Jamie is so passionate and creative about making cards - and wants everyone else to join her in the fun! She is so encouraging and positive in her attitude, helping me along when I get frustrated - and then rejoicing with me at the finished product! I love going to her classes to get new ideas, learn techniques, and have loads of fun in the process. ~ Christine C.
Jamie has wicked awesome classes! If you don’t like a particular stamp or paper/ink color Jamie wants you to change it to suit your style! I did my sister-in-law’s entire bridal shower from invitations/thank you cards, party favors to decorations, it was quaint and whimsical! Everyone ooh’d and ahh’d! I’ve had lots of special requests for classes and Jamie delivers; she always has tasty treats and flavored coffees too ~Ashley W.
I have been attending Jamie's classes for over a year. Her ideas for cards are fresh and fun. She always tries to have several different styles of cards available, so everyone gets to make cards that fit their personal style. The techniques she shows each class can be used in many different applications. She is very patient teacher when instructing class members on how to use the Stampin Up products. ~ Carol D.
If I looked up the word sparkle in the dictionary, I would find Jamie Albanese picture there. I have had the sweet blessing of knowing Jamie and her family for over 5 years now. Every time I am with her I feel loved and inspired. When I am in one of her classes I feel my creative juices flow, as she encourages me to go outside my comfort zone. Jamie helped our girl scout troop make cards for a soldier who needed some encouragement!!! For any of you who have not been in one of Jamie's classes, please don't let another day slip by. She is a beautiful friend and she will become yours too. ~ Blessings, Karen:-)
Jamie has a great eye for style and flair, and it shows in her work. Yet she can pick up on your own individual style and makes great recommendations. I love that she is always flexible for last-minute decision maker mommies like me! So much fun to host craft events with your friends and family - that personal touch always means so much. ~ Adonna


 Designer Series Paper")


")


No comments:
Post a Comment