Showing posts with label Clean. Show all posts

Monday, June 11, 2018

Cleaning day... Clear Block Cleaning How-To

What is a Craftermath?  It is what occurs after crafting and card making... the left behind messes and chaos.  With my crafting weekly, in-person classes and online classes, swaps, happy mail, retreats that just occurred and more.. you can imagine what my crafting area looks like.
This week is where I dive in head on to tackle my chaos.  
Why?  
Because I deserve a clean area!
How do I start??
Cleaning my Clear Blocks.
Clear Blocks take a beating... 
~ With the hands that touch it (imagine any oils from your hands, germs, colds, etc on these blocks).
~ Ink... every single time these clear blocks protect my hands from hitting those ink pads.  In selfless honor they take the beatings and inkings (lol).
~  Embossing Pastes, Brusho, ink drops and adhesives.. they all land on these beauties.

Grabbing my Clear Blocks and these items... 
~  Gloves (protect your hands, don't allow the abuse these blocks take go for nothing - lol).
~  Norwex Enviro Microfiber Cloths (These have silver worked into the fibers, doing the hard work for you and sanitizing your clear blocks).
~  Norwex Pink Cloths (These clean windows, mirrors and our clear blocks with a fine polish and have the silver in the microfibers as well).
~  Lemon Oil (Here I use Young Living brand oil.  This is an acid based oil, gloves really come handy here.  The added benefit of the amazing clean smell is a bonus!).
~  Novus #2 Fine Scratch Remover (This was designed, I believe, for cars and it has warnings on how harsh it is on skin, to try a sample area, etc.).

All new crafting and card making fun.... see this Easy, Quick Clear Block Cleaning tutorial.
I hope that you enjoyed this Video. Don't forget to Sign Up and Follow my Getting Crafty YouTube Channel.

Now ~ I don't sell these items.. I just linked you to those who I know are knowledgeable and do.  I hope this fun little video helps inspire you to clean it up.. your blocks and crafting area!

Saturday, May 4, 2013

Dreaming of Blue Roses

Blue Roses...
They are the bane of my existence!
I've attempted to grow them year after year, to no avail.
Sigh, but I digress...
Stamping BLUE Roses is sure to secure some beauties...
This sweet card is sure to deliver joy!
With a So Saffron card stock (#105118) is a lovely base for this card.  Building it up with our Tea for Two Designer Series Paper (#129311) for a lovely vintage and elegant addition.  These are the same paper piece just layered off center of each other and opposite sides. (I love that our Designer Series Papers are double sided - you get double the options for the same price!!)
This Four Frames (#123442) stamp set has lovely flowers that coordinate with the paper!  Stamped on Very Vanilla card stock (#101650) with our Island Blue ink (#126986) and it is a perfect fit!  Punching this stamped image out is easier than ever with our Decorative Label Punch (#120907)!!
Layered over our Lucky Limeade 3/8" Ruffled Ribbon* (#122977) for a pop of perfectly coordinated color!! 
Add Dimension!
After adhering the Tea for Two paper to the card stock with SNAIL adhesive (#104332) and running it through our Vintage Wallpaper Textured Impressions Embossing Folder (#120175 that is Retiring!!) and the Big Shot (#113439) for a vintage all-over texture! 
 
POP Up the stamped sentiment with our Stampin' Dimensional adhesive (#104430)!
Vintage and Elegant, this girly card is warm and a favorite at my recent Borchard Parks and Rec class*!
 
Have YOU joined one of my many classes*??
Click HERE to see my schedule - or pick a date for a Private Class at a great reduced cost!!
I may not be able to grow some beautiful blue roses, lol.. Dream a dream... so this sentiment embraces the Loving Thoughts one wants to send!  Coordinated in our inks, this So Saffron ink (#126957) the Loving Thoughts stamp set (#125845) is perfect for sooo many situations..
Grab YOURS Now!
 
Do YOU want to see our stunning stamps, paper, inks, tools and more?!?!  Click HERE to see them - all!
 
Want to Save Up-To 65%?!?!
Top Quality stamps, papers, inks, ribbons, tools and more are Retiring*!  Click HERE to see the New line of colors and the many items going away to make room for new items!

Tuesday, February 5, 2013

Bag me some Glimmer!

I LOVE Glimmer, Sparkle and Shine...
Who doesn't?!?!
 
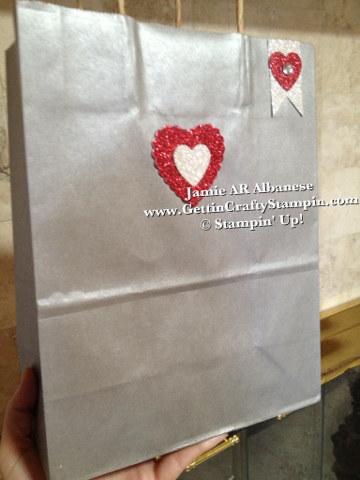
I couldn't resist creating this Glimmer Filled LOVE for a Stampin' Friend of mine... I wonder if Carol liked it...
 
Starting with a our Silver and Red Glimmer Papers,
Hearts A Flutter Framelits Dies (Spring Mini)
the NEW Large Rhinestones Basic Jewels (Spring Mini)
and a Silver Paper Bag...
I have a collection of sizes and colors for blank paper bags -
I keep them ready for various gifts that I can decorate -
it's much prettier and lower in cost than most
Store Bought bags!
and Awayyyyy we go!


Punching the Scalloped Heart from the
Hearts a Flutter Framelits Dies and
my Big Shot is easy and sure to WOW!
 
Punching the little heart out of the center with the nestling hearts allows me to use it later.
 
I actually utilized my scraps of Glimmer for this bag..
 
The little flag is in the Framelits kit and is pretty. 
 
Using the now cut out heart from the Red Glimmer now layers over the flag...
 
Using the Large Rhinestone and it's blinged out to the 'max' (as I would have said as a child - lol).
Punching and Adding the extra small Heart to the center of the Red Glimmer allows for a cool contrast!
BAM!
Silver, Glimmer, Red... it doesn't go wrong!
 
I wrapped up Carol's recent order and with a promise to play, soon, I dropped it off with love!
 
How do YOU Sparkle?
Decorate Almost ANYTHING with the help of our Big Shot, the fun Framelits we offer and our
GLIMMER PAPER!!
 
Grab YOURS Now and see if YOU earn FREE Goodies from the Sale~A~Bration mini and any orders over $150!
Leave me a comment and let me know what
YOUR favorite Sparkle item is!

Thursday, December 20, 2012

3D-Ornament WOW! (Video How-To Included)

WOW People with this Easy and FUN Ornament!
 
We created this ornament with my son's class (22 3rd graders rocked this project!).  A 'non-crafty' mom who was helping said there was no way she could do it but as she saw the simplicity and WOW factor of it - was excited to see that sheeeee got it - too!! - I LOVE when that happens - lol...
 
To Create this WOW Ornament - simply start with 7 strips of paper - or HERE I used the Flocked Window Sheet from the Candeligh Christmas Specialty Designer Series Paper in the Holiday Mini. 
 
 
The Center is a 4" long by 1/2" wide strip of Whisper White Card Stock. 
 
You need 6 strips in staggered layers - the Flocked Window Sheets in 1/2" wide strips... These strips are (2) 6" x 1/2" strips, (2) 5-1/2" x 1/2" strips and (2) 5" x 1/2" stips... lay out and center like this!
 
Two Brads and Baker's Twine tie this all together.... easy peasy!
 
 
 This is only 1/2" thick but has big impact!
 
 
Simple Elegance is key for me!
 
 
 On a Tree - this ornament is going so shine and be elegant.  The lights on the tree are sure to pick up the shine of the window sheet and highlight the red flocked velvet on the window sheet.
 
Stampin' Up! Inspired this ornament with their Stampin' Success Magazine that is sent home to Demonstrators with suggestions, tips, challenges and how-to's!  I love that Stampin' Up! has such a great tool for it's Demonstrators!
 
Here is a portion of my son's class who created their own ornaments...
what fun we had!! 
(That's my boy in the lower right corner.. awww, mom's pride!)
 
 
This Video walks you thru How-To do this fun ornament! 
Thanks for looking, sharing and leaving a comments!  I hope you enjoy decorating your home, tree, windows or gifts with this ornament. 
Have a blessed Christmas and Happy New Year!


Thursday, December 6, 2012

Gold Tree for Meee...

Due to broken foot and family flu issues we have yet to get our tree up... ugh... I just decorated my front door today (geesh - lol)....  When I think of trees, I think of traditional, elegant, simple...
 
This card is created with A River Rock card stock base, Always Artichoke card stock, Brushed Gold paper.  One of my favorite stamp set 'Christmas Lodge' has a stunning collection of stamps. 
 
 
Here with the Embossing Buddy, powder the Brushed Gold paper.  Stamp with Versa Mark the tree.  The powder works like facial powder and fills in the nooks and cranies.. it allows the Embossing Powder (Gold here - Gold on Gold is stunning) to cling only to the area the Versa Mark is. 

 
Heat Set with our new, quiet and easy Heat Gun.  It sets and goes from an ugly gun-metal-green look to a liquid, melted gold tree.
 
Gold on Gold is breath-taking, elegant and easy.  River Rock looks very 'gold' when placed near this mix.  Always Artichoke is the color sister/match to River Rock.  Frame the gold image with the Always Artichoke as a subtle border, the Scallop Edge Border is clean and elegant. 

 
Stamp the Merry Christmas sentiment with Always Artichoke across the top.  The hanging holly and branches frames this monochromatic and elegant card.  Who knew it'd be this easy??  This Victorian tree and sentiment is sure to warm the heart of whom ever receives it.
 
Wishing YOU an elegant, easy and lovely Holiday.

Monday, December 3, 2012

There's Cash in that Can!

I LOVE these cute lil Clear Novelty Paint Cans at the Dollar Bin at Target.  When the Late Night Stampers Challenged to do a Gift Card Holder I couldn't resist using the cans to create this 'snow globe' feel for a Gift Card Holder!
 
I started off with our Holiday Collection Framelits Dies, the Festival of Prints Designer Series Paper Stack (what a fun collection!) and used two different sheets from this pack.  I could have either struggled to stick them to the bottom of the can but instead I pulled out our Large 2-1/2" Circle Punch and Grey paper and built up the scene on that!
Folding the Paper in 1/2 and using the die to cut out two trees at a time saves time, energy and effort.  Folding each of the 4 trees in 1/2 and they back up to one another.  I used my Heat Gun (remember, it's HOT!) to adhere the trees together.  They will NOT align up 100% but it's sooo close and cute, who'd notice??
 
A 1" strip of White Cardstock folded in 1/2 is the ideal Card Holder!  I did a fine/slim line of glue on one side of the fold to keep it together.  Then with the Hot Glue Gun I did a line down the center of the Grey Punched Circle... holding it for a count of 10-15 is all it needs to stay where I place it!
 
Creating two different and abstract trees gives a fun element to this project.  Hot Glue (very thin) holds all 4 sides together and a nice glob holds it to the punched cardstock... again, hold for a count of 15 to get it to stick where I place it!  (I LOVE being the BOSS of my paper - at least ITtttt listens to me, my kids sure don't... sigh, lol.)
 
Super Cute, easy and FUN - Snow Globes are one of my favorite things but my kids are known for breaking them.... this is a great save and represents a favorite childhood memory of my globes!
 
It WORKS!  I love when a plan comes together! lol... but it needs something!
 
OK so I know the basics of sewing... I' ve created cute skirts that are slightly off... my friend Michelle keeps promising me to teach me more... but that'd require time and free hands! lol...
 
Using our Retired Material from the Clearance Rack I cut this in a 2" strip and folded it in 1/2.  I hot glued it together to allow for a 'seam'.  Using the Hot Glue Gun (remember, it's HOT - I burn myself EVERY TIME - ugh) to cut time and with ease I created a line around 1/2 of the circle. 
 
The folding and scrunching allows for a sweet 'snow' look to the bottom of this project.  Keeping it going creates this FUN look!!  Awwwww... softens the look, too!
 
 
After posting this.. my friend Michelle emailed (from Austrailia on a family trip even!) that using a Popsickle Stick while Hot Glue-ing will prevent burns!  Dude, I knew she's a genius and I'm smart enough to call her my friend!  (Does that make ME a genius by extension??) lol
 
 
BAM!  Done, baby!!  What a Sweet Detail!!
 
(A Collective Awwww with me... soooo cute!)
 
 I just placed it into the little paint can.  I did NOT place adhesive but sooo could.  I used my Bone Folder to push down the 'snowy' material - it puffs up and softens the look...
Add the Gift Card of choice!  Easy Peasy, Lemon Squeezy!
 
 
The Clear Window Sheet of the Paint Can limits the ability to take a perfect picture...
 
Gold at the end of the Rainbow...
this is more 'There's Cash in that Can!'... lol
 
 The Trees frame and h0ld up the gift card. 


My Sweet Little Monkeys couldn't resist holding onto this can!  It's light weight, classy and elegant while whimsical and FUN!
 
I Hope YOUR Holidays are filled with whimsical and fun moments, memories and MONEY!  (come on - who wouldn't love that??) 
Don't have a Gift Card??  Do a LOTTO Ticket!  Why NOT??  Do a Post It Note that says you get 1/2 if they win though.. lol.

Wednesday, November 7, 2012

Clean and Simple Christmas Wishes

Be Of Good Cheer (merry men and women, lol) is a stunning, classic Holiday Designer Series Paper. Here with a Cherry Cobbler "face" on Naturals White cardstock an elegant but clean Holiday card. (It has a sprinkles look, kind of like candy.)

With the stripes on the Be Of Good Cheer DSP looking similar to candy cane stripes, I couldn't resist this shadow effect. The Holiday Collection is great as it coordinates with the Scentsational Season stamp set. I like, too, how it can be used solo.

I simply framed the striped DSP with Stampin Dimensional Adhesive and then the Stampin Dimensional on the outside corners. I layered the floating front on the Naturals White card.

I used the cut out candy cane on the back (not to waste such a cute lil cut out). I then couldn't resist and I did stamp the Chock Full Of Cheer candy cane on the inside of the card.

The polka dot sheet is from Be Of Good Cheer as well. I cut clean strips at 1-1/2" and then I wanted the Chock-Gull of Cheer stamp set's Merry Christmas sentiment. I stamped that with Cherry Cobbler ink. SNAIL adhesive creates a great, elegant and clean looking card.

Minimal style isn't my style but I LOVE this look! What do you think?? Thank you for looking, sharing and leaving a comment!

What Others are SAYING about Getting Crafty with Jamie

Jamie is so passionate and creative about making cards - and wants everyone else to join her in the fun! She is so encouraging and positive in her attitude, helping me along when I get frustrated - and then rejoicing with me at the finished product! I love going to her classes to get new ideas, learn techniques, and have loads of fun in the process. ~ Christine C.

Jamie has wicked awesome classes! If you don’t like a particular stamp or paper/ink color Jamie wants you to change it to suit your style! I did my sister-in-law’s entire bridal shower from invitations/thank you cards, party favors to decorations, it was quaint and whimsical! Everyone ooh’d and ahh’d! I’ve had lots of special requests for classes and Jamie delivers; she always has tasty treats and flavored coffees too ~Ashley W.

I have been attending Jamie's classes for over a year. Her ideas for cards are fresh and fun. She always tries to have several different styles of cards available, so everyone gets to make cards that fit their personal style. The techniques she shows each class can be used in many different applications. She is very patient teacher when instructing class members on how to use the Stampin Up products. ~ Carol D.

If I looked up the word sparkle in the dictionary, I would find Jamie Albanese picture there. I have had the sweet blessing of knowing Jamie and her family for over 5 years now. Every time I am with her I feel loved and inspired. When I am in one of her classes I feel my creative juices flow, as she encourages me to go outside my comfort zone. Jamie helped our girl scout troop make cards for a soldier who needed some encouragement!!! For any of you who have not been in one of Jamie's classes, please don't let another day slip by. She is a beautiful friend and she will become yours too. ~ Blessings, Karen:-)

Jamie has a great eye for style and flair, and it shows in her work. Yet she can pick up on your own individual style and makes great recommendations. I love that she is always flexible for last-minute decision maker mommies like me! So much fun to host craft events with your friends and family - that personal touch always means so much. ~ Adonna

Total Pageviews