Showing posts with label Gifts. Show all posts

Saturday, December 1, 2018

Getting Crafty Advent of Kindness 2019

 THIS Holiday Season has JUST Begun!  
Welcome to December 1st!
Join me DAILY to Create something FUN that you can use to bless others!!
 With fun little gift ideas all month long (Dec 1-24th!) you can in just a few minutes create and bless someone special.
 Little gifts.. oh yes!  See the prettiest little gifts in this month's Getting Crafty Advent Calendar of Crafting.
 I will be posting the full tutorials and uploading the videos of the LIVES I do daily to create something ANYONE can do - easy, fun and sure to wow!  
When Santa comes a calling... We created a little Care Basket for our Delivery People!!  The kids and I made a sign, laminated it (for the weather), added a cute little band and stamped image to Coke cans and set it out for our many Amazon and Stampin' Up!, USPS and UPS Delivery people.... what are YOU doing to bless others this season??  Comment and let me know!

Friday, April 5, 2013

Sunshine Door Hanger

I'm NOT a big Chocolate eater...
(I doooo like small amounts of Dark Chocolate, lol...)
When I doooo eat chocolate, I like that Reese's Peanut Butter Cups allow me to share them with a friend, my husband or kids...
(the peanut butter and chocolate combo does rock).
 
Inspired by this Chocolate and Peanut Butter treat
I created this fun Door Hanger!
(It's sweet, isn't it?!?!)
This Rich gift is fun and easy with the use of our Designer Rosette Bigz XL Die and Big Shot (Idea Book & Catalog).  This die Scored, Cut and Perforated 3 - 6" x 12" strips of Chocolate Chip card stock with this sharp edge (what does it remind you of - YES the PB Cup!).

HOT GLUE is the Key to adhering these edges together!  (Be careful, it's HOT - HOT - Hooooootttt!!  I burn myself EVERY time - ugh)
 
Our Floral Frames Framelits and Big Shot (Idea Book & Catalog)  Popped these pretty flowers out from the Summer Smooches Designer Series Paper (a piece of Tangerine Tango patterned paper).

OK So I've created little monsters!
Myyyy kids believe that the moment mommy whips out the Iphone and Craft - THEYyyyyy are models - walking the runway. (lol)  Here is my youngest posing like a famous person with a 'necklace' that is jussssst her size - lol.
After connecting all Three Scored and folded Rosette's - attach something to the back to hold it down and together.  This was a scrap from my Pennant Die.
 
Shhhh - the Secret, too, is Flipping this over and
'Filling' the center from the front. 
When you have this much card stock fighting staying down - it helps to have a 'cone' to hold it together.
Adhering the flowers on the front and the 'Feel Goods' stamp set (Spring Mini) 'those who bring Sunshine into the lives of others cannot keep it from themselves' fits PERFECTLY on this Daffodil Delight flower.  I love that our papers, inks and accessories are all dyed to match - it makes it easy to look amazing!  Simply Stamp your sentiment and then use the Big Shot to cut it out - no guess work and it is sure to WOW everyone!

Adhering a 1/4" Stitched Grosgrain Ribbon in Daffodil Delight to the back (more Hot Glue, since it's out and is Super adhesive).  It is a fun and unique Door Hanger (ding dong ditch in a good way w/ this beauty) but my daughters nabbed it to hang in their room - they want a rainbow of them now - lol.

If you love chocolate or not, this rich gift is a blessing to ANYONE who receives it!  I love that our colors picked up perfectly and embraces the Reese's Peanut Butter Cups without too much orange/in your face.

This Extra-Large Rosette/Lolly is a sweet way to show someone they are special - or greet people at your front door!
 
Who would you gift this too?
Would it end up in YOUR home as you can't seem to part with it?!?! (My kids do this to me often!)
 
Have YOU played with our Amazing Big Shot and accessories?!?!  I would love to show it to you!  I know that Crafting will never be the same with it, it's bound to only be MORE fun!! 
 
 Click HERE to see all of our Big Shot and Accessories.  Many of my friends with disabilities and limitations LOVE that the Big Shot makes crafting easy and fun again! (From injuries to arthritis and other physical challenges, this is a MUST for ANYONE who enjoys crafting - injured or not!)  Want this tool for 1/2 off?!?! 
 
Click HERE and look at how a Private Class can earn it for FREE or 1/2 off while having FUN!!
Sunday, January 13, 2013

Snowmen in a Paint Can

So, when a challenge is thrown down - I'm often one to pick it up.... here is my nod to to the LNS Challenge of Snowmen this week....
my 3D Snowmen in a Paint Can!
 
Using Circle Punches in 1", 1-1/4" & 1-3/8" sizes I punched 4 of each out of Whisper White card stock.  (This creates the larger Snowman.)  The smaller Snowman is the 3/4", 1" & 1-1/4" Circle Punches from the Idea Book - again cutting 4 of each size out in Whisper White card stock. 

 
 Folding each circle in 1/2 I then adhered them together w/ a Hot Glue Gun (careful, it's hot, and yes, I did burn my fingers on this project - lol).  Using a scrap of cardstock in a 1/4" strip I built all four circles around this strip so I could build UP each smaller circle.  This holds all three together!
 
With another circle I then folded a cardstock in 1/2 and then cut a notch out so that I could have it hold onto the bottom/largest 'Snow ball' so it could stand up. 

Adhering the two build snow men and their bases to a circle of Window Sheets (Idea Book) I now had my snowman base.  This Paint Can is a stunning royal blue - I didn't want to take away from it. 
 
Cutting a Window Sheet so that I could create falling snow I used our Basic Jewels Pearls in the three sizes.  Creating random placement I then flipped it over and had the matching size on the back - they now look like falling 3D Snowballs!!!!  (How cute is that?!?!)
 

Placing it between the Snow Man and Snow Child (larger and smaller) it has this cool 3D look, falling Snow and a cool Snow Globe feel without any mess!


Here is a look at the Darling Duo -
who wouldn't want to recieve these little guys?!?!
 

 My kids are enamoured with this and my baby girl can't get enough of walking around w/ them.  With a High of 51* here in Southern California... we don't see snow around our neck of the woods. 
This is a cool way to capture that feel with none of the mess!
 
What would YOU do with a Snowman or two?!?!  Who would you give this to?
Thank you for coming by, taking a look and feel free to share and leave a comment, it's always appreciated!

Friday, January 11, 2013

National Milk Day

WHO KNEW?!?!  Hallmark - that's who... lol
I LOVE Celebrating life's moments - the births, birthdays, anniversaries, graduations and yes, the silly holidays (like National Milk Day!)...
so Celebrate National Milk Day with me and fortify those bones...
they say 'Milk Does a Body Good'!

I LOVE our Spring Mini! 
It's a lovely collection of holidays, lace and accessories - right up my alley! 
 
Grabbing my Bashful Blue cardstock, the Tea for Two Designer Series Paper, the Artisan Embellishments Kit, That's the Ticket stamp set and Ticket Duo Builder Punch, the Mini Milk Carton die and my Big Shot
I created this fun Milk Carton


Starting off with the Bashful Blue card stock is similar to the milk in our fridge... it coordinates perfectly with the Tea for Two DSP (Designer Series Paper) I simply ran it thru the Big Shot and the Mini Milk Carton Die.  Wrapping it around the Milk Carton - it's sweet, vintage, elegant and feminine. 
 
Stamping the Admit One and Valentines Day Tickets from That's the Ticket stamp set with Early Espresso ink on the Pretty in Pink cardstock.  I ADORE that our Punches Coordinate so perfectly with the stamps!  Who doesn't want a ticket to something so sweet??
 
 
This sweet treat fits perfectly into this sweet Carton... the sweet embellishments from the Artisan kit and the sweet paper from the Tea for Two DSP... I LOVE it!  The lovely lace ribbon, flower and it's soft blush on the tips...
 
History of today's celebration...

 
When you can't fill a gift with milk... go sweet, go chocolate, go with the kind of gift that a person will want to receive - lol.
Whoppers Malted Milk Balls...  much better than milk, eh?


What Whimsical and Sweet Holidays do YOU Celebrate?  Go Crazy, Celebrate LIFE!!
 
 
Thank you for coming by and taking a look. 
Feel Free to share this with others, and please leave a comment, they are ALWAYS Appreciated!

Friday, January 4, 2013

Hanging Some Vintage Love

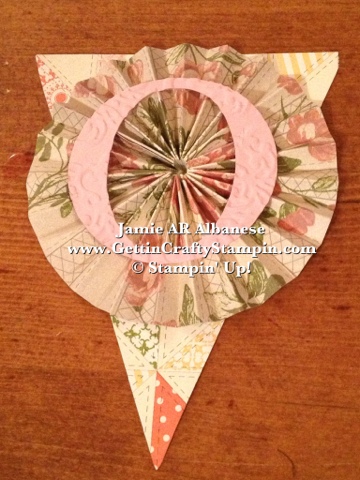
For my Ultimate Thank You Class... I created this stunning double sided 'Love' Pennant Banner.  Going Vintage with the new Tea for Two Designer Series Paper from the Spring Mini is easier than ever!

Designer Series Paper is lighter weight than Card Stock so by backing it up to the a duplicate does two things... it links it together and strengthens it as well as making it viewable from the outside of the window and the inside.... lovely!

Who wouldn't love this Vintage Love hanging in their home or office?  This is in the front window near our kitchen nook - it's sure to brighten my children's face and with the hidden adhesive backed hangers under the awning makes it so that I can change it out with the different seasons and holidays!

 The Pennant Die and Big Shot made it a breeze to pop out these for the banner, using the Simply Scored board and stylus makes it easy to create these Lollies.  Using the Die Cut L-O-V-E in Cameo Coral and Pretty In Pink I alternated them on the different pennants and they have the added vintage feel and look thanks to the Lacy Brocade Embossing folder.

 
Designer Series Paper is Double sided - so using two different sheets of this Tea for Two pack allows for the look of 4+ papers. 

HERE - Sigh with me.... this stunning vanilla 5/8" Flower is from the Flower Trim in our Spring Mini... it's great as they are connected and a stunning ribbon... but these Vintage dimensional flowers on strips of tulle can be used individually! 


Antique Brads... a favorite from the Idea Book... and with the backs covering the brad it's even more stunning!


Alternating the letter colors adds to the dimensional look... this quilted looking paper.... it's just a dream!


STOP!!  OK so make sure that as you line them up, back to back, that they are spelling the correct way - lol... our back almost came out at E-V-O-L.... lol.


Double Sided DSP (Desinger Series Paper) makes for a stunning lolly (those scored, folded circles...) Hot Glue is the KEY To adhering the ends together and them to any project!

Soooo Girly (not my usual style) and lovely...


Back to Back - Strengthening one another -
Especially when hanging and there is tension to the paper.

 
Tied together with Crochet Ribbon! 
This adds to the Vintage look and is truly lovely - I like the texture of it all, too!


I even like the knots on the end of the ribbon.... I cut them to have that V look... just like the Pennants on the Banner!
 
This will be a pleasant surprise for my kids... I may do a Name one for their birthdays... awww.... I LOVE that idea!
 
Thank you for coming by, taking a look and leaving a comment!  Please feel free to share this with others!  Valentines is right around the corner... show some LOVE to those in your life!!


What Others are SAYING about Getting Crafty with Jamie

Jamie is so passionate and creative about making cards - and wants everyone else to join her in the fun! She is so encouraging and positive in her attitude, helping me along when I get frustrated - and then rejoicing with me at the finished product! I love going to her classes to get new ideas, learn techniques, and have loads of fun in the process. ~ Christine C.

Jamie has wicked awesome classes! If you don’t like a particular stamp or paper/ink color Jamie wants you to change it to suit your style! I did my sister-in-law’s entire bridal shower from invitations/thank you cards, party favors to decorations, it was quaint and whimsical! Everyone ooh’d and ahh’d! I’ve had lots of special requests for classes and Jamie delivers; she always has tasty treats and flavored coffees too ~Ashley W.

I have been attending Jamie's classes for over a year. Her ideas for cards are fresh and fun. She always tries to have several different styles of cards available, so everyone gets to make cards that fit their personal style. The techniques she shows each class can be used in many different applications. She is very patient teacher when instructing class members on how to use the Stampin Up products. ~ Carol D.

If I looked up the word sparkle in the dictionary, I would find Jamie Albanese picture there. I have had the sweet blessing of knowing Jamie and her family for over 5 years now. Every time I am with her I feel loved and inspired. When I am in one of her classes I feel my creative juices flow, as she encourages me to go outside my comfort zone. Jamie helped our girl scout troop make cards for a soldier who needed some encouragement!!! For any of you who have not been in one of Jamie's classes, please don't let another day slip by. She is a beautiful friend and she will become yours too. ~ Blessings, Karen:-)

Jamie has a great eye for style and flair, and it shows in her work. Yet she can pick up on your own individual style and makes great recommendations. I love that she is always flexible for last-minute decision maker mommies like me! So much fun to host craft events with your friends and family - that personal touch always means so much. ~ Adonna

Total Pageviews