Showing posts with label Winter. Show all posts

Monday, September 26, 2016

Let it snow hand-stamped card

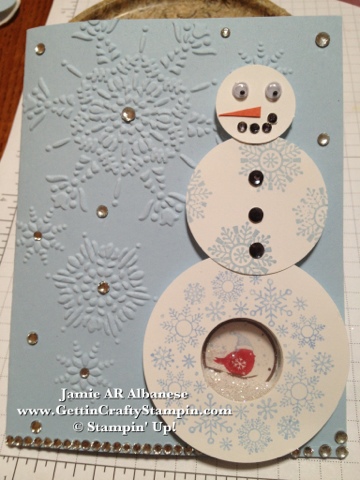
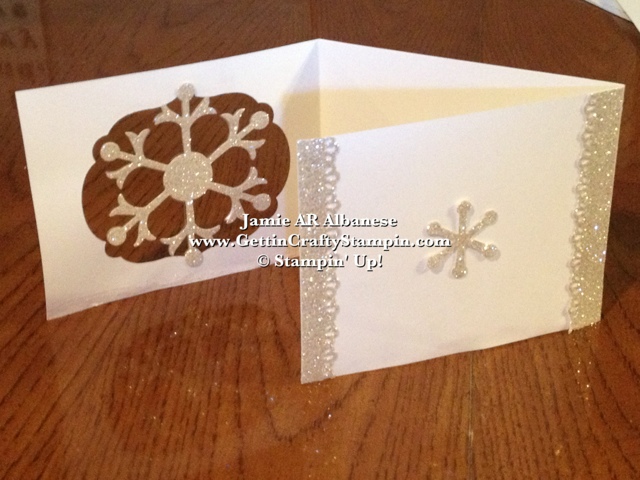
Created at a recent, fun, card making class, this sweet pair is sure to welcome in the holiday season.  See how these cuties are easy and fun to create a hand-crafted card with a coordinating stamp set and matching dies and pretty papers.   Join Us as we create and connect over creating at our fun card making class.
Product List
**  SHOP 24/7 with me.  If you enjoy this project and want to have some fun crafting with me, CLICK HERE and RSVP ASAP for my Upcoming Classes!!  Most classes are FREE with a qualified purchase!!

BOOK Your OWN Private Class that will Highlight the card styles or techniques you are interested in!  With my designing cards for YOU,Book a FUN Gathering of family and friends to create!  From fun Holiday Cards to Celebrations... YOU will earn ALL of the Hostess Benefits on ALL of the Purchases - perfect for stocking up to make cards all year long!! 
There is a heat wave in California (no snow in sight right now).  Join me in welcoming the cooler weather with this chilly but sweet handmade card.

Create a cool card that is fun and easy.  
~  Stamping this these cute snow pals on our Whisper White card stock with the Night of Navy ink pad is so easy.  
~ Add color when you stamp the stick arms and buttons for fun and interest.
~  Die-Cut them with the coordinating Snow Friends framelits dies and our Big Shot Die-Cutting Machine.
~ Tear a strip of Whisper White card stock for a snow-filled ground.
~  Layer over the polka dot background pretty Floral Boutique Designer Series Paper.  (Who knew this cute Floral paper would be ideal for a Snow Filled scene!!)
~ Add the chilly friends with our Stampin' Dimensional adhesive, adhering the arms with our Glue Dots (rolled up).  

~  Ask ME how YOU can get the Big Shot Die-Cutting Machinefor FREE or 1/2 OFF!!  With a full collection from the one of the best catalogs in ages - you can be the first to enjoy the awesomeness and score the FREE Items when you book a Private Class with me!  Score the BEST Deal of $125 for only $99 and FREE Shipping when you take the starter kit home - a kit YOU Pick!!  ~
What do you think??  Please Share Me and This with a Pin, Email, Facebook post, Tweet.. and Join Me with a follow on these avenues like Pinterest and YouTubeInstagram, LinkedIn and Foursquare! Get even MORE Gettin' Crafty Stampin' with our Exclusive Mailing List and it's many rewards!! 

No matter the weather you are experiencing, deliver some chilly and sweet greetings wrapped up in a hand-stamped card.  Grab your calendar and book mark some crafting fun when you book a Private Class with me or at our card making classes!  I love how easy it is to create this handmade card with our coordinating stamp set, dies, inks, papers and more.

Tuesday, October 21, 2014

All is Calm Winter Tree hand-stamped CardMaking tutorial

I love the visions of snowflakes as they fall to the ground... then again, this is usually on television because here, in Southern California, we don't see snow.  This stunning All is Calm Specialty Designer Paper gives me the feel and excitement of the beauty of snow filled winters while I enjoy my mild temperatures.  Celebrate, create and deliver some Very Merry winter wishes with this cool hand-stamped card.
For this card you will need:
Lovely as a Tree stamp set (wood 128655/clear 127793)
And Many More stamp set (wood 134273/clear 134276)
Whisper White card stock (100730)
All is Calm Specialty Designer Series Paper (135823)
Lost Lagoon ink pad (133644)
1/8" Silver Ribbon (132137)
All is Calm Snowflake Embellishments (137383)
Rhinestone Basic Jewels (119246)
Embossing Buddy (103083)
Versa Mark ink pad (102283)
Silver Embossing Powder (109131)
Heat Tool (129053)
 
**  SHOP 24/7 with me while Earning BONUS Frequent Buyer Points!!   If you enjoy this project and want to have some fun crafting with me, CLICK HERE and RSVP ASAP for my Upcoming Classes!!  Most classes are FREE with a qualified purchase!!
 
BOOK Your OWN Private Class that will Highlight the card styles or techniques you are interested in!  With my designing cards for YOU, Book a FUN Gathering of family and friends to create!  From fun Holiday Cards to Celebrations... YOU will earn ALL of the Hostess Benefits on ALL of the Purchases - perfect for stocking up to make holiday cards!! 
When stunning papers, metallic accents, and classic rubber stamps come together to create a stunning winter scene that is cool and sure to delight.

Tool Tip Tuesday:  Get the best Embossed images when you prep the surface of the paper!  Simply using the Embossing Buddy and rub it across the surface will fill any nooks and crannies in and eliminate the oils on the surface of the paper.  This will allow the Embossing Powder to adhere to the Versa Mark inked image and nothing else.  An easy step that will allow for a better Heat Embossed image!

Take the 5-1/4"x4" piece of the All is Calm Specialty Designer Series Paper and rub the surface using the Embossing Buddy.  Stamp the image of the tall Pine tree from the Lovely As A Tree rubber stamp set and Versa Mark ink on the front of this snowy paper.  Cover the image with Silver Embossing Powder, shaking off the excess.  Heat set using the Heat Tool for a hand-stamped, embossed silvery tree.


It's all about the accessories... take your hand-crafted card (or wardrobe) to the next level with you accessories.  Here thread the 1/8" Silver Ribbon into the All is Calm Snowflake.  Wrap it around the front of the card, allowing space to stamp the 'Very Merry' from the And Many More rubber stamp set in Lost Lagoon In-Color ink.  Jazz it up with the addition of the largest of the Rhinestone Basic Jewels for a pretty accent.  Layer over the Whisper White cardstock base for a clean and elegant look.
What do you think??  Please Share Me and This with a Pin, Email, Facebook post, Tweet.. and Join Me with a follow on these avenues like Pinterest and YouTube, Instagram, LinkedIn and Foursquare!  Get even MORE Gettin' Crafty Stampin' with our Exclusive Mailing List and it's many rewards!!
 
No matter where you live, you can enjoy a little Snowflake and Winter love with a pretty hand-stamped card.  This hand-crafted card uses Silver Embossing Powder, Accents and stunning Paper to create a Calm and Pretty Wintery scene that will stand the test of time (and while cool won't chill you - lol).  See how fun it is to combine the Embossing on the Patterned Designer Series Paper for additional WOW.  Perfect for Winter, Christmas and more - this hand-stamped card will look stunning where ever it lands.

Saturday, November 2, 2013

A Merry Dear in the Snow Hand Stamped Card

Snow covered hills... not found in my neck of the woods... but the serene feel of a setting such as this is one of the wonders of Winter.  Capturing this and the glitter of snow.. at just the right angle... is a fun way to celebrate a Merry Christmas.
 
What do you think?!?!  Leave me a comment and let me know!  Share this and me with your friends and family... Pin, Email, Facebook, Tweet, Google+ this and FOLLOW ME on these avenues, YouTube, Instagram, LinkedIn and more!
Create this card, quickly with:
Pool Party card stock (#122924)
Island Indigo card stock (#122923)
Island Indigo ink (#126986)
Whisper White card stock (#100730)
Silver Glimmer Paper (#124005)
Warmth and Wonder Hostess Stamp Set (#131883)Expressions Thinlits Dies (#132171 Holiday pg.36)
Delicate Designs Embossing Folders (#127023)
Adhesive backed Pearl Basic Jewels (#119247)
Paired together with the aide of a favorite tool of mine, the Color Coach (#130118), the Pool Party and Island Indigo are a monochromatic match!  Stamping this serene scene from the Warmth and Wonder Hostess set with the Island Indigo ink on the Pool Party card stock for a cool feel.
 
Emboss the top with the Delicate Details and Big Shot for a snow filled sky.  Add dashes of luxury with these 'snow puffs' of adhesive backed Pearl basic jewels.
Ripping this Whisper White card stock and layering, I can create a snow covered scene.  Adding this Merry from the Expressions Thinlits in Silver Glimmer Paper for a dash of sparkle to the setting.  Apply with the Multi Purpose glue (#110755) and allow to dry.
This scene pulls together for a WOW of grace and beauty.  I remember going to our prom and there was a deer that came to the window of where we were eating.  It's a majestic animal.. and this scene is one to take my breath away..
 
I'm glad you came by today!  I try to post daily and hope to see you often!  Please come and bring others with you!!
 
May the wonder of Winter and the Holiday Season give you a moment of awe.  You may see deer or not in your neck of the woods... but the beauty of nature and the season can inspire a wow moment or two.  Enjoy card making (and Join Me) and create with a dash of sparkle and luxury.

Sunday, January 13, 2013

Snowmen in a Paint Can

So, when a challenge is thrown down - I'm often one to pick it up.... here is my nod to to the LNS Challenge of Snowmen this week....
my 3D Snowmen in a Paint Can!
 
Using Circle Punches in 1", 1-1/4" & 1-3/8" sizes I punched 4 of each out of Whisper White card stock.  (This creates the larger Snowman.)  The smaller Snowman is the 3/4", 1" & 1-1/4" Circle Punches from the Idea Book - again cutting 4 of each size out in Whisper White card stock. 

 
 Folding each circle in 1/2 I then adhered them together w/ a Hot Glue Gun (careful, it's hot, and yes, I did burn my fingers on this project - lol).  Using a scrap of cardstock in a 1/4" strip I built all four circles around this strip so I could build UP each smaller circle.  This holds all three together!
 
With another circle I then folded a cardstock in 1/2 and then cut a notch out so that I could have it hold onto the bottom/largest 'Snow ball' so it could stand up. 

Adhering the two build snow men and their bases to a circle of Window Sheets (Idea Book) I now had my snowman base.  This Paint Can is a stunning royal blue - I didn't want to take away from it. 
 
Cutting a Window Sheet so that I could create falling snow I used our Basic Jewels Pearls in the three sizes.  Creating random placement I then flipped it over and had the matching size on the back - they now look like falling 3D Snowballs!!!!  (How cute is that?!?!)
 

Placing it between the Snow Man and Snow Child (larger and smaller) it has this cool 3D look, falling Snow and a cool Snow Globe feel without any mess!


Here is a look at the Darling Duo -
who wouldn't want to recieve these little guys?!?!
 

 My kids are enamoured with this and my baby girl can't get enough of walking around w/ them.  With a High of 51* here in Southern California... we don't see snow around our neck of the woods. 
This is a cool way to capture that feel with none of the mess!
 
What would YOU do with a Snowman or two?!?!  Who would you give this to?
Thank you for coming by, taking a look and feel free to share and leave a comment, it's always appreciated!

Saturday, January 12, 2013

Snowman Snowglobe

If 'A bird in the hand is worth two in the bush' what is a bird in a snowman?!?! 
A Snowman Snowglobe!!
This fun shaker card was inspired by the LNSChallenge of Snowmen this week.
 
HERE Is a Whimsical Shaker Card that has a cute hidden bird!  The Four Seasons Hostess Stamp Set from the Idea Book is a great and elegant stamp set that can also be a little fun and whimsical! 


Using Bashful Blue cardstock for the base, the Northern Flurry Folder and Big Shot creates this snowflake base...


Using the Stampin' Write Markers in Bashful Blue, Real Red and Chocolate Chip (Suggested by the Color Coach) I 'painted' the stamp with Bashful Blue on the outer circle of snowflakes and the inner falling snow and his chipper little hat!  The great thing about our Stampin' Write Markers is this technique - I then colored in the circle and branch in Chocoalte Chip, the Red lil bird... YEAH!

Using the 2-1/2" Circle Punch and the inner 1" Circle Punch I punched out the large stamp and then the inner circle and the cardstock.  Using the Window Sheets I adhered w/ SNAIL adhesive the first circle to the card stock base.
 
Adhered the Shaker Frames from the Idea Book in a circle slightly larger than the 1" holes.  Leaving the top ON I then filled in some Dazzling Details Glitter.  THEN Removing the top of the Shaker Frame I adhered the second Circle Window Sheet. 
 
Applying the SNAIL adhesive around the back of the Large Circle's inner circle I then adhesived it to the Window Sheets.  Using the 1-3/8" Circle and the 1" Circle's I punched out the top parts of the  Snowman.  Stamping the center circle w/ the solo snowflake from the stamp set it matches the bottom.  DOUBLE UP on the Stampin' Dimensionals as the Shaker Frame is Higher UP than the standard Stampin' Dimensional Adhesive - so by layering one on another, it is now the right height!


SNAIL down the little bird circle in the inside of the card for a fun peek a boo and interest when the card opens up!
 
The Dazzling Diamonds Glitter will move as the card is opened and moved, etc... I LOVE this fun feature!


Using the Permanant Maker to color in the small and larger adhesive backed Rhinestones for the coal buttons and mouth.... the Googlies from the Holiday Mini adds a fun eye feature that will move as the inner circle moves!  Cutting the corner of the Tangerine Tango card stock for the nose... easy peasy and FUN!
 
Add some bling in the center of the embossed Snowflakes and some other 'floating' bling snowflakes.  I added the strips of Rhinestones to the bottom (fallen snow - lol) and some larger in the corner for a fun element. 
 
GO Crazy - add an unexpected element to your card - and have FUN, go Whimsical with your card, it's sure to bring a smile to someone's face!
 
My Kids may have broken many of my Snowglobes... but this one is fun and not breakable...
(well, if you keep it away from my 20 mo. old - she tried to rip it open... geesh!).

Thursday, January 3, 2013

There is a Snowflake in my Window!

Living the Southern California Life doesn't give me the beauty of looking out my window and seeing a White Winterland.. where Snowflakes cascade down my window... So I wanted to create a White Winter Wonderland... and maybe a snowflake or a few in my window...


Starting with the Snowflakes from the DVD's I used to create Tree Earrings (See HERE for that Link) I wanted to Re-Purpose the 'scrap' snowflakes and their iridescent wonder! 
 
Cutting a Whisper White Card Stock in 1/2 at the 4-1/4" mark I then folded them in 1/2 - each of the two.  Layering them so they became a 3 flap card I used SNAIL Adhesive to seal them. 
 

Using the Labels Collection Framelits from the Idea Book I cut out the second largest frame in the set on the front of one of the flaps.  With the Snow Flurries Bigz die I had the cut Large Snowflake in the Iridescent DVD... I cut the smallest snowflake and the largest out of the Silver Glimmer Paper.  Here with Mini Glue Dots I adhered them back to back in the frame!  You can barely tell that it's backed up to another snowflake.  The DVD image is fragile - the extra support with the glue dot and other snowflake will help it to stay where it needs to be.


The smallest Silver Glimmer snowflake lies right behind the snowflakes and is well hidden.  I wanted a dash more winter wonderland so I added 1/2" strips of Glimmer Paper that used the Finishing Touches Edgelits.  A little like a snowflake, in my opinion....


I wanted to have the inside have tons of space to write a note... I'm planning to send this off to my Uncle and Aunt in Indiana and wanted to leave room to write..
With the Dazzling Details sparkle across the inside bottom, there are surprises at every corner!
As you close it up - it's pretty from each angle... I think this will show them some 'extra' love...
From the Outside... this snowflake is just lovely..
SURPRISE!!!  When you open it you see these Silver Glimmer Snow Flakes and edges..
Dazzling Details Glitter Adhesive added bling and 'fallen snow' to the bottom of all three flaps inside the card... another sweet surprise!
 
Plenty Room to Write... with our large family, there is a ton to write about!!
 

Using the Paper effectively, this lovely Tri-Fold card will go into a standard envelope!  I love that!
 
Thanks for coming by and looking.  Please feel free to share this and my site w/ others...
comments are more than appreciated!

What Others are SAYING about Getting Crafty with Jamie

Jamie is so passionate and creative about making cards - and wants everyone else to join her in the fun! She is so encouraging and positive in her attitude, helping me along when I get frustrated - and then rejoicing with me at the finished product! I love going to her classes to get new ideas, learn techniques, and have loads of fun in the process. ~ Christine C.

Jamie has wicked awesome classes! If you don’t like a particular stamp or paper/ink color Jamie wants you to change it to suit your style! I did my sister-in-law’s entire bridal shower from invitations/thank you cards, party favors to decorations, it was quaint and whimsical! Everyone ooh’d and ahh’d! I’ve had lots of special requests for classes and Jamie delivers; she always has tasty treats and flavored coffees too ~Ashley W.

I have been attending Jamie's classes for over a year. Her ideas for cards are fresh and fun. She always tries to have several different styles of cards available, so everyone gets to make cards that fit their personal style. The techniques she shows each class can be used in many different applications. She is very patient teacher when instructing class members on how to use the Stampin Up products. ~ Carol D.

If I looked up the word sparkle in the dictionary, I would find Jamie Albanese picture there. I have had the sweet blessing of knowing Jamie and her family for over 5 years now. Every time I am with her I feel loved and inspired. When I am in one of her classes I feel my creative juices flow, as she encourages me to go outside my comfort zone. Jamie helped our girl scout troop make cards for a soldier who needed some encouragement!!! For any of you who have not been in one of Jamie's classes, please don't let another day slip by. She is a beautiful friend and she will become yours too. ~ Blessings, Karen:-)

Jamie has a great eye for style and flair, and it shows in her work. Yet she can pick up on your own individual style and makes great recommendations. I love that she is always flexible for last-minute decision maker mommies like me! So much fun to host craft events with your friends and family - that personal touch always means so much. ~ Adonna

Total Pageviews